Accessing Raw Pixel Data in Canvas: HTML5

Today lets learn how to access individual pixel data on canvas, manipulate it and put it back on to the canvas.

accessing raw pixel data canvas html5

Important Note: Each pixel is composed of 4-bytes.

index.html and myStyle.css file content are same as Linear Gradients in Canvas: HTML5

JavaScript file: Full code
myScript.js

1
2
3
4
5
6
7
8
9
10
11
12
13
14
15
16
17
18
19
20
21
22
23
24
25
26
27
28
29
30
31
32
33
34
window.onload = canvas;
 
function canvas()
{
var myCanvas = document.getElementById("myCanvas");
 
if( myCanvas && myCanvas.getContext("2d") ) 
{
var context         = myCanvas.getContext("2d");
 
var imgSrc          = document.getElementById("img");
context.drawImage(imgSrc, 0, 0, 350, 350);
 
var image           = context.getImageData(0, 0, 350, 350);
var pixel           = image.data;
var init            = 1;
 
while(init < context.canvas.height){
for(var j = 0; j < 5; j++)
{
var row    = (init + j) * context.canvas.width * 4;
for(var i = 0; i < context.canvas.width * 4; i += 4)
{
    pixel[row + i]      = 255 - pixel[row + i]; //red
    pixel[row + i + 1]= 255 - pixel[row + i + 1]; //green
    pixel[row + i + 2]  = 255 - pixel[row + i + 2]; //blue
}
}
init += 15;
}
 
context.putImageData(image, 0, 0, 0, 0, 175, 350);
}
}

We draw an image on to the canvas using drawImage() method. Once we draw the image, we get all the raw pixel data of the image using getImageData() method. Extract it’s data property(it’s a single dimension array of raw pixel data) and store it inside a variable called pixel.

To process the image data, we proceed executing until init is lesser than the height of the canvas. Inside the while loop we calculate the current row and it’s width and iterate till the entire row pixels are manipulated. We change the values of RGB and assign it back to those pixels selected using the loop.

Once the control is out of while loop, we put back the image using putImageData() method. We also play around with the optional parameters and put back a portion of the manipulated data on to the canvas.

Manipulating Raw Pixel Data in Canvas: HTML5


[youtube https://www.youtube.com/watch?v=0K-n1NEYB7U]

YouTube Link: https://www.youtube.com/watch?v=0K-n1NEYB7U [Watch the Video In Full Screen.]


Image data access functions

createImageData(w, h); – Creates new image data with width w and height h.

createImageData(imgData); – Create new image data from an existing one.

getImageData(x, y, w, h); – Gets image data within given bounds.

putImageData(imgData, x, y); – Puts back the modified data on to the canvas.

putImageData(imgData, x, y, [Dx, Dy, Dw, Dh]); – Puts back the modified data on to the canvas, within the specified rectangle.

Load Data From External JavaScript File: MongoDB

This video tutorial illustrates loading data to mongoDB server from an external JavaScript file ( Writing script for MongoDB shall )

Here, we write a simple JavaScript file and using command prompt we load the contents of JavaScript file into new Database.

import-data

JavaScript file
load.js – in path: C:/temp/load.js

1
2
3
4
5
6
7
8
9
10
11
12
13
14
15
16
17
db.person.insert({
name:'Satish',
age:25,
skills:['nodejs', 'mongoDB', 'HTML5']
});
 
db.person.insert({
name:'Kiran',
age:27,
skills:['PHP', 'mySQL', 'HTML5']
});
 
db.person.insert({
name:'Sunitha',
age:24,
skills:['html', 'ASP']
});

Here we’re inserting some data/record/documents into the collection person.

Database’s Before running the script

1
2
3
4
5
6
7
8
9
10
11
12
13
C:\>cd mongodb
 
C:\mongodb>cd bin
 
C:\mongodb\bin>mongo
MongoDB shell version: 2.4.3
connecting to: test
> show dbs
admin   0.203125GB
company 0.203125GB
local   0.078125GB
> exit
bye

Before running the script, we have only 3 databases.

Running the script

1
2
3
C:\mongodb\bin>mongo 127.0.0.1/satish C:/temp/load.js
MongoDB shell version: 2.4.3
connecting to: 127.0.0.1/satish

Here, mongo is the JavaScript shall.
127.0.0.1 is nothing but our localhost.
satish is the new database we are creating.
C:/temp/load.js is the path of load.js file.
We’re loading the contents of load.js file into new database satish.

Database’s After running the script

1
2
3
4
5
6
7
8
9
10
11
12
13
C:\mongodb\bin>mongo
MongoDB shell version: 2.4.3
connecting to: test
> show dbs
admin   0.203125GB
company 0.203125GB
local   0.078125GB
satish  0.203125GB
> use satish
switched to db satish
> show collections
person
system.indexes

New database satish has been added and it has person collection, which we loaded from the JavaScript file.

Documents/records In person collection

1
2
3
4
5
6
7
8
9
10
11
12
13
14
15
16
17
18
19
20
21
22
23
24
25
26
27
28
29
30
> db.person.find().forEach(printjson)
{
        "_id" : ObjectId("518b62443cbad352108c321b"),
        "name" : "Satish",
        "age" : 25,
        "skills" : [
                "nodejs",
                "mongoDB",
                "HTML5"
        ]
}
{
        "_id" : ObjectId("518b62443cbad352108c321c"),
        "name" : "Kiran",
        "age" : 27,
        "skills" : [
                "PHP",
                "mySQL",
                "HTML5"
        ]
}
{
        "_id" : ObjectId("518b62443cbad352108c321d"),
        "name" : "Sunitha",
        "age" : 24,
        "skills" : [
                "html",
                "ASP"
        ]
}

Using find() method we display all its contents.

This way we could load application data from an external JavaScript file.

Writing script for MongoDB shall


[youtube https://www.youtube.com/watch?v=ygK2zE1-k0w]

YouTube Link: https://www.youtube.com/watch?v=ygK2zE1-k0w [Watch the Video In Full Screen.]


Note:
This method will be handy while migrating our application from one mongoDB server to another mongoDB server.
There is import/export options in mongoDB, but this method is also helpful if we have some custom data to be inserted. nontheless a useful tool to have.

Create and Insert Documents: MongoDB

In this video tutorial, we’ll look at the basic differences between MongoDB and traditional Database Management Systems. Also, commands to create database, collection, documents – insertion.

Topic of discussion:
Key differences.
Keyword differences.
Schema-free collection.
Database creation.
Creation of Collection.
Insertion of Documents.
JavaScript Console/Shall.

Some Commands

Show Database Already Present

1
show dbs

Create Database

1
use company

In MongoDB, it’ll never actually create any database or collection until we start storing documents in it!

Point object ‘db’ to our new database, by switching to company database

1
2
3
4
>use company
Switched to db company 
>db
company

Naming our Collection

1
db.info

So our collection name is info

Number of documents present

1
db.info.count()

using count() method, we check the no of documents present inside info collection.

Inserting document into Collection

1
2
3
4
5
db.info.insert({
 name     : 'Apple',
 product  : 'iPhone5S',
 emp_no   : 100
});

This inserts our first record.
insert() is the method, which accepts key-value pair object as it’s parameter.

JavaScript Shall
Since, this is a JavaScript shall, we can write any valid JavaScript code and interact directly with MongoDB.

Lets see another method to insert documents into the same collection.

Using save method

1
2
3
4
5
6
7
8
9
>var data = {}
>data.name = 'Technotip IT Solutions'
>data.product = 'Video Tutorials - Educational'
>data.emp = [ 'Satish', 'Kiran' ]
>data.videos = {}
>data.videos.mongo = 'MongoDB videos'
>data.videos.php = 'PHP Video Tutorials'
 
>db.info.save(data);

We create a JSON object data.
We start storing { key: value } pair into it.
emp is an array, which contains name of 2 employees.
videos is a sub object.

Now using save method we insert this data object into info collection.

Save()
Save() is a higher lever method. It checks to see if the object we’re inserting is already present in our collection, by checking the _id value we’re inserting. _id field(which is a primary key in MongoDB document)
– If there is no matching _id field in a document, it’ll call insert method and insert the data. And if the data being entered has no _id value, insert() method will create _id value for us, and insert the data into the collection.
– If _id matches to any document in our collection, it’ll use update() instead to update the previously present data with the new data entered by the user.

Database, Collections, Documents: MongoDB


[youtube https://www.youtube.com/watch?v=yAjG_fC6fPU]

YouTube Link: https://www.youtube.com/watch?v=yAjG_fC6fPU [Watch the Video In Full Screen.]


Note:
There is no Schema for our collection. i.e., no column name and datatype.
Since documents are in BSON format, insertion and finding data is much faster.

Schema-free design is flexible and is of much use in modern day web application.

Example: Users upload photos and tag names of people in the pic. This can be stored as an array of tags in a key value pair, for only those pics which has tags. For other pics, we need not create this array itself. This is flexible. Also BSON format helps create application with high Scalability.

Fetch/Extract Data From Database Without Refreshing Webpage: jQuery

Video tutorial illustrating, Fetching / Extraction of Data From Database Without Refreshing Webpage: jQuery + PHP + JSON + MySQL

You need not worry, even if you don’t know any one of these technology. Follow the tutorial, practice and understand, so that you could implement it for your applications.

Also read: Insert Data Into Database Without Refreshing Webpage.

In this tutorial we’ll be showing you, how to extract the data present in our MySQL database table without refreshing the webpage.

HTML code
index.html

1
2
3
4
5
6
7
8
9
10
<html>
<head>
<title>Fetch/Extract Data From Database: jQuery + JSON + PHP+ AJAX</title>
</head>
<body>
<ul></ul>
<script type="text/javascript" src="script/jquery-1.8.2.min.js"></script>
<script type="text/javascript" src="script/my_script.js"></script>
</body>
</html>

Here we have a unordered list. We’ll fill it’s list items by extracting the data from the database, using jQuery and PHP.

PHP File: Database Connection Code
db.php

1
2
3
4
< ?php
      $conn = mysql_connect('localhost', 'root', '');
  $db   = mysql_select_db('company');
?>

Here we’re connecting to the database called company.

Also Read: Connecting To MySQL server From PHP

PHP File: Extracting / Fetching Data From Database table and JSON Encoding
fetch.php

1
2
3
4
5
6
7
8
9
10
11
12
13
14
< ?php
        include_once('db.php');
 
$sql = "SELECT * FROM people";
$res = mysql_query($sql);
$result = array();
 
while( $row = mysql_fetch_array($res) )
    array_push($result, array('name' => $row[0],
                          'age'  => $row[1],
  'company' => $row[2]));
 
echo json_encode(array("result" => $result));
?>

Here we connect to the database by including db.php file.
Next, select all the fields from the people table.
Extract data one-by-one and store it inside the array variable $result, with key => value pair (associative array).
Finally, using PHP standard function json_encode(), we encode the fetched data.

jQuery File: Accessing The Data And Displaying
my_script.js

1
2
3
4
5
6
7
8
9
10
11
function updates() {
 $.getJSON("fetch.php", function(data) {
       $("ul").empty();
   $.each(data.result, function(){
    $("ul").append("<li>Name: "+this['name']+"</li>
                            <li>Age: "+this['age']+"</li>
                            <li>Company: "+this['company']+"</li>
                            <br />");
   });
 });
}

Using the jQuery AJAX method’s shortcut, $.getJSON() method, we parse fetch.php and process the data passed to the callback function.

We empty the unordered list to avoid duplicate entries later on.

Now loop through all the objects present in the jSON output of fetch.php
Using it’s key, retrieve it’s respective values and append it to the unordered list, as it’s list items.

jQuery File: AJAXing
my_script.js

1
2
3
4
5
6
function done() {
  setTimeout( function() { 
  updates(); 
  done();
  }, 200);
}

Call updates() function and itself[ done() ] inside setTimeout() function with a time gap of 200 milliseconds.

jQuery File: Full/Final Code
my_script.js

1
2
3
4
5
6
7
8
9
10
11
12
13
14
15
16
17
18
19
20
21
22
$(document).ready( function() {
 done();
});
 
function done() {
  setTimeout( function() { 
  updates(); 
  done();
  }, 200);
}
 
function updates() {
 $.getJSON("fetch.php", function(data) {
       $("ul").empty();
   $.each(data.result, function(){
    $("ul").append("<li>Name: "+this['name']+"</li>
                            <li>Age: "+this['age']+"</li>
                            <li>Company: "+this['company']+"</li>
                            <br />");
   });
 });
}

Call done() once the document is loaded.
You could also call done() function once the window is focused or once some button is clicked or any other user events. This would reduce the database calls considerably.

Fetching / Extraction of Data From Database Without Refreshing Webpage: jQuery


[youtube https://www.youtube.com/watch?v=G_7oYeNU_3g]

YouTube Link: https://www.youtube.com/watch?v=G_7oYeNU_3g [Watch the Video In Full Screen.]


This would highly enhance the user experience and would help in building rich web applications which look more like desktop / standalone applications.

Please share this video with your friends and also LIKE it on social network sites and on YouTube. Thanks you <3

Related Read:
Insert Data Into Database Without Refreshing Webpage

Insert Data Into MySQL: jQuery + AJAX + PHP

Video tutorial illustrates insertion of data into MySQL database using jQuery and PHP, using AJAX method i.e., $.post() method of jQuery.

There are 5 shortcuts for AJAX in jQuery, ultimately calling ajax method, and by default configured to have different parameters.
$.get
$.post
$.getJSON
$.getScript
$.load

Tutorial Theme: Insert Data Into Database Without Refreshing Webpage

In this tutorial we’ll illustrate $.post method of jQuery.

HTML code
index.html

1
2
3
4
5
6
7
8
9
10
11
12
13
14
15
16
<html>
<head><title>Insert Data Into MySQL: jQuery + AJAX + PHP</title></head>
<body>
 
<form id="myForm" action="userInfo.php" method="post">
Name: <input type="text" name="name" /><br />
Age : <input type="text" name="age" /><br />
<button id="sub">Save</button>
</form>
 
<span id="result"></span>
 
<script src="script/jquery-1.8.1.min.js" type="text/javascript"></script>
<script src="script/my_script.js" type="text/javascript"></script>
</body>
</html>

Here we have a form with an id called myForm, which has 2 input box.
A button with id sub. And a span tag with an id of result.

Once the user enters his/her name, age and hits Save button, the information will be sent to userInfo.php file present in the action field, via post method.

Using AJAX technique, we would make sure the form doesn’t redirect to userInfo.php file after the submission, and we’ll display appropriate message to the user on index.html file itself after the user entered values has been processed by userInfo.php file.

Database Connection code: PHP
db.php

1
2
3
4
< ?php
  $conn = mysql_connect('localhost', 'root', '');
  $db   = mysql_select_db('test');
?>

We connect our application to mysql server using the user name root( and we leave password field empty, as we haven’t set any password to it on our machine ).
Also select the database called test.

Create Database called test.
A table user inside the database test.
user table has 2 fields called name and age.

Processing Page code: PHP
userInfo.php

1
2
3
4
5
6
7
8
9
10
11
< ?php
 include_once('db.php');
 
$name = $_POST['name'];
$age = $_POST['age'];
 
if(mysql_query("INSERT INTO user VALUES('$name', '$age')"))
  echo "Successfully Inserted";
else
  echo "Insertion Failed";
?>

Once the user hits the Save button of our form in index.html, the information is being sent to userInfo.php

Where the user entered values are being copied to local variables $name and $age.
Next a simple MySQL query is formed to insert the data into the table user.

Using mysql_query() standard php function, the MySQL query is being processed.
Using if else conditional statements, we check if the process was successful or failed. Based on which we echo the result.

jQuery code: AJAXing
my_script.js

1
2
3
4
5
6
$("#sub").click( function() {
 $.post( $("#myForm").attr("action"), 
         $("#myForm :input").serializeArray(), 
         function(info){ $("#result").html(info); 
  });
});

Once the user clicks on the button with the id sub, $.post() method is invoked.
$.post() is a shortcut to $.ajax() method.

General Syntax:
$.post( ‘pass_data_to_this_url’, ‘data’, ‘callback_function’ );

We fetch the URL from myForm form, from its action attribute.
Serialize all the user entered input’s.
SerializeArray makes the input into property: value pair.
After the data is passed to the url and is being processed, the result will be returned back to the callback function and is caught in info variable, and is inserted inside the span tag using html() method – which is similar to innerHTML() method of JavaScript.

jQuery code: Disable Form Redirection
my_script.js

1
2
3
$("#myForm").submit( function() {
  return false;
});

Select the form and make sure to return false upon submission.

jQuery code: Clear Input Fields
my_script.js

1
2
3
4
5
function clearInput() {
$("#myForm :input").each( function() {
   $(this).val('');
});
}
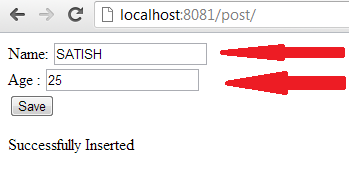
input-fields-form

Write a custom function. Select the input fields and set each of its value to none or empty.
Call this function once the user clicks the submit button.

Full jQuery code
my_script.js

1
2
3
4
5
6
7
8
9
10
11
12
13
14
15
16
17
$("#sub").click( function() {
 $.post( $("#myForm").attr("action"), 
         $("#myForm :input").serializeArray(), 
         function(info){ $("#result").html(info); 
   });
 clearInput();
});
 
$("#myForm").submit( function() {
  return false;
});
 
function clearInput() {
$("#myForm :input").each( function() {
   $(this).val('');
});
}

Note that, we have called clearInput() function inside the click event of #sub.

Video Tutorial: Insert Data Into MySQL: jQuery + AJAX + PHP


[youtube https://www.youtube.com/watch?v=gvGb5Z0yMFY]

YouTube Link: https://www.youtube.com/watch?v=gvGb5Z0yMFY [Watch the Video In Full Screen.]


Note:
You have to implement addslash and stripslash or any other methods into your PHP code, to secure your script from SQL Injection.

If the PHP returns json encoded data, then we need to use json in $.post() method as follows:

1
2
3
4
5
$("#sub").click( function() {
 $.post( $("#myForm").attr("action"), 
         $("#myForm :input").serializeArray(), 
         function(info){ $("#result").html(info); },
         "json" );

But in our example, we are not returning json encoded data from userInfo.php file, so we do not specify encoding information in $.post() method.