Express Web Framework: Node.js

In this video tutorial we shall briefly look at Express web framework for Node.js

express-modules-file-structure-nodejs

With today’s tutorial we will be discussing the basics of Express and we’ll also be running a small example application built with Express, also we shall have a first look at Jade Template Engine.

REPL
global installation of Express Framework

C:\>npm install -g express

This installs the express globally, so that you can access it from anywhere in the system.

Also note that, you’ll need internet connection to download and install these packages.

REPL
creating express example application

C:\>cd node
C:\node>express express_example

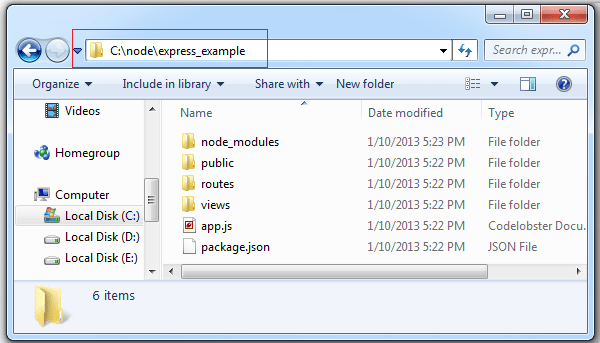
This creates a folder and some recommended folder structure. If you’re a total beginner to Express Framework, then it’s better to stick on with these folder structure.

Now open the package.json present inside express_example folder
JSON File
package.json

{
  "name": "application-name",
  "version": "0.0.1",
  "private": true,
  "scripts": {
    "start": "node app.js"
  },
  "dependencies": {
    "express": "3.4.0",
    "jade": "*"
  }
}

It looks as shown above. It has 2 dependencies: express and jade. Install these dependencies from your command prompt / console.

REPL
installing dependencies

C:\>cd node
C:\node>cd express_example
C:\node\express_example>nmp install

This would install both express and jade, and another folder called node_modules gets created inside express_example folder.


 express-jade-modules-nodejs

Video Tutorials: Getting Started With Express Web Framework: Node.js


[youtube https://www.youtube.com/watch?v=CagrpUlQtdQ]

YouTube Link: https://www.youtube.com/watch?v=CagrpUlQtdQ [Watch the Video In Full Screen.]


Jade File
Jade to HTML

extends layout

block content
  h1= title
  p Welcome to #{title}

This jade file is present inside view folder.

jade-to-html-express-node

More about Jade Template Engine in coming videos ..

Note:


express-modules-file-structure-nodejs

Inside node_modules folder we have dependency modules.
Inside public folder javascript files, css files, images etc are present. Logical part of the application will be kept separate for security reasons.
Inside routes, routing configuration is present.
Inside views, the presentation part of the application is present. If Template Engine is used, those files will be present in this folder. Example: .jade files

app.js Starting point of execution.
package.json Contains app name, version, author, dependency module names etc.

Info: There are many popular websites built upon Express Framework, one that you might know is, MySpace!

Server Up or Down: Node.js

Using Node.js application we’ll check if a website is up and running or is it down.

check-website-up-or-down-nodejs

This is a simple application which pings server/URL and checks for the returned status code. Depending upon the status code returned, it displays message to the user on the console window.

JavaScript: Checking for status code
app.js

1
2
3
4
5
6
7
8
var http = require("http");
 
     http.get({host: "technotip.org"}, function(res){
    if( res.statusCode == 200 )
   console.log("This site is up and running!");
 else
   console.log("This site might be down "+res.statusCode);
   });

Here get() method of http object takes 2 parameters. First parameter is an object which contains host name, and the second parameter is a callback method, which gets its parameter from get() methods first parameter.

Using the res object we fetch the status code returned by the server. If the status code is 200, it means website is up and running. Else the website might be down.

Some times we get status code other than 200 and the site will still be up and running, in such cases we can display user-friendly messages and not web geek status codes!

JavaScript: Checking If website is Up or Down
app.js

1
2
3
4
5
6
7
8
9
10
11
var http = require("http");
 
 
  http.get({host: "www.technotip.org"}, function(res){
    if( res.statusCode == 200 || res.statusCode == 301 )
   console.log("Website Up and Running ..")
 else
  console.log("Website down");
 
console.log(http.STATUS_CODES[res.statusCode]);
   });

http object has yet another object nested inside it, called STATUS_CODES which has a list of status codes and its corresponding meaning: as key value pairs. Using this, we could fetch the description of the status code and display it to the user, which will be much more meaningful.

Check if the Server is Up or Down: Node.js


[youtube https://www.youtube.com/watch?v=KQxVggPwDek]

YouTube Link: https://www.youtube.com/watch?v=KQxVggPwDek [Watch the Video In Full Screen.]


Note: If we implement this as a web application, users could check if the website is down for everyone or is it just them.

You could even go through the entire list of all the status codes and implement a complete check and return the result to the user and not let the user guessing with the status code meaning.

Create/Read/Write File using File Server: Node.js

Lets learn how to Create, read and write a file using file server module of Node.js

file-server-fs-create-read-write-file-nodejs

In this video tutorial we shall learn creating a folder/directory, creating a file, reading from a file, writing to a file and copying content from one file to another. We shall also see how you can look at all other facilities provided by fs module and make use of it in your real-time node.js web applications.

JavaScript: Reading a file
app.js

1
2
3
4
5
var fs= require("fs");
 
var html= fs.readFileSync("index.html", "UTF-8");
 
console.log(html);

Here we require fs module of node.js Using the readFileSync method of fs object, we open and read the file presented to it as its first argument. Second argument is the character-set type.

HTML FILE
index.html

1
2
3
<html>
<h1>Technotip.com</h1>
</html>

This is the html source code which will be fetched by app.js and being displayed on the console window upon execution.

JavaScript: Creating New File and Writing to file
app.js

1
2
3
4
var fs= require("fs");
 
var html= fs.readFileSync("index.html", "UTF-8");
fs.writeFileSync("satish.html", html);

Here we pass 2 arguments to writeFileSync method. First parameter being the file name – to be created, and the second parameter contains the content to be copied to the file we created.

JavaScript: Creating Directory/folder
app.js

1
2
3
4
5
var fs= require("fs");
 
fs.mkdir("satish");
 
console.log("Folder created!");

Pass name of the folder to be created to mkdir method of fs object.

JavaScript: Deleting a file
app.js

1
2
3
4
var fs= require("fs");
 
fs.unlink("satish.html");
console.log("File deleted");

Pass the existing file name to the unlink method and it’ll delete it. Make sure to give proper file name with correct file extension and path.

Create/Read/Write File using File Server: Node.js


[youtube https://www.youtube.com/watch?v=o7NIYGLC13o]

YouTube Link: https://www.youtube.com/watch?v=o7NIYGLC13o [Watch the Video In Full Screen.]


Note: There are plenty other file operation facilities provided by fs module, please use some other properties and methods from below list and let us know the code and what it does in the comment section below. This would surely help everyone in our reader community.

REPL of Node.js
Command Prompt

1
2
3
4
5
6
7
8
9
10
11
12
13
14
15
16
17
18
19
20
21
22
23
24
25
26
27
28
29
30
31
32
33
34
35
36
37
38
39
40
41
42
43
44
45
46
47
48
49
50
51
52
53
54
55
56
57
58
59
60
61
62
63
64
65
66
67
68
69
70
71
72
73
74
75
76
77
78
79
80
81
82
83
84
85
86
87
88
89
90
91
92
93
94
95
96
97
98
99
100
101
102
103
104
105
106
107
C:\node>node
> fs = require("fs");
{ Stats: [Function],
  exists: [Function],
  existsSync: [Function],
  readFile: [Function],
  readFileSync: [Function],
  close: [Function],
  closeSync: [Function],
  open: [Function],
  openSync: [Function],
  read: [Function],
  readSync: [Function],
  write: [Function],
  writeSync: [Function],
  rename: [Function],
  renameSync: [Function],
  truncate: [Function],
  truncateSync: [Function],
  ftruncate: [Function],
  ftruncateSync: [Function],
  rmdir: [Function],
  rmdirSync: [Function],
  fdatasync: [Function],
  fdatasyncSync: [Function],
  fsync: [Function],
  fsyncSync: [Function],
  mkdir: [Function],
  mkdirSync: [Function],
  readdir: [Function],
  readdirSync: [Function],
  fstat: [Function],
  lstat: [Function],
  stat: [Function],
  fstatSync: [Function],
  lstatSync: [Function],
  statSync: [Function],
  readlink: [Function],
  readlinkSync: [Function],
  symlink: [Function],
  symlinkSync: [Function],
  link: [Function],
  linkSync: [Function],
  unlink: [Function],
  unlinkSync: [Function],
  fchmod: [Function],
  fchmodSync: [Function],
  chmod: [Function],
  chmodSync: [Function],
  fchown: [Function],
  fchownSync: [Function],
  chown: [Function],
  chownSync: [Function],
  _toUnixTimestamp: [Function: toUnixTimestamp],
  utimes: [Function],
  utimesSync: [Function],
  futimes: [Function],
  futimesSync: [Function],
  writeFile: [Function],
  writeFileSync: [Function],
  appendFile: [Function],
  appendFileSync: [Function],
  watch: [Function],
  watchFile: [Function],
  unwatchFile: [Function],
  realpathSync: [Function: realpathSync],
  realpath: [Function: realpath],
  createReadStream: [Function],
  ReadStream:
   { [Function: ReadStream]
     super_:
      { [Function: Readable]
        ReadableState: [Function: ReadableState],
        super_: [Object],
        _fromList: [Function: fromList] } },
  FileReadStream:
   { [Function: ReadStream]
     super_:
      { [Function: Readable]
        ReadableState: [Function: ReadableState],
        super_: [Object],
        _fromList: [Function: fromList] } },
  createWriteStream: [Function],
  WriteStream:
   { [Function: WriteStream]
     super_:
      { [Function: Writable]
        WritableState: [Function: WritableState],
        super_: [Object] } },
  FileWriteStream:
   { [Function: WriteStream]
     super_:
      { [Function: Writable]
        WritableState: [Function: WritableState],
        super_: [Object] } },
  SyncWriteStream:
   { [Function: SyncWriteStream]
     super_:
      { [Function: Stream]
        super_: [Object],
        Readable: [Object],
        Writable: [Object],
        Duplex: [Object],
        Transform: [Object],
        PassThrough: [Object],
        Stream: [Circular] } } }
>

Watch the above video to understand how to make use of above data in your own real-time node.js web application.

Adding Routes to Your Server: Node.js

With this video tutorial, lets learn about testing our code snippets using REPL, before implementing it into the actual node application. And then, we’ll show you how to add routes to your node server.

routes-node-server-request-response

In this tutorial, we create 5 routes to the server:
“/” to “Home Page”
“/about” to “About Us”
“/contact” to “Contact Us”
/”satish” redirected to “Home Page”
anything else to “Page Not Found”

Command Prompt
Console Window

1
2
3
4
5
6
7
8
9
10
11
12
13
14
15
16
17
18
C:\>node
> var url = require("url");
undefined
> var myURL = "http://Technotip.org:3030/about";
undefined
> url
{ parse: [Function: urlParse],
  resolve: [Function: urlResolve],
  resolveObject: [Function: urlResolveObject],
  format: [Function: urlFormat],
  Url: [Function: Url] }
> url.parse(myURL).hostname;
'technotip.org'
> url.parse(myURL).port;
'3030'
> url.parse(myURL).pathname;
'/about'
>

Here we test our code snippets on the command prompt, before implementing it into our actual application. Working with node url module on command prompt, we learnt to make use of parse() method of url object to fetch the hostname, port and the pathname of the actual URL. We are interested in pathname – we’ll be using it in our node application.

Related Read: Read Evaluate Print Loop (RELP): Node.js

JavaScript File
app.js

1
2
3
4
5
6
7
8
9
10
11
12
13
14
15
16
17
18
19
20
21
22
23
24
25
26
27
28
29
30
31
32
33
34
var url= require("url");
var http= require("http");
 
     http.createServer(function(req, res){
 
var pathname= url.parse(req.url).pathname;
 
if( pathname === '/' )
{
res.writeHead(200, { "Content-Type": "text/plain" });
res.end("Home Page");
}
else if( pathname === '/about' )
{
res.writeHead(200, { "Content-Type": "text/plain" });
res.end("About Us");
}
else if( pathname === '/contact')
{
res.writeHead(200, { "Content-Type": "text/plain" });
res.end("Contact Us");
}
else if( pathname === '/satish' )
{
res.writeHead(301, { "Location": "/" });
res.end("Home Page");
}
else
{
res.writeHead(404, { "Content-Type": "text/plain" });
res.end("Page Not Found!!");
}
   }).listen("8080", "127.0.0.1");
 console.log("Server running ..");

Here we require url and http module. Using http object we create HTTP Server. Using url object we call parse method to parse and fetch the path from the user request URL.

Once we fetch the path, using conditional statements we display the corresponding message with appropriate response header information. We also illustrate 301 redirection

Adding Routes to Your Server: Node.js


[youtube https://www.youtube.com/watch?v=ejER-HVhDm8]

YouTube Link: https://www.youtube.com/watch?v=ejER-HVhDm8 [Watch the Video In Full Screen.]


Note: Make sure to turn on the server before trying to access the server!
execution code
command prompt

1
2
3
4
5
 
C:\>cd node
 
C:\node>node app.js
Server running ..

Navigate to the folder where you’ve your app.js file located, and run the server by executing the script using node command.

Read Evaluate Print Loop (REPL): Node.js

Today let us see REPL in Node.js

read-evaluate-print-loop-node-js

Most programming languages provide REPL facility to test and debug the code, and Node.js is no different in this approach.

Command Prompt
Console Window

1
2
3
4
5
6
7
8
9
10
11
12
13
14
15
16
17
18
19
20
21
22
23
24
C:\>node
> 1 + 1
2
> var a;
undefined
> a = 10
10
> a + 5
15
> a
10
> ++a
11
> a++
11
> a
12
> "Satish "+"B"
'Satish B'
> function technotip() { return 101; }
undefined
> technotip();
101
>2

Here we can type in our valid code snippet and instantly get the results. Some of the things we can do are: arithmetic operations, string manipulations, pre and post increment decrement of numbers, method declaration and defining and calling the methods etc.

We could even require some built-in node modules and using its objects we can look at the methods and properties it provides.
Command Prompt
Console Window

1
2
3
4
5
6
7
8
9
10
11
12
13
14
15
16
17
18
19
20
21
22
23
24
25
26
27
28
29
30
31
32
33
34
35
36
37
38
39
40
41
42
43
44
45
46
47
48
49
50
51
52
53
54
55
56
57
58
59
> var http = require("http");
undefined
> http.STATUS_CODES
{ '100': 'Continue',
  '101': 'Switching Protocols',
  '102': 'Processing',
  '200': 'OK',
  '201': 'Created',
  '202': 'Accepted',
  '203': 'Non-Authoritative Information',
  '204': 'No Content',
  '205': 'Reset Content',
  '206': 'Partial Content',
  '207': 'Multi-Status',
  '300': 'Multiple Choices',
  '301': 'Moved Permanently',
  '302': 'Moved Temporarily',
  '303': 'See Other',
  '304': 'Not Modified',
  '305': 'Use Proxy',
  '307': 'Temporary Redirect',
  '400': 'Bad Request',
  '401': 'Unauthorized',
  '402': 'Payment Required',
  '403': 'Forbidden',
  '404': 'Not Found',
  '405': 'Method Not Allowed',
  '406': 'Not Acceptable',
  '407': 'Proxy Authentication Required',
  '408': 'Request Time-out',
  '409': 'Conflict',
  '410': 'Gone',
  '411': 'Length Required',
  '412': 'Precondition Failed',
  '413': 'Request Entity Too Large',
  '414': 'Request-URI Too Large',
  '415': 'Unsupported Media Type',
  '416': 'Requested Range Not Satisfiable',
  '417': 'Expectation Failed',
  '418': 'I\'m a teapot',
  '422': 'Unprocessable Entity',
  '423': 'Locked',
  '424': 'Failed Dependency',
  '425': 'Unordered Collection',
  '426': 'Upgrade Required',
  '428': 'Precondition Required',
  '429': 'Too Many Requests',
  '431': 'Request Header Fields Too Large',
  '500': 'Internal Server Error',
  '501': 'Not Implemented',
  '502': 'Bad Gateway',
  '503': 'Service Unavailable',
  '504': 'Gateway Time-out',
  '505': 'HTTP Version Not Supported',
  '506': 'Variant Also Negotiates',
  '507': 'Insufficient Storage',
  '509': 'Bandwidth Limit Exceeded',
  '510': 'Not Extended',
  '511': 'Network Authentication Required' }

Here by using http object, we get all the status code supported by http module of node.js

Command Prompt
Console Window

1
2
3
4
5
6
7
8
9
10
11
12
13
14
15
16
17
18
19
20
21
22
23
> var os = require("os");
undefined
> os
{ endianness: [Function],
  hostname: [Function],
  loadavg: [Function],
  uptime: [Function],
  freemem: [Function],
  totalmem: [Function],
  cpus: [Function],
  type: [Function],
  release: [Function],
  networkInterfaces: [Function],
  arch: [Function],
  platform: [Function],
  tmpdir: [Function],
  tmpDir: [Function],
  getNetworkInterfaces: [Function: deprecated],
  EOL: '\r\n' }
> os.type
[Function]
> os.type();
'Windows_NT'

Here we see contents of os module. Also fetch the type of Operating System we are using, by using type() method supported by OS module.

Read Evaluate Print Loop (REPL): Node.js


[youtube https://www.youtube.com/watch?v=F2tYaJADVos]

YouTube Link: https://www.youtube.com/watch?v=F2tYaJADVos [Watch the Video In Full Screen.]


Note: Node.js is built on the same Google’s V8 JavaScript Engine which is using by Google’s Chrome – thus providing the same speed and robustness to our node.js applications.

For quick reference: Status Code and it’s meaning
‘100’: ‘Continue’,
‘101’: ‘Switching Protocols’,
‘102’: ‘Processing’,
‘200’: ‘OK’,
‘201’: ‘Created’,
‘202’: ‘Accepted’,
‘203’: ‘Non-Authoritative Information’,
‘204’: ‘No Content’,
‘205’: ‘Reset Content’,
‘206’: ‘Partial Content’,
‘207’: ‘Multi-Status’,
‘300’: ‘Multiple Choices’,
‘301’: ‘Moved Permanently’,
‘302’: ‘Moved Temporarily’,
‘303’: ‘See Other’,
‘304’: ‘Not Modified’,
‘305’: ‘Use Proxy’,
‘307’: ‘Temporary Redirect’,
‘400’: ‘Bad Request’,
‘401’: ‘Unauthorized’,
‘402’: ‘Payment Required’,
‘403’: ‘Forbidden’,
‘404’: ‘Not Found’,
‘405’: ‘Method Not Allowed’,
‘406’: ‘Not Acceptable’,
‘407’: ‘Proxy Authentication Required’,
‘408’: ‘Request Time-out’,
‘409’: ‘Conflict’,
‘410’: ‘Gone’,
‘411’: ‘Length Required’,
‘412’: ‘Precondition Failed’,
‘413’: ‘Request Entity Too Large’,
‘414’: ‘Request-URI Too Large’,
‘415’: ‘Unsupported Media Type’,
‘416’: ‘Requested Range Not Satisfiable’,
‘417’: ‘Expectation Failed’,
‘418’: ‘I\’m a teapot’,
‘422’: ‘Unprocessable Entity’,
‘423’: ‘Locked’,
‘424’: ‘Failed Dependency’,
‘425’: ‘Unordered Collection’,
‘426’: ‘Upgrade Required’,
‘428’: ‘Precondition Required’,
‘429’: ‘Too Many Requests’,
‘431’: ‘Request Header Fields Too Large’,
‘500’: ‘Internal Server Error’,
‘501’: ‘Not Implemented’,
‘502’: ‘Bad Gateway’,
‘503’: ‘Service Unavailable’,
‘504’: ‘Gateway Time-out’,
‘505’: ‘HTTP Version Not Supported’,
‘506’: ‘Variant Also Negotiates’,
‘507’: ‘Insufficient Storage’,
‘509’: ‘Bandwidth Limit Exceeded’,
‘510’: ‘Not Extended’,
‘511’: ‘Network Authentication Required’