User Input Using readline Module: Node.js

In this video tutorial we shall see how to gather user input and process it inside our node.js application.

In this application, we’ll be asking the user to enter his/her work experience and based on the user input we’ll do some logical processing and output appropriate result to the user.

readline Module
readline.js

1
2
3
4
5
6
7
8
9
10
11
12
13
14
15
16
17
18
var rl = require('readline');
 
var prompts = rl.createInterface(process.stdin, process.stdout);
prompts.question("No of years you've been working in corporate?", 
                  function(experience){
 
 var msg = "";
 
 if( experience < 5 )
  msg = "You're short of "+(5-experience)+" years experience to 
         attend job interview at Apple Inc!";
 else
  msg = "Excellent, you're eligible for the job interview!!";
 
 console.log(msg);
 process.exit();
 
});

readline module is built into node.js to facilitate user input in node applications.

createInterface method is used to create an interface for user input.
createInterface method takes 2 parameters: process.stdin and process.stdout. These are standard input and standard output properties of the current process.

Using the createInterface object, we invoke question method.

question method takes 2 parameters:
First one being the question(something which is to be prompted to the user).
Second parameter is an anonymous function.

Response of the user is passed in as argument to this anonymous function.

Inside this anonymous function, we use some simple conditional logic and display the appropriate message to the user, based on his/her input.

i.e., if the person has less than 5 years of job experience, then he/she is not eligible to the job interview at Apple inc. If the job experience is greater than 5 years, then he/she is eligible!!

Finally, we display the content of msg variable using console.log
and exit from the process.

process.exit() is very important. If we don’t exit the process, the interface keeps reading from the standard input.

User Input Using readline Module: Node.js


[youtube https://www.youtube.com/watch?v=Y1TmesiVtGg]

YouTube Link: https://www.youtube.com/watch?v=Y1TmesiVtGg [Watch the Video In Full Screen.]


Output
node readline.js
No of years you’ve been working in corporate? 3
You’re short of 2 years experience to attend job interview at Apple Inc!

node readline.js
No of years you’ve been working in corporate? 9
Excellent, you’re eligible for the job interview!!

Note:
readline module is built into node.js because this is used most often in node applications.
User input is a crucial thing in any sophisticated application.
HTTP Server(request/response) Counter Application: Node.js

This video tutorial is a rapid application development to illustrate HTTP Server(request/response) using Node.js

In this video, we use HTTP Server(request/response): Node.js code and work on it to develop a simple counter application.

Using this application, we can know how many visits have been made since the last server down time!

For explanation of all the keywords and working, please visit HTTP Server(request/response): Node.js

HTTP Server
count.js

1
2
3
4
5
6
7
8
9
10
11
12
13
14
15
16
 var http = require('http');
 var visits = 0;
 
 http.createServer( function(request, response) {
 
console.log('New Connection');
visits++;
 
response.writeHead(200, { 'Content-Type':'text/plain' } );
response.write('Hello\n');
response.write('We have had '+visits+' visits');
response.end();
 
 }).listen(8080);
 
 console.log('Server Started..');

Here we take a variable called visits and initialize it to 0.
Once there is a new connection request, we increment it’s value by 1.
Since there is also request from favicon, practically, there’ll be 2 requests simultaneously: hence the counter increments by 2 for each new connection request.

using write method, we print the number of visits.

HTTP Server(request/response) Counter Application: Node.js


[youtube https://www.youtube.com/watch?v=yRaMJy5Mot0]

YouTube Link: https://www.youtube.com/watch?v=yRaMJy5Mot0 [Watch the Video In Full Screen.]


Output:
Hello
We have had 3 visits

Note:
Once you stop the server or whenever there is down time in the server, the counter is reinitialized once the server is restarted.

Make use of Database to store the counter value, if you need it inspite of server downtime or restarts.

HTTP Server(request/response): Node.js

This video tutorial illustrates working of simple HTTP Server, using Node.js
We’ll show the request, response of our HTTP server using simple Node.js program.

We’ll create a HTTP Server, with some response text in it.
Then, send request using web browser and see to that our HTTP server responds appropriately.

HTTP Server
hello.js(using chaining of methods)

1
2
3
4
5
6
7
8
9
10
11
var http = require('http');
 
http.createServer( function(request, response){
 
 response.writeHead(200, { 'Content-Type': 'text/plain' });
 response.write('Welcome to Node!');
 response.end();
 
}).listen(8080);
 
console.log('Server Started');

OR

hello.js(without using chaining of methods)

1
2
3
4
5
6
7
8
9
10
11
12
13
var http = require('http');
 
var server = http.createServer( function(request, response){
 
 response.writeHead(200, { 'Content-Type': 'text/plain' });
 response.write('Welcome to Node!');
 response.end();
 
});
 
server.listen(8080);
 
console.log('Server Started');

In the first line, we require http module of node.js
http module is built into node.js package, to help build node.js applications.

Using this http, we’ll call createServer method, which returns an object. Using this object we’ll call another method listen and pass port number 8080 to be(reserve to be used) used to invoke our HTTP server.

createServer method takes a anonymous function as parameter.

Anonymous function: Method with no name.

This anonymous method takes two parameters: request and response.

request and response: These are two objects passed by our http server when it receives new connection requests.

Using response object we’ll call writeHead method and pass 2 parameters.
First being the status code: 200 (which means, everything is ok or successfully connected)
Second parameter specifies that, the content type is plain text.

Inorder to demonstrate that our HTTP server is indeed responding/working, we’ll output a simple string “Welcome to Node” onto our web browser, as a response text.

Using the object returned by createServer method, we’ll invoke another method called listen and then reserve port number 8080 for our HTTP Server request.

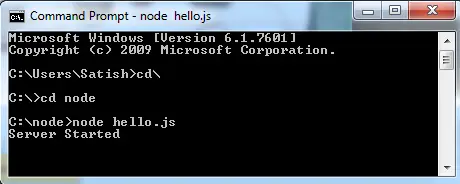
Server Start
To indicate the server start, using simple console.log we’ll indicate its start.

node-http-server-start

Server Start
Command Prompt

1
node hello.js

Navigate to the folder where hello.js file is located. Now using node command execute hello.js file.

Once “Server Started” message is given, open any web browser and goto localhost:8080 to ping / request our HTTP server.

HTTP Server ( Request / Response ): Node.js


[youtube https://www.youtube.com/watch?v=9DFbfXcSIOw]

YouTube Link: https://www.youtube.com/watch?v=9DFbfXcSIOw [Watch the Video In Full Screen.]


Output:
Welcome to Node!

Note:
If you make changes to the response text(as in our example), you’ll need to restart the server in order for the changes to reflect at the client end.

Close the server connection using ctrl+ c and restart it using node command followed by file name.

Getting Started: Node.js

This video tutorial illustrates, running node.js programs.

Video Contains

Download Nodejs
Downloading procedure.
Getting started with first node.js application(‘ Hello World ‘) program.

nodejs

hello.js

 console.log('Hello World');

This line, prints the string Hello World on the console window.

Command

Go to command prompt and navigate to the directory where you’ve saved hello.js file.
Now type the following command to execute the node.js program

 > node hello.js

i.e., node is the command followed by file name.

Video Tutorial: Hello World: Node.js


[youtube https://www.youtube.com/watch?v=eP6cUdIBwzM]

YouTube Link: https://www.youtube.com/watch?v=eP6cUdIBwzM [Watch the Video In Full Screen.]


Output:
Hello World

Note:
To let you know, I’m writing my code on Windows 7 Operating System. So please check with alternative methods for your operating system. If there’s any significant difference, do let us know in the comment section. Most of the code we write must work across various platforms.

Next Video..
This video tutorial is just to get you started with node.js
In our next video we’ll show you how to create a server using node.js and get the response from our server on to the web browser(upon request).

Stay tuned, it’s fun to explore it.