ngIf, index, first, last: Ionic 2

Today lets see how we can track the index number of the loop. i.e., the number of completed iterations in a loop. We shall also learn *ngIf conditional operator and its usage.

Related Read:
Basics of Page Component: Ionic 2

*ngIf Conditional Operator

ngIf is called conditional operator because it operates based on conditions i.e., if the conditional statement it has been assigned is true, then the node it is attached to will be rendered or else it’ll not. *ngIf takes boolean values.

Example: If *ngIf is attached to a div and the condition is false, then the div it has been attached to won’t be added to the DOM. If the condition is true, then div is added to the DOM.

Video Tutorial: ngIf, index, first, last: Ionic 2


[youtube https://www.youtube.com/watch?v=Cb4a-oh_yXM]

YouTube Link: https://www.youtube.com/watch?v=Cb4a-oh_yXM [Watch the Video In Full Screen.]


index, first, last
While we are looping through some array elements inside template file we can know the index of the loop using index variable. We can use ngIf and do something at the first iteration using first variable and similarly we can know the last iteration using last variable.

Source Code: src/pages/home/home.ts

<ion-list no-lines>
  <ion-item *ngFor="let company of companies; 
                     let i = index; 
                     let lst = last; 
                     let fst = first;">
    {{i+1}}. {{company.name}}  
    <span *ngIf="lst"> - Am last!</span>
    <span *ngIf="fst"> - Am first</span>
  </ion-item>
</ion-list> 

inside *ngFor we have initiated and assigned index value to variable i, last index value to variable lst and first index value to variable fst.

Inside ion-item we are using *ngIf to check if the iteration is first iteration, if so add ‘Am first’ message besides the first list item i.e., beside Microsoft. We also check if the iteration is a last iteration, if so we display ‘Am last!’ message beside the last item in the list i.e., beside IBM.

Output:

  1. Microsoft – Am first
  2. Apple
  3. Google
  4. Oracle
  5. IBM – Am last!

Dynamically Load Images: jQuery Looping

Video tutorial to demonstrate loading of images dynamically using jQuery looping method: .each()

In this tutorial, we take 5 div elements in our html document, and then using each() method, we loop through each of these div tags and insert images in each one of them.

HTML code
index.html

1
2
3
4
5
6
7
8
9
10
11
12
13
14
15
16
17
18
19
20
21
22
23
24
25
26
<html>
<head><title>Dynamically load images: jQuery Looping</title>
<style type="text/css">
div  {
 
display: inline;
padding: 10px;
 
}
 
</style>
 
</head>
<body>
 
<div>1</div>
<div>2</div>
<div>3</div>
<div>4</div>
<div>5</div>
 
 
<script src="script/jquery-1.8.1.min.js" type="text/javascript"></script>
<script src="script/my_script.js" type="text/javascript"></script>
</body>
</html>

Here we have 5 div tags, and we have applied some cascading stylesheet property to it.

jQuery code
my_script.js

1
2
3
4
5
6
7
$(document).ready( function() {
 
 $("div").each( function(i) {
  $(this).append("<img src='images/"+(++i)+".png' width='79' height='79' />");
 });
 
});

Here we select all the div tags and loop through each one of them using each() method.
Using this selector, we append image tag with a image to each div present in our html document.

+ is concatenation operator.
i++ is a shorthand notation of i = i + 1;

++i is pre increment.
i++ is post increment.

Similarly,
– -i is pre decrement.
i- – is post decrement.

Ex:

let i = 1;

display or echo ++1; results in 2. after display i = 2;
display or echo i++; results in 1. after display i = 2;

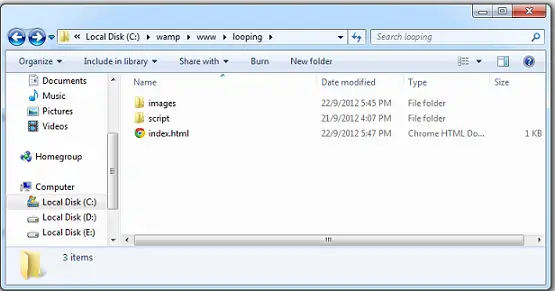
folder-structure-jquery

Note: We have our images inside a folder called images.

Video Tutorial: Dynamically Load Images: jQuery Looping


[youtube https://www.youtube.com/watch?v=r-7ljuuljgY]

YouTube Link: https://www.youtube.com/watch?v=r-7ljuuljgY [Watch the Video In Full Screen.]


each() method is often used in all the application level programming logic.
We would also use a static method $.each() when we encounter ajax in jQuery. We would explain it in further videos. Stay subscribed to our blog and youtube channel and please like and share our tutorials with your friends.