Dynamically Load Images: jQuery Looping

Video tutorial to demonstrate loading of images dynamically using jQuery looping method: .each()

In this tutorial, we take 5 div elements in our html document, and then using each() method, we loop through each of these div tags and insert images in each one of them.

HTML code
index.html

1
2
3
4
5
6
7
8
9
10
11
12
13
14
15
16
17
18
19
20
21
22
23
24
25
26
<html>
<head><title>Dynamically load images: jQuery Looping</title>
<style type="text/css">
div  {
 
display: inline;
padding: 10px;
 
}
 
</style>
 
</head>
<body>
 
<div>1</div>
<div>2</div>
<div>3</div>
<div>4</div>
<div>5</div>
 
 
<script src="script/jquery-1.8.1.min.js" type="text/javascript"></script>
<script src="script/my_script.js" type="text/javascript"></script>
</body>
</html>

Here we have 5 div tags, and we have applied some cascading stylesheet property to it.

jQuery code
my_script.js

1
2
3
4
5
6
7
$(document).ready( function() {
 
 $("div").each( function(i) {
  $(this).append("<img src='images/"+(++i)+".png' width='79' height='79' />");
 });
 
});

Here we select all the div tags and loop through each one of them using each() method.
Using this selector, we append image tag with a image to each div present in our html document.

+ is concatenation operator.
i++ is a shorthand notation of i = i + 1;

++i is pre increment.
i++ is post increment.

Similarly,
– -i is pre decrement.
i- – is post decrement.

Ex:

let i = 1;

display or echo ++1; results in 2. after display i = 2;
display or echo i++; results in 1. after display i = 2;
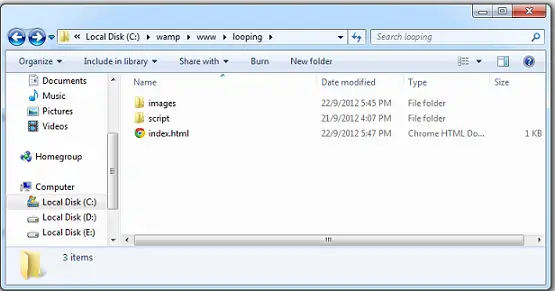
folder-structure-jquery

Note: We have our images inside a folder called images.

Video Tutorial: Dynamically Load Images: jQuery Looping


[youtube https://www.youtube.com/watch?v=r-7ljuuljgY]

YouTube Link: https://www.youtube.com/watch?v=r-7ljuuljgY [Watch the Video In Full Screen.]


each() method is often used in all the application level programming logic.
We would also use a static method $.each() when we encounter ajax in jQuery. We would explain it in further videos. Stay subscribed to our blog and youtube channel and please like and share our tutorials with your friends.

Working With Images: Small jQuery Application

In this video tutorial, we shall test our skills in jQuery: bind, unbind, append and remove functions. Also we shall see the use of chain methods.

jQuery Event Handling: Binding and Unbinding
Animate Image with ‘this’ Selector: jQuery
Append/Add and Remove HTML/XML Elements: jQuery

Assume that a client has mailed her requirements to us:
She has 5 images in her html page.
Once the user clicks on a image, a message should popin beside the image.
Image should be clickable only once.
Once the user clicks on other images, the messages appended beside previously clicked image must be removed.

With these requirements in mind, we shall start developing our image based jQuery Application.

HTML code
index.html

1
2
3
4
5
6
7
8
9
10
11
12
13
14
15
16
17
18
19
20
<html>
 <head><title>Working With Images: Small jQuery Application</title>
 <style type="text/css">
 img{
  padding: 10px;
 }
 </style>
 </head>
 <body>
 
   <div> <img src="images/aperture.png" width="69" height="69" /> </div>
   <div> <img src="images/coda.png" width="69" height="69" /> </div>
   <div> <img src="images/finder.png" width="69" height="69" /> </div>
   <div> <img src="images/photoshop.png" width="69" height="69" /> </div>
   <div> <img src="images/safari.png" width="69" height="69" /> </div>
 
   <script type="text/javascript" src="script/jquery-1.8.1.min.js"></script>
   <script type="text/javascript" src="script/my_script.js"></script>
 </body>
</html>

Here we have included 5 images and have added 10px padding using CSS.
Each image is being placed inside a div tag.

Note:
So img is a child of div or div is the parent of img.

jQuery code
my_script.js

1
2
3
4
5
6
7
8
9
$(document).ready( function() {
 
  $("img").click( function() {
   $("b").remove();
   $(this).parent().append("<b>You clicked on Me!</b>");
   $(this).unbind();
 });
 
});

Once the document is ready and the user clicks on a image:
1. Any b tag present in the document is removed. Thus, the message associated with the image which was being clicked previously is removed.
2. The parent tag of the image being clicked: i.e., div tag is selected and a message with b tag is appended to it, which appears beside the image being clicked by the user.
3. The event associated with the image being clicked is removed.

Note:
Use of function().function() is called chain method.
Example:
parent().append();
next().parent().remove(); etc

Make sure to maintain the order of the code. If you replace or rearrange the code in a way other than above, you wouldn’t get expected result.
While practicing, change the order of the code and look for the output, that would help you understand the code and the flow / execution flow well.

Video Tutorial: Working With Images: Small jQuery Application


[youtube https://www.youtube.com/watch?v=MckRCdhiZBI]

YouTube Link: https://www.youtube.com/watch?v=MckRCdhiZBI [Watch the Video In Full Screen.]


Keep testing your jQuery skills by doing some mini projects like this one.
Let it be small, so that it doesn’t take forever to test your skills.

You could even test and enhance your jQuery skills by helping people on our forum.