In this video tutorial we shall learn some basics of a page component.
Topics Covered
1. Decorators – little bit
2. Class
3. Template File – ionic list items, For loop in ionic template.
4. Variables in Ionic – data type(number, string, Array, any)
5. Importing libraries and using it in our project.
6. Setting home page of our project.
Related Read:
Project Structure: Ionic 2
Video Tutorial: Basics of Page Component: Ionic 2
[youtube https://www.youtube.com/watch?v=Tb4k00ALHeA]
In this tutorial we are using a blank template and setting home.html as our home page.
inside src/app/app.component.ts file
We import the HomePage page
import { HomePage } from '../pages/home/home';
next inside the class definition we assign this HomePage as root file for our application
rootPage = HomePage;
Full Source Code src/app/app.component.ts
import { Component } from '@angular/core';
import { Platform } from 'ionic-angular';
import { StatusBar, Splashscreen } from 'ionic-native';

import { HomePage } from '../pages/home/home';


@Component({
  template: `<ion-nav [root]="rootPage"></ion-nav>`
})
export class MyApp {
  rootPage = HomePage;

  constructor(platform: Platform) {
    platform.ready().then(() => {
      // Okay, so the platform is ready and our plugins are available.
      // Here you can do any higher level native things you might need.
      StatusBar.styleDefault();
      Splashscreen.hide();
    });
  }
}
Important: Do NOT forget to import all your classes in app.module.ts file, also specify its class name inside declarations and entryComponents section.
src/app/app.module.ts
import { NgModule } from '@angular/core';
import { IonicApp, IonicModule } from 'ionic-angular';
import { MyApp } from './app.component';
import { HomePage } from '../pages/home/home';

@NgModule({
  declarations: [
    MyApp,
    HomePage
  ],
  imports: [
    IonicModule.forRoot(MyApp)
  ],
  bootstrap: [IonicApp],
  entryComponents: [
    MyApp,
    HomePage
  ],
  providers: []
})
export class AppModule {}
Now lets take a look at our HomePage component, which is present inside pages directory and Home folder
src/pages/home/home.ts
import { Component } from '@angular/core';
import { NavController } from 'ionic-angular';

@Component({
  selector: 'page-home',
  templateUrl: 'home.html'
})
export class HomePage {
  constructor(public navCtrl: NavController) {
  }

}
Here we have imported two important library files. Component is used to configure the decorator and NavController is used for navigation purposes. In this tutorial we’re not using Navigation, but we’ll make use of it in our next video tutorial.
Decorators
There are 3 types on decorators:
1. Component
2. Pipe
3. Directive
I’ll explain each one of them separately in other videos.
Component
In today’s tutorial we’ve a component and it has a selector and a templateUrl. Selector name is used to inject an element or an attribute into the DOM. TemplateUrl tells the class about its associated template file. Components(Decorative) are placed just above the class definition.
Class
A class is a blueprint of an object. This is where we write our logic. It’ll usually have some properties(public or private or protected) and some methods.
In Ionic 2 class, you might have seen export keyword – which means we can import this file in some other class file and make use of its service or output.
variables
In TypeScript variables are typed – which means, variables have data type.
var1: any; Means variable var1 can take value of any data type.
var1: string; Here var1 can be assigned with string value only.
var1: number; as you might have already guessed, var1 takes number value.
var1: Array< {}>; var1 takes an array as its value.
var1: boolean; var1 takes value true or false.
Wrong initialization
var1: number = ‘Satish’;
var1: string = 1;
Correct initialization
var1: number = 1;
var1: string = ‘Satish’;
src/pages/home.ts
import { Component } from '@angular/core';
import { NavController } from 'ionic-angular';

@Component({
  selector: 'page-home',
  templateUrl: 'home.html'
})
export class HomePage {
companies: Array< {name: string, code: number}>;
  constructor(public navCtrl: NavController) {
    this.companies = [
      {name: 'Microsoft', code: 1},
      {name: 'Apple', code: 2},
      {name: 'Google', code: 3},
      {name: 'Oracle', code: 4},
      {name: 'IBM', code: 5}
    ];
  }
}
Here we have an array called companies – which has a list of company names like Microsoft, Apple, Google, Oracle, IBM. Each of this is stored as an individual element inside the array.
Using ngFor loop we can iterate through this array and display the company names.
*ngFor loop
<p *ngFor="let company of companies">
</p>
In Ionic 2, we make use of *ngFor for for loop. We declare a new variable company and reference individual elements of the array present inside companies array.
src/pages/home/home.html
<ion-list>
  <ion-item *ngFor="let company of companies">
    {{company.name}}
  </ion-item>
</ion-list>
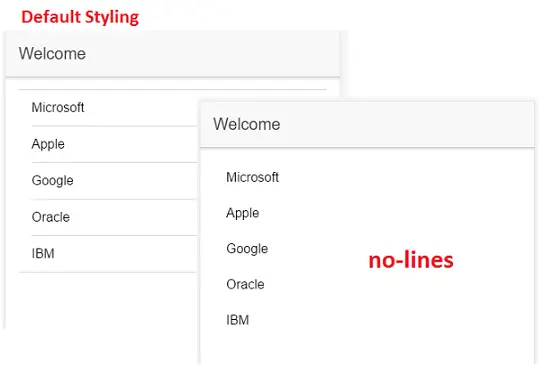
Here I’m making use of ion-list tag and ion-item tags to display the company names.

If we want to remove the default lines which come along with the ion-list items then we can add no-lines styling to ion-list tag.
<ion-list no-lines>
  <ion-item *ngFor="let company of companies">
    {{company.name}}
  </ion-item>
</ion-list>
In next video tutorial lets learn how to navigate to other pages using Ionic 2 routing.