Basic Routing Using Express: Node.js

Today let us learn a very important lesson in any web application development i.e., setting up the routes.
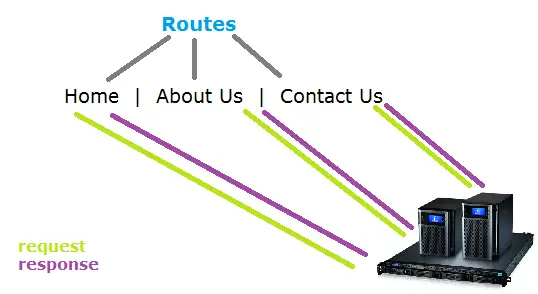
basic route using Express Node.js

Express is an excellent web framework for Node.js

Basic Routing with Express
app.js

1
2
3
app.get('/', function(req, res){
    res.send("Hello World!"); 
});

This would output Hello World when users access the index or home page.

Basic Routing with Express
app.js

1
2
3
app.get('/myPhone', function(req, res){
    res.send("Sony Xperia!"); 
});

This would output Sony Xperia! when users access the /myPhone route.

Dynamic Routing with Express
app.js

1
2
3
app.get('/user/:username', function(req, res){
    res.send(" "+req.params.username+"'s profile!"); 
});

When we request information of particular user by using his username in the URL, it fetches the username using request object and displays appropriate message.
Example: If the user requests /user/Satish it’ll output Satish’s profile!

Public Folder

If we put some files inside our public directory, it would be convenient if some middlewares fetch the files directly upon user request, instead of writing routes for all those files. Connect module which is a dependency of Express web framework takes care of this.

Middleware for public folder files
app.js

1
2
3
4
5
6
var express = require('express');
var path = require('path');
 
var app = express();
 
 app.use(express.static(path.join(__dirname, 'public')));

This would set the public directory.

Middleware for public folder files
app.js

1
2
 app.use(app.router);
 app.use(express.static(path.join(__dirname, 'public')));

If you want your custom routes to be checked before the public folder, then you could specify it using another middleware, i.e., app.router

Note that, the ordering of Middleware is significant.

Sending HTML in Routs: Express
app.js

1
2
3
4
5
6
7
8
9
10
app.get('/', function(req, res){
    var msg = [
               "<h1>I love Google..</h1>",
               "<p>Because they make awesome products",
               "<br />like my Nexus 7 Tablet",
               "which is so amazing!"
    ].join("\n");
    res.send(msg); 
});
</p>

This would out put with all HTML semantics on the browser.

Get, Post, Put, Delete Requests
Web browsers by default support only get and post requests. But we can override methods and make sure our Node.js application supports even the Put and Delete requests.

Post Request
HTML Form
index.html present in public directory

1
2
3
4
5
6
7
8
9
10
11
12
13
< !DOCTYPE html>
<html>
<head>
<title>Enter your name</title>
</head>
<body>
<form action="/user" method="POST">
<label for="name">Name: </label>
 <input type="text" name="name"/>
 <input type="submit"/>
</form>
</body>
</html>

Here we have a form with post method and also take note of action field value.

POST Route
app.js

1
2
3
4
5
app.use(express.bodyParser());
 
app.post('/user', function(req, res){
    res.send("Submitted user's name is: "+req.body.name);  
});

Inorder to parse the HTML page, you’ll need bodyParser middleware. Once you have it in place you can get form field entries and use it to insert the data into database or simply display as in our case with this example.

We could similarly write code for PUT and DELETE requests.
PUT & DELETE Routes
app.js

1
2
3
4
5
6
7
8
9
10
app.use(express.bodyParser());
app.use(express.methodOverride());
 
app.put('/user/:userId', function(req, res){
    res.send("Editing user with userid: "+req.params.userId);  
});
 
app.delete('/user/:userId', function(req, res){
    res.send("Editing user with userid: "+req.params.userId);  
});

By getting the unique userId of the user, you could fetch the data from database and make changes and update the information using Put request. Similarly, using the unique userId of the user, you could select and delete the information about the user!

Basic Routing Using Express: Node.js


[youtube https://www.youtube.com/watch?v=zHykHw9JlhE]

YouTube Link: https://www.youtube.com/watch?v=zHykHw9JlhE [Watch the Video In Full Screen.]


Separating Route Files
As your application grows, its hard to keep the code cleaner and maintainable, so it’s always a good idea to separate these kind of information from the main application file. So we create a file called routes and include it as a local module in our main application file.

External Route File
/routes/index.js

1
2
3
4
5
6
7
/*
 * GET home page.
 */ 
exports.index = function(req, res){
  res.send('Google Nexus 5 To Be Release Shortly ..');
};

exports is a global provided by node.js
index is a name given by us; it’s a property name and we assign a function to it.

Accessing External Route File
app.js

1
2
3
var routes = require('./routes');
 
app.get('/', routes.index);

This would output: Google Nexus 5 To Be Release Shortly ..
Configuration of Express Application: Node.js

You may often want different settings for development environment and a different settings in the production environment. Also you could keep pushing the files to server for testing. So you’ll need to test your application in two different environments: development & production

development-production-environment-express-nodejs

In situations like this, you could have environment specific configurations using express. In this video tutorial, I’ll be walking you through setting up configurations for these environments using Express, web framework of Node.js.

Main application file
app.js

1
2
3
4
5
6
7
8
9
10
var express = require('express');
var app = express();
 
// all environments
app.set('port', process.env.PORT || 3000);
app.set('views', __dirname + '/views');
app.set('view engine', 'jade');
 
app.set('view cache', true);
// app.enable('view cache');

Here we create an express object, using which we set the configurations.
First we set the port number to whatever is set by the server – which is present in the environment variable process.env.PORT if it is not set use 3000 as port number.
Next, assign views a directory: root directory( __dirname ) and views folder. You could create any folder inside root and assign it to views. Then, set default view engine as Jade. Next we enable the view cache – btw View caching is useful in production environment.

Development Environment
app.js

1
2
3
4
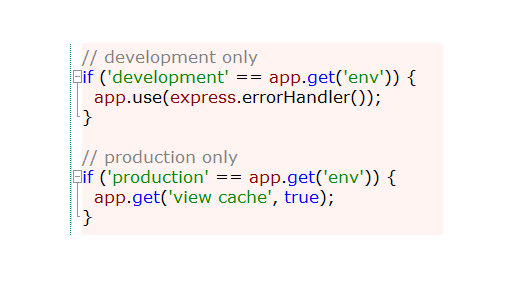
// development only
if ('development' == app.get('env')) {
  app.use(express.errorHandler());
}

Here we could list all the settings needed for our development environment.

Production Environment
app.js

1
2
3
4
// production only
if ('production' == app.get('env')) {
  app.enable('view cache');
}

Here we could list all the settings needed for our production environment.

Configuring Express Application: Node.js


[youtube https://www.youtube.com/watch?v=60xRnFSMRk8]

YouTube Link: https://www.youtube.com/watch?v=60xRnFSMRk8 [Watch the Video In Full Screen.]


Note: To run with specific environment settings configuration use the following command while running your Node.js application

1
2
C:/>cd node
C:/node>NODE_ENV = production node app.js

Basics of Jade – Template Engine: Node.js

Lets learn some of the basics of Jade Template Engine. Jade is the default template engine for Express Web Framework of Node.js Also note that, Jade and Express are open source product of the same company, so go very well with each other!

jade-template-engine-nodejs-express-web-framework

Using template engine might seem pointless in the beginning, but if you’re building a large-scale application, it’s a handy tool and you’ll feel good about your decision to use one for your project.

Make sure you’ve installed Express Web framework and Jade module locally for your application. You can find the procedure at Express Web Framework: Node.js

Configuration Section
app.js

1
app.set('view engine', 'jade');

This would let your application know that you’ll be using Jade as Template Engine. This way, you need not mention the Template Engines file extension each time.

Jade File: Indentation
index.jade

1
2
3
4
html
 head
  title Technotip
 body

Would output

1
2
3
4
5
<html>
 <head><title>Technotip</title></head>
 <body>
 </body>
</html>

Indentations in Jade decide which element(s) is/are a child off which element.

Jade File: Variable
index.jade

1
2
 - var name = "Love For Design"
 p= name

and

Jade File: String. Minus sign significance
index.jade

1
2
 - var name = "Love For Design"
 p #{name}

Out put Love For Design on the browser, inside a paragraph tag.

Jade File: Code Interpretation – REPL
index.jade

1
 p #{ 1 + 5 }

This outputs 6 on to the browser inside a paragraph tag.

Jade File: String Length Management
index.jade

1
2
3
4
5
6
7
 p
  | My Name is Satish
  | I Love web development
  | I love helping people
  | by teaching them whatever I know
  | I believe, this is a good cause of 
  | spreading knowledge.

This would treat the entire string as a single line text, and out put looks like:
My Name is Satish I Love web development I love helping people by teaching them whatever I know I believe, this is a good cause of spreading knowledge.

Jade File: Id’s and Classes
index.jade

1
2
div#wrapper
  p.highlight I Love Node.js

This would apply the id wrapper to div and highlight class to p tag.

Jade File: Multiple id and class
index.jade

1
2
div#wrapper.content.highlight
  p I Love Node.js

We could even assign multiple id’s and classes to a html element.

Jade File: Anchor Tag
index.jade

1
a(href="/about", rel="nofollow") Satish

This would wrap the word Satish with anchor tag and nofollow attribute.

Jade File: Anchor Tag and Image Tag
index.jade

1
2
a(href="/about", rel="nofollow") Satish
img(src="1.gif", alt="Child Eating KitKat")

This would output Satish with anchor tag and nofollow attribute. Also an image with alt attribute attached to it. Both these tags are siblings.

Jade File: Hyperlink the Image file – Hypermedia
index.jade

1
2
a(href="/about", rel="nofollow")
 img(src="1.gif", alt="Child Eating KitKat")

Indent img tag inside anchor tag and the image gets linked to by the anchor tag.

Jade File: Writing Function inside Jade file
index.jade

1
2
- var fn = function() { return "android KitKat"}
p #{fn()}

This outputs android KitKat to the browser.

Jade File: Accessing elements of Object
index.jade

1
2
3
4
- obj = { name: "Apple", product: "iPhone"}
ul
  li #{obj.name}
  li #{obj.product}

This would output

  • Apple
  • iPhone

Jade File: Accessing elements of an array
index.jade

1
2
3
4
- obj = [ "Nexus 5", "iPhone 5S"]
ul
  li #{obj[0]}
  li #{obj[1]}

This would output

  • Nexus 5
  • iPhone 5S

Jade File: Including another jade file
index.jade

1
2
p
 include show

This would include the contents of show.jade file inside index.jade file.

Basics of Jade – Template Engine: Node.js


[youtube https://www.youtube.com/watch?v=xNoWTLsZbaU]

YouTube Link: https://www.youtube.com/watch?v=xNoWTLsZbaU [Watch the Video In Full Screen.]


Note:
sign tells jade that the code that follows should be executed.
= sign tells that the code should be evaluated, escaped and then output.

Stay subscribed: In next video we’ll show how to use bootstrap + Express + Jade + Node.js
Building a web form. Loops and Conditional statements present in Jade.

Express Web Framework: Node.js

In this video tutorial we shall briefly look at Express web framework for Node.js

express-modules-file-structure-nodejs

With today’s tutorial we will be discussing the basics of Express and we’ll also be running a small example application built with Express, also we shall have a first look at Jade Template Engine.

REPL
global installation of Express Framework

C:\>npm install -g express

This installs the express globally, so that you can access it from anywhere in the system.

Also note that, you’ll need internet connection to download and install these packages.

REPL
creating express example application

C:\>cd node
C:\node>express express_example

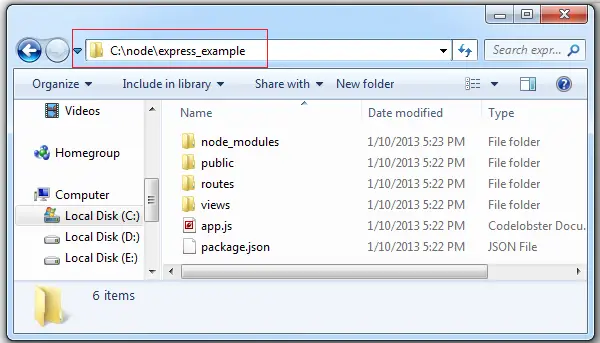
This creates a folder and some recommended folder structure. If you’re a total beginner to Express Framework, then it’s better to stick on with these folder structure.

Now open the package.json present inside express_example folder
JSON File
package.json

{
  "name": "application-name",
  "version": "0.0.1",
  "private": true,
  "scripts": {
    "start": "node app.js"
  },
  "dependencies": {
    "express": "3.4.0",
    "jade": "*"
  }
}

It looks as shown above. It has 2 dependencies: express and jade. Install these dependencies from your command prompt / console.

REPL
installing dependencies

C:\>cd node
C:\node>cd express_example
C:\node\express_example>nmp install

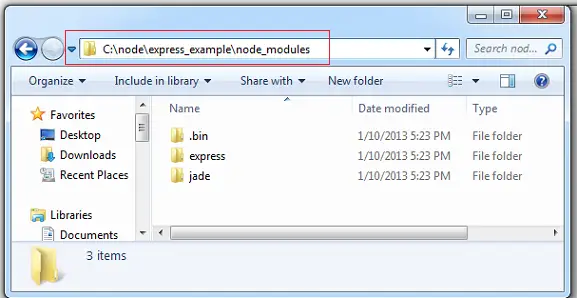
This would install both express and jade, and another folder called node_modules gets created inside express_example folder.


 express-jade-modules-nodejs

Video Tutorials: Getting Started With Express Web Framework: Node.js


[youtube https://www.youtube.com/watch?v=CagrpUlQtdQ]

YouTube Link: https://www.youtube.com/watch?v=CagrpUlQtdQ [Watch the Video In Full Screen.]


Jade File
Jade to HTML

extends layout

block content
  h1= title
  p Welcome to #{title}

This jade file is present inside view folder.

jade-to-html-express-node

More about Jade Template Engine in coming videos ..

Note:


express-modules-file-structure-nodejs

Inside node_modules folder we have dependency modules.
Inside public folder javascript files, css files, images etc are present. Logical part of the application will be kept separate for security reasons.
Inside routes, routing configuration is present.
Inside views, the presentation part of the application is present. If Template Engine is used, those files will be present in this folder. Example: .jade files

app.js Starting point of execution.
package.json Contains app name, version, author, dependency module names etc.

Info: There are many popular websites built upon Express Framework, one that you might know is, MySpace!

External Module( NPM ) Install, Update, Remove: Node.js

This video tutorial illustrates searching, installing, updating and removing the external, free modules.

External Free Node Modules are listed at npmjs.org and is managed by NPMNode Package Manager.

There are so many amazing modules already written to handle so many sophisticated functionalities, that it becomes easy to use them in our application and build a robust, scalable application quickly.

Command to look at all the external module names and their respective description

1
npm search

It gives a long list of names and descriptions.

To make is look better, you can use GREP(if you’re on Linux or Unix based System)
Search with GREP

1
npm search | grep module_name

npm search followed by pipe symbol, which is followed by any module name.

For Windows users

1
npm search module_name

it gives all the details of available methods, properties and their description.

Installation of Modules

init command

1
npm init

Once you run this command, it prompts you with some optional things, like, name of the project, version, author, licensing etc. Once you’re done with that, it creates package.json file with all the details you provided.

The ‘init’ command in NPM allows us to identify our project and list out any Node Modules it requires.

Now open that package.json file: it looks somewhat like this
package.json file

1
2
3
4
5
6
7
8
9
10
11
12
{
  "name": "app",
  "version": "0.0.0",
  "description": "authentication application",
  "main": "index.js",
  "scripts": {
    "test": "echo \"Error: no test specified\" && exit 1"
  },
  "repository": "",
  "author": "SATISH B",
  "license": "BSD"
}

You need to open this package.json file using a plain text editor and add your project dependencies i.e., some of the modules you need to install for your project.

In this video tutorial we’re installing 3 external modules:
express
jade
mongoose

package.json file, after editing

1
2
3
4
5
6
7
8
9
10
11
12
13
{
  "name": "app",
  "version": "0.0.0",
  "description": "authentication application",
  "main": "index.js",
  "scripts": {
    "test": "echo \"Error: no test specified\" && exit 1"
  },
 "dependencies": { "express": "2.5.8", "jade": "0.26.1", "mongoose": "2.6.5" },
  "repository": "",
  "author": "SATISH B",
  "license": "BSD"
}

Now you’ve specified all the external modules your project depends on.

Now using install command, we need to install these modules.
installation command

1
npm install

Once this command is executed, it looks through the package.json file and installs all the dependency modules one by one.

External Module Install, Update, Remove via NPM: Node.js


[youtube https://www.youtube.com/watch?v=HRISSD0ic2s]

YouTube Link: https://www.youtube.com/watch?v=HRISSD0ic2s [Watch the Video In Full Screen.]


What is a module?
A module is a self-contained series of one or more javascript files represented by an object.

Update Command

1
npm update

once you run this command, package.json file is parsed and the dependency modules are checked for any updates, if any, it’ll be updated.
If any module is installed with -g (global scope), i.e., the root installation, then while updating or removing them, it may throw some errors, in such case, use sudo keyword:

Update Command

1
sudo npm update -g

This would solve the problem both for updating and deleting external modules.

remove/delete module command

1
npm prune

To remove the unused modules: open package.json file and remove the module names which you want to remove. Save the package.json file and then run above(npm prune) command. This would safely remove the modules you no more intend to use in your project.

List Global module: using command

1
npm -g ls

This lists all the global modules, it’s path and file structure: as shown below:

Example output

1
2
3
4
5
6
7
8
9
10
11
12
13
14
15
16
17
18
19
20
21
22
23
C:\node\express_example>npm  -g ls
C:\Users\Satish\AppData\Roaming\npm
└─┬ [email protected]
  ├── [email protected]
  ├─┬ [email protected]
  │ └── [email protected]
  ├─┬ [email protected]
  │ ├── [email protected]
  │ ├─┬ [email protected]
  │ │ ├── [email protected]
  │ │ └── [email protected]
  │ ├── [email protected]
  │ ├── [email protected]
  │ └── [email protected]
  ├── [email protected]
  ├── [email protected]
  ├── [email protected]
  ├── [email protected]
  ├── [email protected]
  ├── [email protected]
  ├── [email protected]
  └─┬ [email protected]
    └── [email protected]

Removing/Uninstalling Global modules: using command

1
npm -g rm

This removes all the global modules installed.

Clear cache

1
npm cache clear

After modifiying things from command prompt, if it’s still not working, try clearing the cache.

Note:
To install latest version of the module: you’ll need to write * (asterisk or star) in the place of version number inside package.json file.