Clipping Paths in Canvas: HTML5

Today lets learn about clipping paths in HTML5 canvas.

clipping-path-canvas-html5

In this tutorial, we take an image and display the image only at particular clipping regions on our canvas.

HTML file
index.html

1
2
3
4
5
6
7
8
9
10
11
12
13
14
15
< !DOCTYPE HTML>
<html>
<head>
<title>Canvas: HTML5</title>
<meta charset="utf-8"/>
<link href="myStyle.css" rel="stylesheet" />
<script src="myScript.js"></script>
</head>
<body>
 <canvas id="myCanvas" width="400" height="400">
  Upgrade Browser
 </canvas>
 <img id="myImg" src="technotip.jpg" style="display: none;"/>
</body>
</html>

Here we have a canvas with 400px width and height. Also an image whose display has been set to none.

CSS file
myStyle.css

1
2
3
canvas {
border: 2px dotted black;
}

We assign 2px black dotted border to the canvas present on our HTML page.

JavaScript file: Circular Clipping Path
myScript.js

1
2
3
4
var myImg = document.getElementById("myImg");
context.arc(200, 200, 180, 0, 2 * Math.PI);
context.clip();
context.drawImage(myImg, 0, 0);

This creates a circular clipping region, with a radius of 180px. We use drawImage() method to draw the image. Clip() method is used to create clipping region.

JavaScript file: random Clipping Path
myScript.js

1
2
3
4
5
6
7
8
9
var myImg = document.getElementById("myImg");
context.beginPath();
context.moveTo(50, 30);
context.lineTo(30, 250);
context.lineTo(390, 350);
context.lineTo(399, 30);
context.closePath();
context.clip();
context.drawImage(myImg, 0, 0);

This creates a random region, which is then clipped and the image is drawn inside this random clipping region.
Related: Canvas Lines and Paths: HTML5

Clipping Paths in Canvas: HTML5


[youtube https://www.youtube.com/watch?v=_2HzJJ7R8sM]

YouTube Link: https://www.youtube.com/watch?v=_2HzJJ7R8sM [Watch the Video In Full Screen.]


drawImage() Syntax
context.drawImage(img,sx,sy,swidth,sheight,x,y,width,height);

sx – The x coordinate where to start clipping(optional).
sy – The y coordinate where to start clipping(optional).
x – The x coordinate where to place the image on the canvas.
y – The y coordinate where to place the image on the canvas.
swidth– The width of the clipped image(optional).
sheight– The height of the clipped image(optional).

stretch or reduce the image
width– The width of the image to use(optional).
height– The height of the image to use(optional) .

JavaScript file: Full Code
myScript.js

1
2
3
4
5
6
7
8
9
10
11
12
13
14
15
16
17
18
19
20
21
22
23
24
25
26
27
28
window.onload = canvas;
 
function canvas()
{
var myCanvas = document.getElementById("myCanvas");
 
if( myCanvas && myCanvas.getContext("2d") ) 
{
var context         = myCanvas.getContext("2d");
 
var myImg           = document.getElementById("myImg");
 
 
context.arc(210, 195, 190, 0, 2 * Math.PI);
 
 
//context.beginPath();
//context.moveTo(50, 30);
//context.lineTo(30, 250);
//context.lineTo(390, 350);
//context.lineTo(399, 30);
//context.closePath();
 
 
context.clip();
context.drawImage(myImg, 0, 0);
}
}

Note: By default, current clipping path is the entire canvas. Clipping path is a region inside which drawing takes place, outside which drawing has no effect. Any path can be a clipping path. You simply draw a path as normal and then call the context’s clip method to clip the region. With this clipping path, we can restrict the drawing to a particular area on the canvas.
Radial Gradients in Canvas: HTML5

Lets see how radial gradients are drawn on canvas using HTML5.

radial-Gradients-canvas-html5-technotip

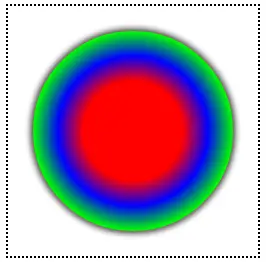
For Radial Gradients, we take 2 circles, one is the interior to the other. Thus, one circle is bigger than the other.

index.html and myStyle.css file content are same as Linear Gradients in Canvas: HTML5

JavaScript file: Radial Gradient
myScript.js

1
2
3
4
5
6
7
8
9
var rdl              = context.createRadialGradient(125, 125, 50, 125, 125, 100);
rdl.addColorStop(0.0, "#f00");  // RED
rdl.addColorStop(0.5, "#00f");  // BLUE
rdl.addColorStop(1.0, "#0f0");  // GREEN
 
                context.beginPath();
context.fillStyle    = rdl;
context.arc(125, 125, 100, 0, 2 * Math.PI);
context.fill();

We make use of createRadialGradient method and draw 2 circles at 125px x-axis and 125px y-axis as center. With radius of 50 and 100 each. i.e., First circle is inside the second circle.
Now using addColorStop we add different colors at different points.

addColorStop() takes 2 parameter, first being the position and the next being any valid css color string.

The value of position can range from 0.0 to 1.0

at point 0% we take red – #f00
at point 50% we take blue – #00f
at point 100% we take green – #0f0

Radial Gradients in Canvas: HTML5


[youtube https://www.youtube.com/watch?v=DfbA1h36MDw]

YouTube Link: https://www.youtube.com/watch?v=DfbA1h36MDw [Watch the Video In Full Screen.]


We assign the radial gradient object rdl to the fillStyle of circle present on canvas.

JavaScript file: Full Code
myScript.js

1
2
3
4
5
6
7
8
9
10
11
12
13
14
15
16
17
18
19
20
21
22
23
24
25
26
27
window.onload = canvas;
 
function canvas()
{
var myCanvas = document.getElementById("myCanvas");
 
if( myCanvas && myCanvas.getContext("2d") ) 
{
var context         = myCanvas.getContext("2d");
 
var rdl                = context.createRadialGradient(125, 125, 50, 125, 125, 100);
rdl.addColorStop(0.0, "#f00");  // RED
rdl.addColorStop(0.5, "#00f");  // BLUE
rdl.addColorStop(1.0, "#0f0");  // GREEN
 
context.shadowColor     = "#000";   // BLACK
context.shadowBlur      = 10;
 
context.beginPath();
context.lineWidth       = 2;
context.strokeStyle     = "pink";
context.fillStyle       = rdl;
context.arc(125, 125, 100, 0, 2 * Math.PI);
context.stroke();
context.fill();
}
}

We add shadow to the circle and stroke it with pink color border.

Note: We change the gradient radially by changing the center point of the inner circle.

Linear Gradients in Canvas: HTML5

Lets see how linear gradients are drawn on canvas using HTML5.

Linear-Gradients-canvas-html5

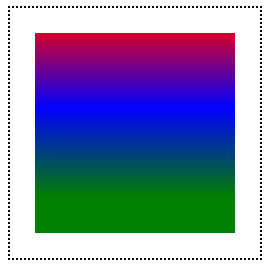
In this tutorial, we take a rectangle and draw linear gradient color as it’s fill color(fillStyle).

HTML file
index.html

1
2
3
4
5
6
7
8
9
10
11
12
13
14
15
< !DOCTYPE HTML>
<html>
<head>
<title>Canvas: HTML5</title>
<meta charset="utf-8"/>
<link href="myStyle.css" rel="stylesheet" />
<script src="myScript.js"></script>
</head>
<body>
 <canvas id="myCanvas" width="250" height="250">
  Upgrade Browser
 </canvas>
 
</body>
</html>

In this HTML5 document, we have a canvas with an id of myCanvas, and 250px width and height.

CSS file
myStyle.css

1
2
3
canvas {
border: 2px dotted black;
}

We assign 2px black dotted border to the canvas present on our HTML page.

JavaScript file
myScript.js

1
2
3
4
5
6
7
var lnr                 = context.createLinearGradient(10, 10, 10, 190);
lnr.addColorStop(0, "red");
lnr.addColorStop(0.5, "blue");
lnr.addColorStop(1, "green");
 
context.fillStyle      = lnr;
context.fillRect(25, 25, 200, 200);

by using createLinearGradient() method, we specify the start and end points of the linear gradient.

using addColorStop() method we create a color gradient at each stop position. It takes 2 parameter, first being the position and the next being any valid css color string.

The value of position can range from 0.0 to 1.0

at point 0% we take red.
at point 50% we take blue.
at point 100% we take green.

Now assign lnr object to fillStyle of a rectangle which has 200px width and height.

Linear Gradients in Canvas: HTML5


[youtube https://www.youtube.com/watch?v=RlilYyjLF78]

YouTube Link: https://www.youtube.com/watch?v=RlilYyjLF78 [Watch the Video In Full Screen.]


Note: As the name suggests linear gradient changes its angle when we change its line alignment, by changing the start and end points of the line. By changing this value you can change the gradient.

Canvas Element Pattern: HTML5

Today lets learn how to create pattern from another canvas element.

canvas-element-pattern-html5

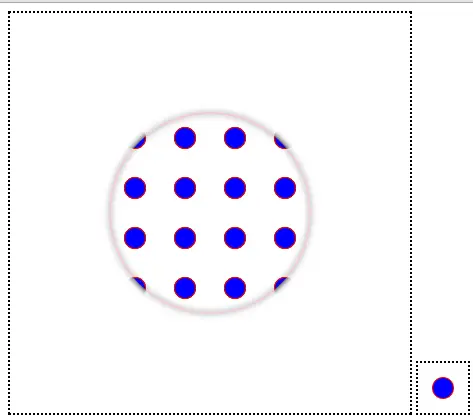
In this video tutorial, we take 2 canvas elements. Draw a small circle on one canvas and use it as pattern and draw a bigger circle on the main canvas.

HTML file
index.html

1
2
3
4
5
6
7
8
9
10
11
12
13
14
15
16
17
18
19
< !DOCTYPE HTML>
<html>
<head>
<title>Canvas: HTML5</title>
<meta charset="utf-8"/>
<link href="myStyle.css" rel="stylesheet" />
<script src="myScript.js"></script>
</head>
<body>
 <canvas id="myCanvas" width="400" height="400">
  Upgrade Browser
 </canvas>
 
 <canvas id="pattern" width="50" height="50">
 Please upgrade your browser!
 </canvas>
 
</body>
</html>

Here we have 2 canvas elements with unique ids. First/Main canvas is 400px X 400px width and height, second canvas is 50px X 50px width and height.
Related: Canvas Basics: HTML5

CSS file
myStyle.css

1
2
3
canvas {
border: 2px dotted black;
}

We assign 2px black dotted border to both the canvas present on our HTML page.

JavaScript file: Pattern Code
myScript.js

1
2
3
4
5
6
7
8
9
var pCanvas          = document.getElementById("pattern");
var pContext         = pCanvas.getContext("2d");
 
pContext.lineWidth   = 2;
pContext.arc(25, 25, 10, 0, 2 * Math.PI);
pContext.strokeStyle = "red";
pContext.fillStyle   = "blue";
pContext.stroke();
pContext.fill();

Here we get the pattern id and extract the 2d context APIs. Using pContext object, we draw a small circle of radius 10px with red border and filled with blue color.
Related: Draw Arcs/Circle with Canvas: HTML5

JavaScript file: Main Canvas Code
myScript.js

1
2
3
4
5
context.fillStyle    = context.createPattern(pCanvas, "repeat");
context.strokeStyle  = "pink";
context.arc(200, 200, 100, 0, 2 * Math.PI);
context.stroke();
context.fill();

We assign previously created pattern to fillStyle of our main canvas context. With this pattern as fillStyle, and a pink border, we draw a circle which has a radius of 100px.
Related: Canvas Image Patterns: HTML5

JavaScript file: Full Code
myScript.js

1
2
3
4
5
6
7
8
9
10
11
12
13
14
15
16
17
18
19
20
21
22
23
24
25
26
27
28
29
30
31
32
window.onload = canvas;
 
function canvas()
{
var myCanvas = document.getElementById("myCanvas");
 
if( myCanvas && myCanvas.getContext("2d") ) 
{
var context            = myCanvas.getContext("2d");
 
var pCanvas            = document.getElementById("pattern");
var pContext           = pCanvas.getContext("2d");
 
pContext.lineWidth     = 2;
pContext.arc(25, 25, 10, 0, 2 * Math.PI);
pContext.strokeStyle   = "red";
pContext.fillStyle     = "blue";
pContext.stroke();
pContext.fill();
 
context.shadowColor    = "black";
//context.shadowOffsetX= - 10;
//context.shadowOffsetY= - 10;
context.shadowBlur     = 10;
 
context.fillStyle      = context.createPattern(pCanvas, "repeat");
context.strokeStyle    = "pink";
context.arc(200, 200, 100, 0, 2 * Math.PI);
context.stroke();
context.fill();
}
}

We’re making the main canvas circle stand out by applying shadow effects.
Related: Shadow Effect on Canvas: HTML5

Canvas Element Pattern: HTML5


[youtube https://www.youtube.com/watch?v=2LuBWIzs_EY]

YouTube Link: https://www.youtube.com/watch?v=2LuBWIzs_EY [Watch the Video In Full Screen.]


Patterns can be used creatively in HTML5 games development and to draw images which look like having a 2d or 3d dimensions.

Canvas Image Patterns: HTML5

Today lets learn how to create patterns on canvas using image.

index.html and myStyle.css files are kept same as illustrated in previous video tutorial: Canvas State: HTML5

Related Topics:
Canvas Basics: HTML5
Draw Rectangle: HTML5 Canvas

Javascript file
myScript.js

1
2
3
4
5
6
7
8
9
10
11
12
13
14
15
16
17
18
19
20
window.onload = canvas;
 
function canvas()
{
var myCanvas = document.getElementById("myCanvas");
 
if( myCanvas && myCanvas.getContext("2d") ) 
{
var context         = myCanvas.getContext("2d");
 
var myImg           = new Image();
myImg.src           = "technotip.png";
 
myImg.onload        = function() {
  context.fillStyle = context.createPattern(myImg, "no-repeat");
  context.fillRect(0, 0, context.canvas.width, context.canvas.height);
}
 
}
}

Here we create a new image object myImg and set it’s source to a image technotip.png Once the object loads the source image we call an anonymous function. Here we set fillStyle property with the pattern we create out of the image. createPattern takes 2 parameter, first on being the pattern itself and the second one being the image repeat value, it takes repeat, no-repeat, repeat-x or repeat-y as it’s value.

Canvas Image Patterns: HTML5


[youtube https://www.youtube.com/watch?v=AhxDlK5dOHY]

YouTube Link: https://www.youtube.com/watch?v=AhxDlK5dOHY [Watch the Video In Full Screen.]


Note:
We can create pattern out of another canvas element or an image or even a video file.