Basics of Page Component: Ionic 2

In this video tutorial we shall learn some basics of a page component.

Topics Covered
1. Decorators – little bit
2. Class
3. Template File – ionic list items, For loop in ionic template.
4. Variables in Ionic – data type(number, string, Array, any)
5. Importing libraries and using it in our project.
6. Setting home page of our project.

Related Read:
Project Structure: Ionic 2

Video Tutorial: Basics of Page Component: Ionic 2


[youtube https://www.youtube.com/watch?v=Tb4k00ALHeA]

YouTube Link: https://www.youtube.com/watch?v=Tb4k00ALHeA [Watch the Video In Full Screen.]


In this tutorial we are using a blank template and setting home.html as our home page.

inside src/app/app.component.ts file
We import the HomePage page

import { HomePage } from '../pages/home/home';

next inside the class definition we assign this HomePage as root file for our application

rootPage = HomePage;

Full Source Code src/app/app.component.ts

import { Component } from '@angular/core';
import { Platform } from 'ionic-angular';
import { StatusBar, Splashscreen } from 'ionic-native';

import { HomePage } from '../pages/home/home';


@Component({
  template: `<ion-nav [root]="rootPage"></ion-nav>`
})
export class MyApp {
  rootPage = HomePage;

  constructor(platform: Platform) {
    platform.ready().then(() => {
      // Okay, so the platform is ready and our plugins are available.
      // Here you can do any higher level native things you might need.
      StatusBar.styleDefault();
      Splashscreen.hide();
    });
  }
}

Important: Do NOT forget to import all your classes in app.module.ts file, also specify its class name inside declarations and entryComponents section.

src/app/app.module.ts

import { NgModule } from '@angular/core';
import { IonicApp, IonicModule } from 'ionic-angular';
import { MyApp } from './app.component';
import { HomePage } from '../pages/home/home';

@NgModule({
  declarations: [
    MyApp,
    HomePage
  ],
  imports: [
    IonicModule.forRoot(MyApp)
  ],
  bootstrap: [IonicApp],
  entryComponents: [
    MyApp,
    HomePage
  ],
  providers: []
})
export class AppModule {}

Now lets take a look at our HomePage component, which is present inside pages directory and Home folder
src/pages/home/home.ts

import { Component } from '@angular/core';
import { NavController } from 'ionic-angular';

@Component({
  selector: 'page-home',
  templateUrl: 'home.html'
})
export class HomePage {
  constructor(public navCtrl: NavController) {
  }

}

Here we have imported two important library files. Component is used to configure the decorator and NavController is used for navigation purposes. In this tutorial we’re not using Navigation, but we’ll make use of it in our next video tutorial.

Decorators
There are 3 types on decorators:
1. Component
2. Pipe
3. Directive

I’ll explain each one of them separately in other videos.

Component
In today’s tutorial we’ve a component and it has a selector and a templateUrl. Selector name is used to inject an element or an attribute into the DOM. TemplateUrl tells the class about its associated template file. Components(Decorative) are placed just above the class definition.

Class
A class is a blueprint of an object. This is where we write our logic. It’ll usually have some properties(public or private or protected) and some methods.

In Ionic 2 class, you might have seen export keyword – which means we can import this file in some other class file and make use of its service or output.

variables
In TypeScript variables are typed – which means, variables have data type.
var1: any; Means variable var1 can take value of any data type.
var1: string; Here var1 can be assigned with string value only.
var1: number; as you might have already guessed, var1 takes number value.
var1: Array< {}>; var1 takes an array as its value.
var1: boolean; var1 takes value true or false.

Wrong initialization
var1: number = ‘Satish’;
var1: string = 1;

Correct initialization
var1: number = 1;
var1: string = ‘Satish’;

src/pages/home.ts

import { Component } from '@angular/core';
import { NavController } from 'ionic-angular';

@Component({
  selector: 'page-home',
  templateUrl: 'home.html'
})
export class HomePage {
companies: Array< {name: string, code: number}>;
  constructor(public navCtrl: NavController) {
    this.companies = [
      {name: 'Microsoft', code: 1},
      {name: 'Apple', code: 2},
      {name: 'Google', code: 3},
      {name: 'Oracle', code: 4},
      {name: 'IBM', code: 5}
    ];
  }
}

Here we have an array called companies – which has a list of company names like Microsoft, Apple, Google, Oracle, IBM. Each of this is stored as an individual element inside the array.

Using ngFor loop we can iterate through this array and display the company names.

*ngFor loop

<p *ngFor="let company of companies">
</p>

In Ionic 2, we make use of *ngFor for for loop. We declare a new variable company and reference individual elements of the array present inside companies array.

src/pages/home/home.html

<ion-list>  
  <ion-item *ngFor="let company of companies">  
    {{company.name}}  
  </ion-item>  
</ion-list> 

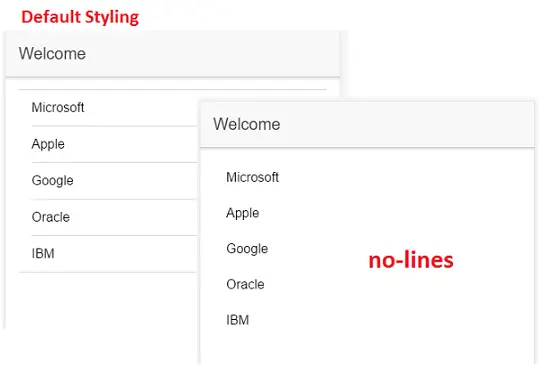
Here I’m making use of ion-list tag and ion-item tags to display the company names.
ion-list-no-lines

If we want to remove the default lines which come along with the ion-list items then we can add no-lines styling to ion-list tag.

<ion-list no-lines>  
  <ion-item *ngFor="let company of companies">  
    {{company.name}}  
  </ion-item>  
</ion-list>  

In next video tutorial lets learn how to navigate to other pages using Ionic 2 routing.
Project Structure: Ionic 2

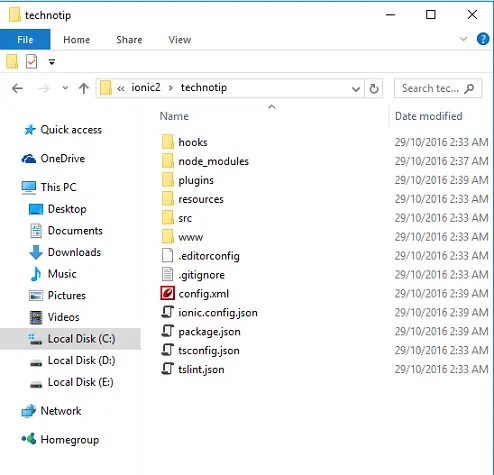
Before we move forward with coding, it’s important to know some of the files and folders present inside our ionic 2 project. Since you’re a beginner you might find this video to be confusing and fast paced. But let me assure you, this won’t affect your learning of Ionic 2. How much ever time you spend in understanding the anatomy of an ionic 2 cordova project, you won’t understand it properly until we start coding and utilizing these files and folders for our application needs.

I would advice you to take down whatever you understand in this video in a note-book and keep it for your future reference. It would be handy soon.

anatomy of ionic2 cordova project

hooks: this is not for beginners, so will skip that for now.
node_modules: This is where core libraries like angular2, ionic2, array manipulation, regEx etc are present. We import these libraries in our ionic 2 project and utilize their services.
plugins: Here Ionic 2 project specific cordova plugins are stored. There are many plugins which ionic-native provides which we can make use of for our application needs. For example: If you need to use your devices camera functionality, there is a cordova plugin for that which you can use in your ionic 2 project.
resources: Here we store icon and splashscreen files of our app.
src: is where we can find raw, uncompiled code. Inside src we have our page components(src/pages), application root components(src/app), static files(src/assets) etc, which gets transpiled, compiled, minified and stored inside www folder during the build process. If you edit any file inside www folder, it’ll simply be overwritten during the build process.

Anatomy of an Ionic 2 Project


[youtube https://www.youtube.com/watch?v=JpB3FafevH4]

YouTube Link: https://www.youtube.com/watch?v=JpB3FafevH4 [Watch the Video In Full Screen.]


src/assets: We store static resource files in this folder. Example: Image files which we use for our project.

src/pages: For every page you create you’ll add another folder in this directory. For example, if you want to create a login page, you’ll need to create a folder called login(or any other unique name) and then store the login template, login class definition file and login style definition file inside that folder. Ionic CLI can be used to automate this process and I’ll show you how to do it in upcoming video tutorials.

src/theme: This folder has style definition which is applicable for the entire application. We can simply change the value of some variables and customize the look and feel of our application. This will also be explained in a separate video tutorial in coming days.

src/app: This folder is where the ‘root components’ of our application are located. main.dev.ts and main.prod.ts files are responsible for the bootstrapping process of the application. main.dev.ts is active in development mode and main.prod.ts should be used in production environment.

src/app/app.module.ts is the entry point for the app.

import { NgModule } from '@angular/core';
import { IonicApp, IonicModule } from 'ionic-angular';
import { MyApp } from './app.component';
import { AboutPage } from '../pages/about/about';
import { ContactPage } from '../pages/contact/contact';
import { HomePage } from '../pages/home/home';
import { TabsPage } from '../pages/tabs/tabs';

@NgModule({
  declarations: [
    MyApp,
    AboutPage,
    ContactPage,
    HomePage,
    TabsPage
  ],
  imports: [
    IonicModule.forRoot(MyApp)
  ],
  bootstrap: [IonicApp],
  entryComponents: [
    MyApp,
    AboutPage,
    ContactPage,
    HomePage,
    TabsPage
  ],
  providers: []
})
export class AppModule {}

This essentially controls the work flow of rest of the application.

Using NgModule of angular core library we manage the modules in our ionic 2 applications. All the components and data services we create must be imported in this file and its class name must be specified inside the declarations and entryComponents section. If we have any data service providers we must specify it inside providers block. This file also points to the first component of our Ionic 2 application i.e., MyApp class of src/app/app.component.ts

src/app/app.component.ts is the first component of Ionic 2 application

import { Component } from '@angular/core';
import { Platform } from 'ionic-angular';
import { StatusBar, Splashscreen } from 'ionic-native';

import { TabsPage } from '../pages/tabs/tabs';


@Component({
  template: `<ion-nav [root]="rootPage"></ion-nav>`
})
export class MyApp {
  rootPage = TabsPage;

  constructor(platform: Platform) {
    platform.ready().then(() => {
      // Okay, so the platform is ready and our plugins are available.
      // Here you can do any higher level native things you might need.
      StatusBar.styleDefault();
      Splashscreen.hide();
    });
  }
}

This is the first component which gets loaded in our application. It’s simply an empty shell for other components to load into.

One important thing to note here is the rootPage. Since this is a project which uses tabs template, it has automatically assigned the rootPage to the TabsPage present in our src/pages/tabs/tabs.ts page.

src/pages/tabs/tabs.ts component

import { Component } from '@angular/core';

import { HomePage } from '../home/home';
import { AboutPage } from '../about/about';
import { ContactPage } from '../contact/contact';

@Component({
  templateUrl: 'tabs.html'
})
export class TabsPage {
  // this tells the tabs component which Pages
  // should be each tab's root Page
  tab1Root: any = HomePage;
  tab2Root: any = AboutPage;
  tab3Root: any = ContactPage;

  constructor() {

  }
}

Here we are importing 3 pages HomePage, AboutPage and ContactPage and then assigning it to each tab.

src/pages/tabs/tabs.html template file

<ion-tabs>
  <ion-tab [root]="tab1Root" tabTitle="Home" tabIcon="home"></ion-tab>
  <ion-tab [root]="tab2Root" tabTitle="About" tabIcon="information-circle"></ion-tab>
  <ion-tab [root]="tab3Root" tabTitle="Contact" tabIcon="contacts"></ion-tab>
</ion-tabs>

Which is then assigned as root pages on each tab. This is to maintain the sanity of navigation history. We’ll discuss about navigation in Ionic 2 in a separate video shortly.

src/index.html

<!DOCTYPE html>
<html lang="en" dir="ltr">
<head>
  <meta charset="UTF-8"/>
  <title>Ionic App</title>
  <meta name="viewport" content="width=device-width, initial-scale=1.0, 
        minimum-scale=1.0, maximum-scale=1.0, user-scalable=no"/>
  <meta name="format-detection" content="telephone=no"/>
  <meta name="msapplication-tap-highlight" content="no"/>
 
  <link rel="icon" type="image/x-icon" href="assets/icon/favicon.ico"/>
  <link rel="manifest" href="manifest.json"/>
  <meta name="theme-color" content="#4e8ef7"/>
 
  <!-- cordova.js required for cordova apps -->
  <script src="cordova.js"></script>
 
  <!-- un-comment this code to enable service worker
  <script>
    if ('serviceWorker' in navigator) {
      navigator.serviceWorker.register('service-worker.js')
        .then(() => console.log('service worker installed'))
        .catch(err => console.log('Error', err));
    }
  -->
 
  <link href="build/main.css" rel="stylesheet"/>
 
</head>
<body>
 
  <!-- Ionic's root component and where the app will load -->
  <ion -app></ion>
 
  <!-- The polyfills js is generated during the build process -->
  <script src="build/polyfills.js"></script>
 
  <!-- The bundle js is generated during the build process -->
  <script src="build/main.js"></script>
 
</body>
</html>

This file has some minimal configurations and links to some JavaScript library files. Ionic 2 application looks for ion-app tag present inside the body of index.html to kick-start the visuals of the project.

config.xml (located at the root of the project)

<?xml version="1.0" encoding="UTF-8" standalone="yes"?>
<widget id="com.technotip.radio" version="0.0.1" 
        xmlns="http://www.w3.org/ns/widgets" 
        xmlns:cdv="http://cordova.apache.org/ns/1.0">
  <name>Radio</name>
  <description>Internet radio streaming live ..</description>
  <author email="[email protected]" href="https://technotip.com/">SATISH</author>
 .
 .
 .
 .
</widget>

Using this file we can configure the display mode and other such things of the device for our application. We can also set the app name, description. author email id, name and the URL. We can set the id of the application which’ll be shown in the URL of the playstore once your app has been uploaded to the playstore. We have a radio application in the playstore which has an id com.technotip.radio You can visit our Radio Application and check the URL.

package.json (located at the root of our application)
This file has the list of our dependencies and plugins our application is using. It gets updated automatically when we install new plugins.

Important: Keep in mind that, whenever you are using any page component or data services in any of your project files, make sure to import it first. Also make sure to register its existence by importing it in src/app/app.module.ts file and listing it in specific sections which it belongs to.

Ionic 2 Starter Templates

Ionic 2 comes with some starter templates which saves us a lot of time and effort.

Video Content
Today lets learn:
1. How to install ionic framework via ionic CLI (Command Line Interface) utility.
2. Install ionic 2 templates such as blank, tutorial/sidemenu, tabs(default ionic 2 template).
3. Run each project and check how each template looks.

Related Read:
Getting Started With IONIC APP
(Go through above link without fail)

Ionic Logo

Requirement

Ionic CLI (Command Line Interface) utility.
Node.js version 6 or higher: Download Nodejs
XCode for iOS: Cordova iOS Platform Guide
Android Studio for Windows: Cordova Android Platform Guide

Related Read:
Node.js Video Tutorial List

Troubleshooting

If you already had older version of Ionic and cordova installed, then make sure to uninstall them first

npm uninstall -g ionic cordova

Then make sure you’ve latest version of node.js installed.

Now install ionic and cordova globally using by logging in as a root user / system admin

npm install -g ionic cordova

My System Info, for this tutorial

ionic info

Cordova CLI: 6.1.1
Gulp version: CLI version 3.9.0
Gulp local:
Ionic CLI Version: 2.1.0
Ionic App Lib Version: 2.1.0-beta.1
OS: Windows 10
Node Version: v6.7.0

Video Tutorial: Starting IONIC 2 Project


[youtube https://www.youtube.com/watch?v=AcEY_bS37SU]

YouTube Link: https://www.youtube.com/watch?v=AcEY_bS37SU [Watch the Video In Full Screen.]


Installing CLI
Open command prompt and type the following command to install latest Ionic CLI

npm install -g ionic cordova

Ionic 2 apps are created and developed primarily through the Ionic CLI utility and use cordova to build and deploy as a native app.

Remember, Ionic CLI and Ionic framework are two different things. Ionic CLI is a utility which provides bunch of tools through the command line to help create and manage your Ionic project.

Important: The Ionic CLI will handle downloading the actual Ionic framework onto your machine for each project you create.

Ionic Starter templates

List of templates

ionic start -l

OR

ionic start -list

Output

blank — A blank starter project for Ionic.
complex-list — A complex list starter template.
maps — An Ionic starter project using Google Maps and a side menu.
salesforce — A starter project for Ionic and Salesforce.
sidemenu — A starting project for Ionic using a side menu with navigation in the content area.
tabs — A starting project for Ionic using a simple tabbed interface.

But to my surprise some of these templates aren’t working. Ionic team might fix these or remove some of the templates in future release of ionic 2 framework. In this tutorial I’m showing blank, tutorial/sidemenu and tabs templates.

Note: Ionic uses tabs template as its default template.

Starting Ionic Project

ionic start is the command to start an Ionic project, followed by project name, followed by template name(if not specified, tabs template will be installed), followed by version of Ionic framework to be installed.

Note: Here myApp1, myApp2, myApp3 are my project names.
myApp1 has blank template.
myApp2 has tutorial or sidemenu template.
myApp3 has tabs template.

Blank Template

ionic start myApp1 blank --v2

Tutorial or Side Menu Template

ionic start myApp2 tutorial --v2

OR

ionic start myApp2 sidemenu --v2

Tabs Template

ionic start myApp3 tabs --v2

OR

ionic start myApp3 --v2

Launching Project in Web Browser

Get into the projects folder before using the command ionic serve or else it’ll through errors:

C:\ionic2>ionic serve

Couldn’t find ionic.config.json file. Are you in an Ionic project?

So first get into project folder and then run the project

C:\ionic2>cd myApp1
C:\ionic2\myApp1>ionic serve -l

We can see how our project looks via web browser. With labs feature we can see how our project looks on each platform – iOS, android and Windows.

ionic serve -l

-l is supplied to ionic serve command to invoke labs feature.

Ionic grid system

Today lets play with Ionic grid system – it’s built with CSS Flexible Box Layout Module standard, hence it supports all the devices which ionic supports.

Topics Covered
1. Basics of row, column
2. even spacing of column
3. explicit column sizing
4. column offset
5. column positioning
6. row positioning – Going vertical
7. responsive grid

Getting started
To get started from scratch, please visit Getting Started With IONIC APP. Get your IONIC app template ready and continue with this video tutorial.

Software Versions used for the demo
1. Node: v4.2.6
2. Cordova: 6.0.0
3. Ionic: 1.7.14
4. android: Android 6.0 (API level 23)
5. OS: Demo showed on Windows 10 Operating System.

I’ve installed ionic tabs template and am editing tab-dash.html file inside www/templates folder.


[youtube https://www.youtube.com/watch?v=IYw0n9hEqMg]

YouTube Link: https://www.youtube.com/watch?v=IYw0n9hEqMg [Watch the Video In Full Screen.]


Basics of row and column

    <span class="row">
       <div class="col">.col</div>
       <div class="col">.col</div>  
    </span>

rows are specified with class row and columns with class name col

Even spacing of columns

    <span class="row">
       <div class="col">.col</div>
       <div class="col">.col</div>  
       <div class="col">.col</div>  
       <div class="col">.col</div>  
       <div class="col">.col</div>  
    </span>

In above example all columns take up 20% of space depending on the screen width of the device. i.e., 100/5 = 20. There are 5 columns.

Explicit column spacing

    <span class="row">
       <div class="col col-50">.col-50</div>
       <div class="col">.col</div>  
       <div class="col">.col</div>  
    </span>

Here the first column takes 50% of the width and the other 2 columns share the width equally i.e., 25% each.

Column offset

    <span class="row">
       <div class="col col-offset-25 col-25">.col-25</div>
       <div class="col col-25">.col-25</div>  
       <div class="col col-25">.col-25</div>  
    </span>

Above code leaves 25% offset at the beginning, then a column of width 25% followed by 2 more columns of 25% width.

Column positioning

    <span class="row">
       <div class="col col-top">.col-top</div>
       <div class="col col-center">.col-center</div>  
       <div class="col col-bottom">.col-bottom</div>  
       <div class="col">
        1 <br />2 <br />3 <br />4
       </div>
    </span>

The first column aligns itself to the top, the second one to the center and the last one to the bottom.

Row positioning – Going vertical

    <span class="row row-center">
       <div class="col">.col</div>
       <div class="col">.col</div>  
       <div class="col">.col</div>  
       <div class="col">
        1 <br />2 <br />3 <br />4
       </div>
    </span>

row-center class makes the row align itself to the center, row-top makes it align itself to the top and row-bottom makes row to align itself to the bottom.

responsive grid

    <span class="row responsive-sm">
       <div class="col">.col</div>
       <div class="col">.col</div>  
       <div class="col">.col</div>  
    </span>

You can see its effect only on real devices. You must test it with real devices having different screen size.

responsive-sm for devices smaller than landscape.
responsive-md for devices smaller portrait tablet.
responsive-lg for devices smaller than landscape tablet.

UI
Using this simple ionic grid system we can make our applications User Interface to suit our applications needs.

Further ..
For further configuration, each class uses a Sass variable that can be changed to your liking. There’s also a responsive-grid-break mixin you can use to create your own grid classes.