Insert And Extract/Fetch Data From Database: PHP Script

What to expect ?
Using PHP script insert user entered data/information into database and extract/fetch data stored in database and display it on the browser.
This video tutorial also teaches the MySQL queries.

In this video tutorial we have used a readymade form which uses POST method to pass the user entered information. To watch the coding/designing of this form go to POST Method In Action: Simple Form

Video Tutorial: Insert And Extract/Fetch Data From Database: PHP Script


[youtube https://www.youtube.com/watch?v=4oViKzEDiMo]

YouTube Link: https://www.youtube.com/watch?v=4oViKzEDiMo [Watch the Video In Full Screen.]


MySQL Commands and Uses

mysql > drop database abc;

This command will delete the database by name abc, if its already present.

mysql > create database abc;

This MySQL command creates a new database by name abc.

mysql > use abc;

After creating the database abc, we must tell the console that we want to operate on the newly created database. i.e., use abc;

mysql > create table bbc(name varchar(15), company varchar(20));

This MySQL command is used to create a table by name bbc with two string type data fields name and company with character length of 15 and 20 respectively.

mysql > desc bbc;

This shows the description or the structure of the table.

mysql > select * from bbc;

This returns all the contents stored in the table bbc.

PHP Script

Connecting the PHP Script to database

<?php
    $conn = mysql_connect("localhost","root","");
    $db   = mysql_select_db("abc",$conn);
?>

mysql_connect() is a standard function which takes 3 parameters. First parameter is host name, second parameter is the MySQL username, and the 3rd parameter is the MySQL password.
mysql_select_db() is also a php standard function. Firs parameter is the database name, with which you want the script to be connected to, and the second parameter is optional.
NOTE: We can put this database connection code inside a separate file and include it inside whichever script we want using include(); or include_once(); function. This way we can reduce the coding and this helps a lot while we are editing this information.

Compete Source Code

postform.php

<html>
 <head><title>POST Method in Action</title></head>
 <body>
<form action="post.php" method="post">
Name <input type="text" name="user"><br />
Company<input type="text" name="comp"><br />
<input type="submit" value=" Submit Info">
</form>
 </body>
</html>

This is a simple form which contains 2 input fields(user and comp) and a submit button. It uses POST method to pass the user submitted information/data.

post.php

<?php
    $conn = mysql_connect("localhost","root","");
    $db      = mysql_select_db("abc",$conn);
?>

<?php

    $name       =     $_POST['user'];
    $company =    $_POST['comp'];

    # echo "My name is $name 
And I'm the CEO of my company {$company}" $sql = "INSERT into bbc values('$name','$company')"; $qury = mysql_query($sql); if(!$qury) echo mysql_error(); else { echo "Successfully Inserted"; echo "View Result"; } ?>

After storing the information passed by the user inside $name and $company variables, we use the MySQL query to store this data into the database.

   $sql     = "INSERT into bbc values('$name','$company')";

This MySQL query is stored into $sql variable and is passed to a standard PHP function for execution. i.e., mysql_query($sql);
Based on the result of the execution of the query, we show the proper messages using if statement.

mysql_error() is a standard PHP error function. This helps a lot in development stage, as it shows a descriptive error message. It is not advised to have this error function in the script at deployment stage.

show.php
If the query is executed successfully, a link to show.php file is shown and a “Successfully Inserted” message will be displayed on the browser.

<?php
    $conn = mysql_connect("localhost","root","");
    $db      = mysql_select_db("abc",$conn);
?>

<?php

    echo "<ul>";
    $sql = "select * from bbc";

    $qury = mysql_query($sql);

    while($row = mysql_fetch_array($qury))
        echo "<li>Name: $row[0]</li><li>Company: $row[1]</li>";

    echo "</ul>";
?>

We have already explained the select query above.

$row = mysql_fetch_array($qury)

This PHP function gets all the result stored in $query and stores it inside $row variable in the form of an array.

If we put this above statement inside a While loop, the loop terminates once there are no more elements in the $query variable.

Now, echo/print the contents of the $row variable to get the contents being fetched by the database using SELECT query.

We can either use the indexing like: $row[0], $row[1] etc or we can directly mention the database field names to reduce confusion i.e., $row[name], $row[company] etc.
POST Method In Action: Simple Form

This Basic PHP tutorial illustrates the usage of POST method, with the help of a simple HTML form. It echo’s/print’s the user entered information on to the browser by passing it via POST method.

If you are sending sensitive information like credit card number or your password, then make sure to use POST method. If you use GET method, it will reveal all the information in the address bar. With POST method, the parameters are not shown and hence not visible for people who might be stalking you!

Source Code: POST Method In Action: Simple Form

We have purposefully kept this example super simple, as this is a basic thing in PHP and complex things may confuse beginners.

postform.php

<html>
 <head><title>POST Method in Action</title></head>
 <body>
<form action="post.php" method="post">
Name <input type="text" name="user"><br />
Company<input type="text" name="comp"><br />
<input type="submit" value=" Submit Info">
</form>
 </body>
</html>

This is a simple form which contains 2 input fields(user and comp) and a submit button. Observe the method used: its POST method.
We have given unique name to each input fields, so that the values are passed to the post.php

post.php

<?php
 
$name       =  $_POST['user'];
$company  =   $_POST['comp'];
 
echo "My name is $name <br /> And I'm the CEO of my company {$company}";
 
?>

This is the actual file where the action takes place. All the information is passed on to post.php via postform.php file. Using $_POST[] we receive the values and store it in the local variables. Using the values in these local variables we can do whatever we want to do: like print it on the browser(as we do in this tutorial), insert it into database etc.

Video Tutorial: POST Method In Action: Simple Form


[youtube https://www.youtube.com/watch?v=XrX02OSbPt4]

YouTube Link: https://www.youtube.com/watch?v=XrX02OSbPt4 [Watch the Video In Full Screen + HD]


Advantages of using POST method over GET method

The POST method does not have any restriction on data size to be sent.
The POST method can be used to send ASCII as well as binary data.
The data sent by POST method goes through HTTP header so security depends on HTTP protocol. By using Secure HTTP you can make sure that your information is secure.

GET Method In Action: Simple Form

This Basic PHP tutorial illustrates the usage of GET method, with the help of a simple HTML form. It echo’s/print’s the user entered information on to the browser by passing it via GET method.
It also tells one big advantage of GET method over POST method.

Source Code
We have purposefully kept this example super simple, as this is a basic thing in PHP and complex things may confuse beginners.

Source Code: GET Method In Action: Simple Form

getForm.php

<html>
 <head><title>Form using GET method</title></head>
 <body>
<form action="get.php" method="get">
Name <input type="text" name="uname"><br />
Age    <input type="text" name="age"><br />
<input type="submit" value="Submit Info">
</form>
 </body>
</html>

This is a simple form which contains 2 input fields and a submit button. Observe the method used: its GET method.
We have given unique name to each input fields, so that the values are passed to the get.php

get.php

<?php
 
$name = $_GET['uname'];
$age     = $_GET['age'];
 
echo "Name is $name <br /> Age is $age";
 
?>

This is the actual file where the action takes place. All the information is passed on to this file via getForm.php file. Using $_GET[] we receive the values and store it in the local variables. Using the values in these local variables we can do whatever we want to do: like print it on the browser(as we do in this tutorial), insert it into database etc.

Video Tutorial: GET Method In Action: Simple Form


[youtube https://www.youtube.com/watch?v=3zmH6zXyrx8]

YouTube Link: https://www.youtube.com/embed/3zmH6zXyrx8 [Watch the Video In Full Screen + HD]


Advantages of using GET method over POST method

One of the biggest advantage of using GET method is, we can send the URL in the address bar to a friend over email as it contains the name and associated value in the URL. But in post method, you will neither get the name nor the value in the address bar, hence you can’t send it over to any one. If you still send, it may not make any sense!

Ex: You Google for the term “technotip”. Copy the URL in the address bar and can send it to your friend. Many bookmarking sites use GET method, because users must be able to copy and paste the url and pass it on to their friends. If they used POST method, then its of no use to send the url, since the URL before and after querying remains same!

WordPress Username & Password For Your Application Login

Today we shall learn a simple method of using Self Hosted WordPress’s Credentials(username and password) to log into your custom application..

You may ask, “Well, why we should use this?”
The reason is, because WordPress is an opensource script which is constantly improving and has a strong security. And this approach provides easy integration of our custom application with WordPress.

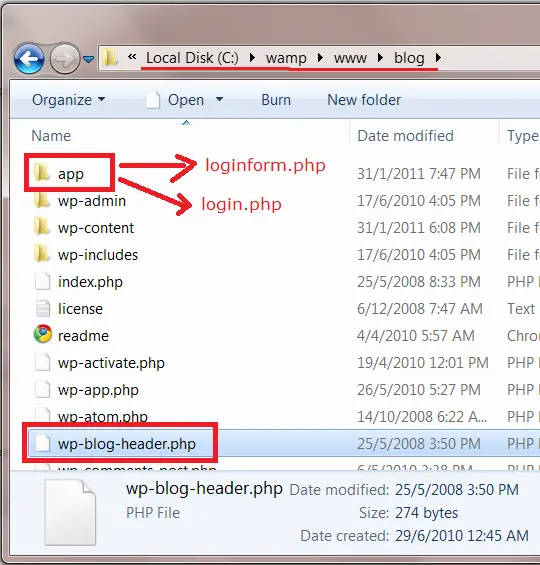
In this tutorial we are using a simple login form(loginform.php) wherein our custom application’s users enter their username and password, which is sent to login.php file, where it is passed on to a standerd WordPress function for processing. Based on the result returned by this function, we decide the success and failure of user login.

WordPress-Custom-Application

Source Code: WordPress Username & Password For Your Application Login

(loginform.php)

 
<html>
 <head>
  <title>User Login Form</title>
 </head>
 <body>
<form action="login.php" method="post">
Username: <input type="text" name="txtuid"><br />
Password:  <input type="password" name="txtpwd"><br />
<input type="submit" value=" LogIn ">
  </form>
 </body>
</html>

This is simple HTML login form with two input fields, each having unique names to it. We are using post method here, as we will be passing sensitive information i.e., password.

login.php

<?php require('..\wp-blog-header.php'); ?>
 
<?php
 
  $uid = $_POST['txtuid'];
  $pwd = $_POST['txtpwd'];
 
  if(!user_pass_ok( $uid, $pwd ))
    echo "Login Failed!";
  else
   echo "Welcome {$uid}!!";
 ?>

We MUST include wp-blog-header.php file into our login.php file. wp-blog-header.php is a core WordPress file found in the root of the WordPress installation.
user_pass_ok() is a standard WordPress function which takes a minimum of two arguments. One is username and the other is password.
Once we pass these parameters to this function, it checks for the username and password combination in the WordPress’s database and returns true if present and false if not present. Based on this result we authenticate the user.

If user_pass_ok($username, $password) returns true, then the username and password combination passed is present in the WordPress database, hence login successful. If it returns false, then the username and password combination passed is NOT present in the WordPress database, hence login failed.

Video Tutorial: WordPress Username & Password For Your Application Login


[youtube https://www.youtube.com/watch?v=uSRkv2jfPG0]

YouTube Link: https://www.youtube.com/watch?v=uSRkv2jfPG0 [Watch the Video In Full Screen.]


At the time of recording this video, we have WordPress 3.0.4 as the latest version. The above tutorial works for all the versions of WordPress 3.0.4 and below. We don’t know when WordPress folks will change this method of authentication in future versions of WordPress.

Please share any such WordPress techniques you know, in the comment section.

Develop User Signup and Login forms: PHP & MySQL

PHP & MySQL tutorial to develop signup form and store user information in a database and using signin or login form we compare for the correct username and password combination in our database. We also use session and demonstrate session_start(), session_unset(), session_destroy().

php-login-session

This tutorial is very important for any of your projects where you want to implement authentication: user signup and signin. So this is a crucial part of your online application. So better spend some time to understand the working. Watch the video and try to code on your own. And please make sure to contribute back to the community by commenting and sharing what you have learnt, in the comment section below.

Video Tutorial: Develop User Signup and Login forms: PHP & MySQL


[youtube https://www.youtube.com/watch?v=mn0ucCuNOTI]

YouTube Link: https://www.youtube.com/watch?v=mn0ucCuNOTI [Watch the Video In Full Screen.]


In this tutorial we are using MySql database, PHP, and some HTML coding to design the forms.

Complete Source Code and Explanation:

For Database connectivity:(db.php)

<?php
     $conn = mysql_connect("localhost","root","");
     $db   = mysql_select_db("technotip",$conn);
?>

Instead of writing the database information again and again, we have moved this to one file(db.php) and call/include that file in all the scripts which needs to connect with the database.
Here localhost is the hostname. In 95% of the time the hostname will be localhost. If you are using a grid based hosting service, then it will be your grid number followed by .gridserver.com ex: xxxx.gridserver.com

We are using localhost, root is its username. We do not have any password, so we have left the next field blank.

Next line of code is to select the database present in our localhost. Here we have created a database called technotip. Below is the MySQL syntax to create the database.
Creating Database:

mysql> create database technotip;
mysql> use technotip;

First line of code is to create the database, and the next line is to start making use of the created database.

Table Creation:

mysql> CREATE table phplogin( id int, username varchar(15), password varchar(20));

To keep things simple, we are creating only 3 fields in the table: id, username, password.

To Check the table description/structure:

mysql> desc phplogin;

To see the table entries:

mysql> SELECT * from phplogin;

A Form for People To SignUp(signupform.php)

 
 <html>
        <form action="signup.php" method="post">
              Username:<input type="text" name="n"><br />
              Password:<input type="password" name="p"><br />
              id      :<input type="text" name="id"><br />
              <input type="submit">
        </form>
 </html>

In signupform.php we are using post method, because we will be using password and it should not be shown in the address bar of the user!
Let the name for each input field be unique, as we will be using this to receive the user input data in another file which is pointed by form action.

GET v/s POST method
The GET method produces a long string that appears in your server logs and in the browser’s address bar.
The GET method is restricted to send upto 1024 characters only.
Never use GET method if you have password or other sensitive information to be sent to the server.
GET can’t be used to send binary data, like images or word documents, to the server.
The data sent by GET method can be accessed using QUERY_STRING environment variable.

The POST method does not have any restriction on data size to be sent.
The POST method can be used to send ASCII as well as binary data.
The data sent by POST method goes through HTTP header so security depends on HTTP protocol. By using Secure HTTP you can make sure that your information is secure.

signup.php file

<?php include_once("db.php"); ?>
 
<?php
           $user = $_POST['n'];
           $pass = $_POST['p'];
           $id = $_POST['id'];
        #$sql = "INSERT into phplogin values(".$id.",'".$user."','".$pass."')";
          $sql = "INSERT into phplogin values($id,'$user','$pass')";
           $qury = mysql_query($sql);
 
        #  INSERT into phplogin values(
        #   1,
        #   'satish',
        #   'satish');
 
        if(!$qury)
        {
                  echo "Failed ".mysql_error();
                  echo "<br /><a href='signupform.php'>SignUp</a>";
                  echo "<br /><a href='signinform.php'>SignIn</a>";
        }
        else
        {
                  echo "Successful";
                  echo "<br /><a href='signupform.php'>SignUp</a>";
                  echo "<br /><a href='signinform.php'>SignIn</a>";
        }
?>

Using include_once(), we are including the file db.php By including this file, we automatically get connected to the database.
We use $_POST because we have used post method in signupform.php form.
We can use either of the two MySQL query to insert the values into our table phplogin.

       $sql = "INSERT into phplogin values(".$id.",'".$user."','".$pass."')";
                                   OR
       $sql = "INSERT into phplogin values($id,'$user','$pass')";

Integer values need not be enclosed within single quotes, but the string variables(and values) must be enclosed within single quotation mark.

mysql_query() is used to execute the query. You can directly pass the query as parameter to this standard PHP function.
Based on the result of execution of above query we display a “Success” or “Failure” message and display some HTML links for further navigation.

Login Form: (signinform.php)

 
<html>
       <form action="signin.php" method="post">
              username: <input type="text" name="name"><br />
              password: <input type="password" name="pwd"><br />
              <input type="submit">
       </form>
</html>

This is same as signupform.php form, with minor modification to the input field. And the form action is pointing to signin.php file. Here also we are using post method.

signin.php

<?php 
 
  include_once("db.php"); 
  session_start();
 
?>
 
<?php
 
     $uname = $_POST['name'];
     $pass = $_POST['pwd'];
 
     $sql = "SELECT count(*) FROM phplogin WHERE(
     username='".$uname."' and  password='".$pass."')";
 
 
#     SELECT count(*) FROM phplogin WHERE(
#     username='$uname' and  password='$pass');
 
      $qury = mysql_query($sql);
 
      $result = mysql_fetch_array($qury);
 
      if($result[0]>0)
      {
        echo "Successful Login!";
        $_SESSION['userName'] = $uname;
        echo "<br />Welcome ".$_SESSION['userName']."!";
        echo "<br /><a href='signupform.php'>SignUp</a>";
        echo "<br /><a href='signinform.php'>SignIn</a>";
        echo "<br /><a href='logout.php'>LogOut</a>";
      }
      else
      {
        echo "Login Failed";
        echo "<br /><a href='signupform.php'>SignUp</a>";
        echo "<br /><a href='signinform.php'>SignIn</a>";
      }
?>

First we include the db.php inorder to connect to the database, so that we can compare the user entered credentials with the actual username and password present in our database.
Here we are also starting the session. session_start() is the start call for the session and is a mandatory step, if you want to use session in any of your PHP script.

   $sql = "SELECT count(*) FROM phplogin WHERE(
     username='".$uname."' and  password='".$pass."')";

Using above MySQL query, we pass the user submitted username and password to our table and check if there is any presence of such combination of username and password. If the result is 1, then the username and password combination is present. If it returns 0, then there are no such a combination of username and password in the database: that means, login failed.

So, according to the result obtained we display the message and further give some links for navigation purpose.

If the login is successful, then we create a session variable with name userName and then assign the username to it.

        $_SESSION['userName'] = $uname;
        echo "Welcome ".$_SESSION['userName']."!";

and we display Welcome userName! message, which looks like a customized welcome for each person who logs in successfully.
Once the user is logged in successfully, we provide a link to log out. Which is explained after the below snippet of code.

Logout (logout.php)

<?php
 
session_start(); # Starts the session
 
session_unset(); #removes all the variables in the session
 
session_destroy(); #destroys the session
 
if(!$_SESSION['userName'])
   echo "Successfully logged out!<br />";
else
    echo "Error Occured!!<br />";
 
?>

Above code is to illustrate a simple way of working of session.

session_start(); # To Start the session

session_unset(); # Unsets/Removes all the variables in the session

session_destroy(); # Destroys the session

To demonstrate whether the logout process has removed/destroyed the set session variable, we have used the if statement, where in we check if the session variable is set or not. If still set, then the logout process isn’t working. If the session variable is destroyed/unset, then the logout successful message is displayed.

   if(!$_SESSION['userName'])
        echo "Successfully logged out!
";
    else
         echo "Error Occurred!!
";

In above tutorial we have taken much time to link to signup and signin forms, this may look trivial; but in practice these are very important for better user experience and usability factor. So make sure you provide options for your users so that they can do something when they are landed on a page. If the page is empty and there are no links to navigate, then the user may get puzzled! Instead, if you have links to the profile and a log out link, then the user can choose, where to go next.

Please share the above video tutorial with your friends on Facebook, Twitter etc, and subscribe to our blog and YouTube channel. All the best for your application development. We are excited and eager to hear about your application development in the comment section.