Simple Animation using Canvas: HTML5

Today lets see how we can do simple animation using Canvas.

moving-circle-animation-canvas-html5

Demo

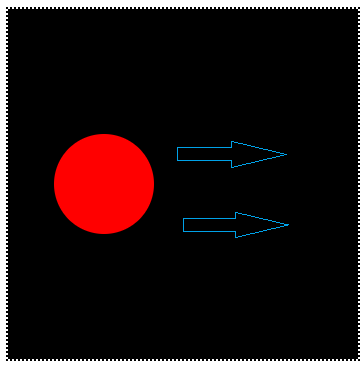
Here we draw a circle and move it from starting point of x-axis to the end of the canvas.

index.html and myStyle.css file content are same as Linear Gradients in Canvas: HTML5

JavaScript file: Moving Circle Code
myScript.js

1
2
3
4
context.beginPath();
context.fillStyle = "red";
context.arc(x++, context.canvas.height/2, r, 0, 2 * Math.PI);
context.fill();

Here I’m drawing a circle with a red fill and incrementing it’s x-axis value each time it is called.

JavaScript file: x-axis movement control
myScript.js

1
2
3
4
5
var r = 50;
var x = -r;
 
if( x >= context.canvas.width + r)
    x  = -r;

Here the x-axis value is tracked each time and is set back to -50 ( minus radius of the circle ) once the circle moves out of the x-axis or the canvas width.

Simple Animation using Canvas: HTML5


[youtube https://www.youtube.com/watch?v=iyGQhumPgcc]

YouTube Link: https://www.youtube.com/watch?v=iyGQhumPgcc [Watch the Video In Full Screen.]


JavaScript file: Full Free Source Code
myScript.js

1
2
3
4
5
6
7
8
9
10
11
12
13
14
15
16
17
18
19
20
21
22
23
24
25
26
window.onload = canvas;
 
function canvas()
{
var myCanvas = document.getElementById("myCanvas");
 
if( myCanvas && myCanvas.getContext("2d") ) 
{
var context         = myCanvas.getContext("2d");
var r = 50;
var x = -r;
 
setInterval(function(){
context.fillStyle   = "#000";
context.fillRect(0, 0, context.canvas.width, context.canvas.height);
 
context.beginPath();
context.fillStyle   = "red";
context.arc(x++, context.canvas.height/2, r, 0, 2 * Math.PI);
context.fill();
 
if( x >= context.canvas.width + r)
    x  = -r; 
}, 10);
}
}

Here we use the setInterval() method to iterate/loop through the anonymous function and each time the background of the canvas is set to black(#000 or #000000) by drawing a black rectangle across the entire canvas width and height. For every call the value of x increments by 1, hence the circle moves 1px away from its previous position, until it reaches the end of canvas – after which it is reset back to -r value.

Rotate Transformation in Canvas: HTML5

Today lets learn about rotate transformation. And also lets see how we can use translate transformation and rotate transformation to create simple animation.

Recommended Read:
Translate Transformation in Canvas: HTML5
Scale Transformation in Canvas: HTML5

rotate transformation canvas html5

Demo

Syntax
rotate(angleInRadians);
The rotate() transformation causes the subsequent drawing operations to be rotated by a given angle. Note that the angles are in radian and not in degrees. Also the rotation takes place around the current origin and not with respect to the center of the object or the element drawn.

index.html and myStyle.css file content are same as Linear Gradients in Canvas: HTML5

JavaScript file: Rotate Transformation On a rectangle
myScript.js

1
2
3
4
5
6
7
8
9
10
11
12
13
14
15
16
17
window.onload = canvas;
 
function canvas()
{
var myCanvas = document.getElementById("myCanvas");
 
if( myCanvas && myCanvas.getContext("2d") ) 
{
var context         = myCanvas.getContext("2d");
 
context.fillStyle   = "blue";
                context.fillRect(150, 50, 100, 50);
                context.rotate(0.5);
                context.fillRect(150, 50, 100, 50);
 
}
}

Here we take 2 rectangles with same x and y axis and same width and height. For second rectangle we apply a rotation of 0.5 radians. With this you can see that the rotation takes place with respect to the origin of the canvas, which is (0, 0).

JavaScript file: Rotate Transformation On a Circle
myScript.js

1
2
3
4
5
6
7
8
9
10
11
12
13
14
15
16
17
18
19
20
21
22
23
24
25
26
27
window.onload = canvas;
 
function canvas()
{
var myCanvas = document.getElementById("myCanvas");
 
if( myCanvas && myCanvas.getContext("2d") ) 
{
var context         = myCanvas.getContext("2d");
 
var rdl             = context.createRadialGradient(175, 175, 25, 175, 175, 100);
rdl.addColorStop(0.0, "#f00"); //RED
rdl.addColorStop(0.5, "#00f"); //BLUE
rdl.addColorStop(1.0, "#0f0"); //Green
 
 
setInterval(function(){
context.beginPath();
context.fillStyle  = rdl;
context.arc(175, 175, 100, 0, 2 * Math.PI);
context.fill();
context.translate(175, 175);
context.rotate(2);
}, 50);
 
}
}

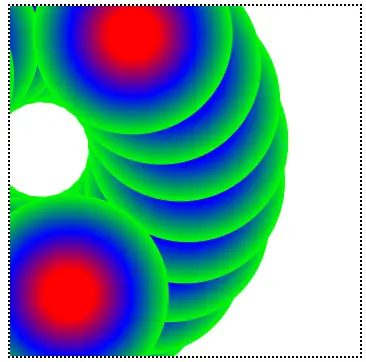
Here we draw a radialgradient and rotate it with 2 radians with a time interval of 50 milliseconds. Before we rotate the circle we change the origin of the canvas to 175px x-axis and 175px y-axis, so that the rotation takes place with respect to the point (175, 175).

Rotate Transformation and Animation in Canvas: HTML5


[youtube https://www.youtube.com/watch?v=U3v5J-fOeV0]

YouTube Link: https://www.youtube.com/watch?v=U3v5J-fOeV0 [Watch the Video In Full Screen.]


Note:
We convert degree to radian using a simple mathematical formula:
Radian = (PI / 180 ) * degree;

While developing moving objects in our applications(like online games applications), we need not remember lot of locations/points on the canvas to move our element, instead, we can change the origin of the canvas using translate transformation and move the elements or rotate them!

Animation of Text and Image: jQuery

Video tutorial to illustrate animation of text and image using jQuery.

In this tutorial, we accomplish:
Animation of text: using animate method.
Display of hidden image: using fadeIn method.
Toggle of image: using slideToggle method.
Change the color of the text being animated: using jQuery’s css method.

xHTML code

1
2
3
4
5
6
7
8
9
10
11
12
13
14
<html>
 <head><title>jQuery Basics</title>
 </head>
 <body>         <button id="top">Move Top</button>
                <button id="down">Move Down</button>
                <button id="blue">Blue Coloring!</button>                
                <button id="img_show">Show Image</button>
 
               <div id="move">jQuery is awesome!</div>
               <img src="https://technotip.com/logo.png"/>
 
 
 </body>
</html>

Here we have 4 buttons, 1 div tag which contains some string in it, and 1 image tag.
Each button has its own unique ID, which is referenced to track user click event.

CSS code

1
2
3
4
5
6
7
8
9
10
11
12
13
14
15
  <style type="text/css">
    #move{
      position: absolute;
      top: 200;
      left: 400;
    }
    img {
      display: none;
      padding: 10px;
      position: absolute;
      top: 100;
      left: 400;
 
    }
  </style>

Using Cascading Stylesheet we position the string present in div tag and the image conveniently on our web page.

jQuery
Move Top

1
2
3
4
5
6
7
$(document).ready( function() {
 
    $("#top").click( function() {
       $("#move").animate({top: 30}, 200);
     });
 
});

Once the #top button is clicked, the string inside div tag(which has move as its id), moves upwards leaving 30px from top of the document and 200px from left.

Move Down

1
2
3
4
5
6
7
$(document).ready( function() {
 
    $("#down").click( function() {
       $("#move").animate({top: 200}, 200);
     });  
 
});

Once the #down button is clicked, the string inside div tag(which has move as its id), moves down leaving 200px from top of the document and 200px from left.

Changing CSS property/value using jQuery

1
2
3
4
5
6
7
$(document).ready( function() {
 
 $("#blue").click( function() {
        $("#move").css("color", "blue");
     });
 
});

Once the #blue button is clicked, the color of string inside div tag(which has move as its id), changes to blue.
.css() method takes 2 parameters, first one being css property and the second one its value.

Toggle image with sliding effect

1
2
3
4
5
6
7
$(document).ready( function() {
 
   $("#img_show").click( function() {
       $("img").slideToggle("slow");
     });
 
});

Once the #img_show button is clicked, the image slides and toggles with slideIn and slideOut effect.

Image appears on the web page with fadeIn effect

1
2
3
4
5
6
7
$(document).ready( function() {
 
   $("#img_show").click( function() {
       $("img").fadeIn("slow");
     });
 
});

Once the #img_show button is clicked, the hidden image fades into the web page.
The image is hidden with the help of css.

Video Tutorial: Animation of Text and Image: jQuery


[youtube https://www.youtube.com/watch?v=1nDGjCrfvrU]

YouTube Link: https://www.youtube.com/watch?v=1nDGjCrfvrU [Watch the Video In Full Screen.]


Full code

1
2
3
4
5
6
7
8
9
10
11
12
13
14
15
16
17
18
19
20
21
22
23
24
25
26
27
28
29
30
31
32
33
34
35
36
37
38
39
40
41
42
43
44
45
46
47
48
49
50
51
52
53
54
55
56
57
58
59
60
61
62
<html>
 <head><title>jQuery Basics</title>
 
  <script src="script/jquery-1.8.1.min.js"></script>
  <script type="text/javascript">
 
   $(document).ready( function() {
 
 
     $("#top").click( function() {
       $("#move").animate({top: 30}, 200);
     });
 
     $("#down").click( function() {
       $("#move").animate({top: 200}, 200);
     });     
 
     $("#img_show").click( function() {
       $("img").slideToggle("slow");
     });
 
     $("#blue").click( function() {
        $("#move").css("color", "blue");
     });
 
     $("#txt_toggle").click( function() {
        $("#move").slideToggle("slow");
     });
 
   });
 
  </script>
 
  <style type="text/css">
    #move{
      position: absolute;
      top: 200;
      left: 400;
    }
    img {
      display: none;
      padding: 10px;
      position: absolute;
      top: 100;
      left: 400;
 
    }
  </style>
 
 </head>
 <body>         <button id="top">Move Top</button>
                <button id="down">Move Down</button>
                <button id="txt_toggle">Text Toggle</button>
                <button id="blue">Blue Coloring!</button>                
                <button id="img_show">Show Image</button>
 
               <div id="move">jQuery is awesome!</div>
               <img src="https://technotip.com/logo.png"/>
 
 
 </body>
</html>

Watch previous day videos and you’ll understand today’s and forthcoming video tutorials easily.

Previous Day Videos:
jQuery Basics: Replace Text/String Inside HTML Document
jQuery: Selectors, Methods, Effects
jQuery: Basic Image Effects
CSS Hover Over Effect On HTML Table: pseudo class

In this tutorial we are illustrating the css hover effect using html4 table and simple css coding.

The CSS pseudo class which is used to accomplish hover over effect is:

  :hover

HTML4 Table Syntax(table.html)

1
2
3
4
5
6
7
8
9
10
11
12
13
14
15
16
17
18
19
20
21
22
23
24
25
26
27
28
29
30
31
32
<html>
 <head>
  <title>Hover Over On Table</title>
  <link type="text/css" href="style.css" rel="stylesheet">
 </head>
 <body>
<table border="1">
<thead>
<td>Apple</td>
<td>Microsoft</td>
<td>Google</td>
</thead>
<tfoot>
<td>4</td>
<td>3</td>
<td>6</td>
</tfoot>
<tbody>
<tr>
<td>2</td>
<td>2</td>
<td>3</td>
</tr>
<tr>
<td>2</td>
<td>1</td>
<td>2</td>
</tr>
</tbody>
</table>
 </body>
</html>

[If you are used to old stay table syntax, then it’s completely OK to use this CSS Hover over technique on it. It’s not mandatory to use HTML4. ]
In HTML4, table mainly contains 3 parts. thead, tfoot and tbody.

table-html4-syntax

thead represents the heading and the tfoot, the footer of the table. tbody represents the body except the head and the foot of the table.
In thead, I have taken “Apple”, “Microsoft” and “Google”.
In tfoot and tbody some random numbers for the purpose of illustration.

Just don’t try worry about these numbers, instead concentrate on the structure of the table.

  <link type="text/css" href="style.css" rel="stylesheet">

This line is very important, since it connects the HTML file and the CSS file.
This type of StyleSheet is called as external stylesheet.

Styling information of the HTML document. (style.css)

1
2
3
4
5
6
7
8
9
10
11
12
13
14
15
16
17
18
19
20
21
22
23
24
25
26
body {
font-family: verdana;
font-size: 24px;
}
 
table {
width: 400px;
}
 
thead { font-weight: bold; }
tfoot  { font-weight: bold; }
 
thead:hover { 
background-color: red; 
color: blue;
}
 
tfoot:hover {
background-color: yellow; 
color: blue;
}
 
tbody tr:hover {
background-color: green; 
color: blue;
}

Cascading Style Sheet
Here we apply all the styling property to the HTML file.

Make sure you try this :hover pseudo class with other html elements too. You can create very good user interface with the help of this simple CSS hover over effect.

Video Tutorial


YouTube Link: https://www.youtube.com/watch?v=BAk9qYQyBlY [Watch the Video In Full Screen.]


Please watch the above video tutorial in full screen.

Related:
You may also like: CSS Hover Over Effect on Lists