Simple Animation using Canvas: HTML5

Today lets see how we can do simple animation using Canvas.

moving-circle-animation-canvas-html5

Demo

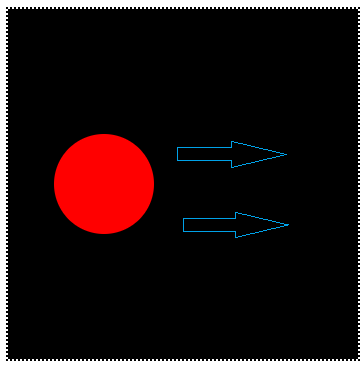
Here we draw a circle and move it from starting point of x-axis to the end of the canvas.

index.html and myStyle.css file content are same as Linear Gradients in Canvas: HTML5

JavaScript file: Moving Circle Code
myScript.js

1
2
3
4
context.beginPath();
context.fillStyle = "red";
context.arc(x++, context.canvas.height/2, r, 0, 2 * Math.PI);
context.fill();

Here I’m drawing a circle with a red fill and incrementing it’s x-axis value each time it is called.

JavaScript file: x-axis movement control
myScript.js

1
2
3
4
5
var r = 50;
var x = -r;
 
if( x >= context.canvas.width + r)
    x  = -r;

Here the x-axis value is tracked each time and is set back to -50 ( minus radius of the circle ) once the circle moves out of the x-axis or the canvas width.

Simple Animation using Canvas: HTML5


[youtube https://www.youtube.com/watch?v=iyGQhumPgcc]

YouTube Link: https://www.youtube.com/watch?v=iyGQhumPgcc [Watch the Video In Full Screen.]


JavaScript file: Full Free Source Code
myScript.js

1
2
3
4
5
6
7
8
9
10
11
12
13
14
15
16
17
18
19
20
21
22
23
24
25
26
window.onload = canvas;
 
function canvas()
{
var myCanvas = document.getElementById("myCanvas");
 
if( myCanvas && myCanvas.getContext("2d") ) 
{
var context         = myCanvas.getContext("2d");
var r = 50;
var x = -r;
 
setInterval(function(){
context.fillStyle   = "#000";
context.fillRect(0, 0, context.canvas.width, context.canvas.height);
 
context.beginPath();
context.fillStyle   = "red";
context.arc(x++, context.canvas.height/2, r, 0, 2 * Math.PI);
context.fill();
 
if( x >= context.canvas.width + r)
    x  = -r; 
}, 10);
}
}

Here we use the setInterval() method to iterate/loop through the anonymous function and each time the background of the canvas is set to black(#000 or #000000) by drawing a black rectangle across the entire canvas width and height. For every call the value of x increments by 1, hence the circle moves 1px away from its previous position, until it reaches the end of canvas – after which it is reset back to -r value.

Image Gallery using Canvas: HTML5

Lets build a simple image gallery application quickly, using HTML5’s canvas.

directory-structure-image-gallery-application-canvas-html5

Demo

index.html and myStyle.css file content are same as Linear Gradients in Canvas: HTML5

JavaScript file: Array Element
myScript.js

 var myImages  = [
'images/1.png',
'images/2.jpg',
'images/3.jpg',
'images/4.jpg',
'images/5.jpg',
'images/6.jpg',
'images/technotip.jpg'
];

We put some images inside images folder. Create an array and have the paths of all the images inside the array: myImages.

JavaScript file: Creating and Setting Image properties on the fly
myScript.js

var img  = document.createElement("img");
 img.setAttribute('width', context.canvas.width);
 img.setAttribute('height', context.canvas.height);
 img.setAttribute('src', myImages[i++]);

We create img tag on the fly by using createElement() method. And by using setAttribute() method, we set the image tag’s width, height and it’s source(i.e., src). We fetch the image path from the array myImages and loop through the array elements with the help of an index variable i.

JavaScript file: drawImage and setInterval
myScript.js

 setInterval(function(){
 img.setAttribute('src', myImages[i++]);
img.onload    = function(){
if(i >= myImages.length)
{
i = 0;
}
context.drawImage(img, 0, 0, context.canvas.width, context.canvas.height);
}
 }, 2000);

For every 2 seconds delay, the anonymous function sets the image source and checks if the index has exceeded the actual length of the myImages array, if it exceeds, we set it back to the start index 0. Now using drawImage() method, we draw the image on to the canvas.

Simple Image Gallery Application using Canvas: HTML5


[youtube https://www.youtube.com/watch?v=qvaKJFIbWuo]

YouTube Link: https://www.youtube.com/watch?v=qvaKJFIbWuo [Watch the Video In Full Screen.]


Note: If you’re using separate methods to write the setInterval() calls, then make sure the variables corresponding to canvas, context, image array and the index variables are in global scope.

JavaScript file: Full Free Code!
myScript.js

window.onload = canvas;
 
function canvas()
{
var myCanvas = document.getElementById("myCanvas");
 
if( myCanvas && myCanvas.getContext("2d") ) 
{
var context         = myCanvas.getContext("2d");
var myImages        = [
'images/1.png',
'images/2.jpg',
'images/3.jpg',
'images/4.jpg',
'images/5.jpg',
'images/6.jpg',
'images/technotip.jpg'
  ];
var img           = document.createElement("img");
var i             = 0;

 img.setAttribute('width', context.canvas.width);
 img.setAttribute('height', context.canvas.height);
 
 setInterval(function(){
 img.setAttribute('src', myImages[i++]);
img.onload = function(){
if(i >= myImages.length)
{
i = 0;
}
context.drawImage(img, 0, 0, context.canvas.width, context.canvas.height);
}
 }, 2000);
}
}

This is a simple image gallery application, and you can build upon this to give some transition effects and make it look lot cooler than this!

Accessing Raw Pixel Data in Canvas: HTML5

Today lets learn how to access individual pixel data on canvas, manipulate it and put it back on to the canvas.

accessing raw pixel data canvas html5

Important Note: Each pixel is composed of 4-bytes.

index.html and myStyle.css file content are same as Linear Gradients in Canvas: HTML5

JavaScript file: Full code
myScript.js

1
2
3
4
5
6
7
8
9
10
11
12
13
14
15
16
17
18
19
20
21
22
23
24
25
26
27
28
29
30
31
32
33
34
window.onload = canvas;
 
function canvas()
{
var myCanvas = document.getElementById("myCanvas");
 
if( myCanvas && myCanvas.getContext("2d") ) 
{
var context         = myCanvas.getContext("2d");
 
var imgSrc          = document.getElementById("img");
context.drawImage(imgSrc, 0, 0, 350, 350);
 
var image           = context.getImageData(0, 0, 350, 350);
var pixel           = image.data;
var init            = 1;
 
while(init < context.canvas.height){
for(var j = 0; j < 5; j++)
{
var row    = (init + j) * context.canvas.width * 4;
for(var i = 0; i < context.canvas.width * 4; i += 4)
{
    pixel[row + i]      = 255 - pixel[row + i]; //red
    pixel[row + i + 1]= 255 - pixel[row + i + 1]; //green
    pixel[row + i + 2]  = 255 - pixel[row + i + 2]; //blue
}
}
init += 15;
}
 
context.putImageData(image, 0, 0, 0, 0, 175, 350);
}
}

We draw an image on to the canvas using drawImage() method. Once we draw the image, we get all the raw pixel data of the image using getImageData() method. Extract it’s data property(it’s a single dimension array of raw pixel data) and store it inside a variable called pixel.

To process the image data, we proceed executing until init is lesser than the height of the canvas. Inside the while loop we calculate the current row and it’s width and iterate till the entire row pixels are manipulated. We change the values of RGB and assign it back to those pixels selected using the loop.

Once the control is out of while loop, we put back the image using putImageData() method. We also play around with the optional parameters and put back a portion of the manipulated data on to the canvas.

Manipulating Raw Pixel Data in Canvas: HTML5


[youtube https://www.youtube.com/watch?v=0K-n1NEYB7U]

YouTube Link: https://www.youtube.com/watch?v=0K-n1NEYB7U [Watch the Video In Full Screen.]


Image data access functions

createImageData(w, h); – Creates new image data with width w and height h.

createImageData(imgData); – Create new image data from an existing one.

getImageData(x, y, w, h); – Gets image data within given bounds.

putImageData(imgData, x, y); – Puts back the modified data on to the canvas.

putImageData(imgData, x, y, [Dx, Dy, Dw, Dh]); – Puts back the modified data on to the canvas, within the specified rectangle.

Compositing Methods in Canvas: HTML5

There are 12 different compositing methods in Canvas. By default, source-over is applied for all the drawing operations on canvas.

In this video tutorial, we draw 2 rectangle and show the effects of applying different compositing methods on them.

index.html and myStyle.css file content are same as Linear Gradients in Canvas: HTML5

darker compositing method canvas html5

Demo

JavaScript file: Full code
myScript.js

1
2
3
4
5
6
7
8
9
10
11
12
13
14
15
16
17
18
19
window.onload = canvas;
 
function canvas()
{
var myCanvas = document.getElementById("myCanvas");
 
if( myCanvas && myCanvas.getContext("2d") ) 
{
var context         = myCanvas.getContext("2d");
 
context.fillStyle   = "red";
context.fillRect(40, 40, 250, 100);
 
  context.globalCompositeOperation  = "darker";
 
context.fillStyle   = "blue";
context.fillRect(80, 80, 250, 100);
 }
}

Here we’ve given a value of darker to globalCompositeOperation and the result is as shown in above image. i.e., the intersection region of the two image gets darker color.

Global Composite Operation in Canvas: HTML5


[youtube https://www.youtube.com/watch?v=b9FC6i8FVRg]

YouTube Link: https://www.youtube.com/watch?v=b9FC6i8FVRg [Watch the Video In Full Screen.]


Change the value of globalCompositeOperation to see the effects, as listed in below image:

compositing methods canvas html5

There are 12 different compositing methods:
1. source-over: This is the default value. Here the new image is drawn on top of the existing elements.
2. source-in: Displays only the new element in the region where the intersection takes place.
3. source-out: New drawing shown in the area where it doesn’t overlap with the existing elements.
4. source-atop: Drawing is shown only at the place where the first/existing drawing is present.
5. lighter: The intersection region is drawn in a lighter color.
6. xor: Exclusive or composite method clears the overlapping region and displays the rest of the drawing.

7. destination-over: The older/existing elements/drawing is shown on top of the new element. That is the new element is behind the existing ones.
8. destination-in: Displays only the existing element in the region where the intersection takes place.
9. destination-out: Existing/old element/drawing shown in the area where it doesn’t overlap with the new element/image.
10. destination-atop: Drawing is shown only at the place where the new element/drawing is present.
11. darker: The intersection region is drawn in a darker color.
12. copy: older content/element/image is removed and only the new content/element is shown.

globalAlpha and RGBa in Canvas: HTML5

Today lets learn about globalAlpha and rgba properties of Canvas.

Lets draw 2 rectangle and apply rgba and see how it’ll be affected by globalAlpha setting.

index.html and myStyle.css file content are same as Linear Gradients in Canvas: HTML5

JavaScript file
myScript.js

1
2
3
4
5
6
7
context.globalAlpha = 0.5;
 
context.fillStyle   = "rgba(255, 0, 0, 0.5)";
context.fillRect(100, 100, 150, 50);
 
context.fillStyle   = "blue";
context.fillRect(100, 25, 150, 50);

Here we’ve set the globalAlpha value to 0.5, which will be applied to all the elements present on the canvas irrespective of its individual alpha values.
For Example: If we have a globalAlpha of 0.5 and we set individual alpha(using RGBa) to 0.5, then the individual element will have an alpha of 0.5 of it’s globalAlpha 0.5 i.e., half of the globalAlpha.

globalAlpha and RGBa in Canvas: HTML5


[youtube https://www.youtube.com/watch?v=TtnGYP0AXd0]

YouTube Link: https://www.youtube.com/watch?v=TtnGYP0AXd0 [Watch the Video In Full Screen.]


Note: globalAlpha and rgba take values from 0.0 to 1.0

JavaScript file: Full Code
myScript.js

1
2
3
4
5
6
7
8
9
10
11
12
13
14
15
16
17
18
19
window.onload = canvas;
 
function canvas()
{
var myCanvas = document.getElementById("myCanvas");
 
if( myCanvas && myCanvas.getContext("2d") ) 
{
var context         = myCanvas.getContext("2d");
 
context.globalAlpha = 0.5;
 
context.fillStyle   = "rgba(255, 0, 0, 0.5)";
context.fillRect(100, 100, 150, 50);
 
context.fillStyle   = "red";
context.fillRect(100, 25, 150, 50);
}
}

Take 2 rectangles with red color, so that you can easily compare the alpha differences between them, as you apply alpha value to them individually.

A canvas rgba() example:

rgba canvas html5

1
2
3
4
5
6
7
8
9
10
11
12
13
14
15
16
17
18
19
20
21
22
23
24
25
26
27
28
29
30
 
window.onload = canvas;
 
function canvas()
{
var myCanvas = document.getElementById("myCanvas");
 
if( myCanvas && myCanvas.getContext("2d") ) 
{
var context         = myCanvas.getContext("2d");
 
  // Draw background
  context.fillStyle = 'rgb(255,221,0)';
  context.fillRect(0,0,150,37.5);
  context.fillStyle = 'rgb(102,204,0)';
  context.fillRect(0,37.5,150,37.5);
  context.fillStyle = 'rgb(0,153,255)';
  context.fillRect(0,75,150,37.5);
  context.fillStyle = 'rgb(255,51,0)';
  context.fillRect(0,112.5,150,37.5);
 
  // Draw semi transparent circles
  for (i=0;i&lt;10;i++){
    context.fillStyle = 'rgba(255,255,255,'+(i+1)/10+')';
    for (j=0;j&lt;4;j++){
      context.fillRect(5+i*14,5+j*37.5,14,27.5)
    }
  }
 }
}

Above code for self learning .. :-)