Today lets learn how to implement reordering of list items in Ionic 2, using reorder directive and ionItemReorder event.
We’re using previous day code to implement reordering list items. So please go through these two small video tutorials before continuing .. (if you’re an advance user, then you can directly follow todays video tutorial).
1. Ionic Storage: Ionic 2
2. Pull To Refresh: Ionic 2
In this video tutorial lets learn
1. To build drag and rearrange interface and functionality.
2. Solve the ion-refresher component interference with the reorder directive.
3. Save rearranged data back to the database.
Reordering list items using reorder directive: Ionic 2
[youtube https://www.youtube.com/watch?v=wKq4sKk5DXU]
reorder directive
We can implement reorder directive directly on ion-list. This way we apply reordering to the entire items present inside ion-list.
reorder on ion-list: src/pages/home/home.html
 < ion-list no-lines
           reorder="true"
           (ionItemReorder)="reorderItems($event);">
   < ion-item *ngFor="let item of items">
     {{item}}
   < /ion-item>
< /ion-list> |
But if we have ion-header, ion-footer and other items inside the list for which we do not want the reorder directive to be applied.
reorder on ion-item-group: src/pages/home/home.html
 < ion-list no-lines>
   < ion-list-header>Company Names
   < ion-item-group reorder="true" (ionItemReorder)="reorderItems($event);">
    < ion-item *ngFor="let item of items">
     {{item}}
    < /ion-item>
   < /ion-item-group>
< /ion-list> |
In that case we need to group those items on which we want the reordering, and then apply reorder directive on that group, as shown in above example.
reordering code: src/pages/home/home.ts
reorderItems(indexes){ let element = this.items[indexes.from]; this.items.splice(indexes.from, 1); this.items.splice(indexes.to, 0, element); }; |
When the item is dragged and dropped to the new position, (ionItemReorder) event is emitted and this event also provides initial and new position index of the reordered item. Using this, we reorder the list items.
Above code snippet is a simple JavaScript code, where we first get the actual item value which is being reordered(using its index value – indexes.from) and store it in a temporary variable. Next we remove that item from the list. Finally we place that element in the new position. All these operation is done using simple JavaScript splice method.
Helper Function: src/pages/home/home.ts
import { reorderArray } from 'ionic-angular'; class MyComponent { items = []; reorderItems(indexes) { this.items = reorderArray(this.items, indexes); } } |
Ionic 2 also provides helper function called reorderArray to reorder the array of items. Here we import the helper class and then use it to reorder the array of items.
Helper Function: src/pages/home/home.html
< ion-list>
  < ion-list-header>Header< /ion-list-header>
  < ion-item-group reorder="true" (ionItemReorder)="$event.applyTo(items)">
    < ion-item *ngFor="let item of items">{{ item }}< /ion-item>
  < /ion-item-group>
< /ion-list> |
We can execute helper function inside template as well, as shown above.
Reordering ON and OFF
src/pages/home/home.html
< ion-header>
  < ion-navbar>
    < ion-title>
      Company Names
    < /ion-title>
    < ion-buttons end>
      < button ion-button small clear (click)="actionBtn();">
        {{btnName}}
      < /button>
    < /ion-buttons>
  < /ion-navbar>
< /ion-header>

< ion-content padding>
 < ion-list no-lines>
   < ion-list-header>Company Names< /ion-list-header>
   < ion-item-group reorder="{{flag}}"
                    (ionItemReorder)="reorderItems($event);">
   < ion-item *ngFor="let item of items">
     {{item}}
   < /ion-item>
   < /ion-item-group>
 < /ion-list>
< /ion-content> |
Note that we have a button inside ion-header. We switch the value of btnName variable between ‘edit’ and ‘Done’ alternatively when the user clicks on it. Also we have assigned a variable(flag) to reorder directive. flag is of type Boolean and it also switches between ‘true’ and ‘false’ when the user clicks on btnName button. This way we enable and disable the visual drag and rearrange interface on the list items.
src/pages/home/home.ts
import { Component } from '@angular/core'; import { NavController } from 'ionic-angular'; import { Storage } from '@ionic/storage'; @Component({ selector: 'page-home', templateUrl: 'home.html' }) export class HomePage { items: any; btnName: any = 'edit'; flag: any = false; constructor(public navCtrl: NavController, public storage: Storage) { this.doRefresh(0); }; doRefresh(refresher){ this.storage.get('myStore1').then((data) => { this.items = data; if(refresher != 0) refresher.complete(); }); }; reorderItems(indexes){ let element = this.items[indexes.from]; this.items.splice(indexes.from, 1); this.items.splice(indexes.to, 0, element); }; actionBtn(){ if(this.btnName == 'edit') { this.btnName = 'Done'; this.flag = true; } else { this.btnName = 'edit'; this.flag = false; this.storage.set('myStore1', this.items); } }; } |
Here we initialize the btnName with a value of ‘edit’ and flag as ‘false’. So initially, the drag and rearrange interface will be disabled. Once the user clicks on the ‘edit’ button present inside ion-header, the visual drag and rearrange interface appears. After the rearrangement of the item is finished user needs to click on ‘Done’ button and we save the rearranged list items to our database. This way we can persist the rearranged data.
We could even save the data to database inside reorderItems() method itself, so that the data gets saved when the user drags and drops the item in its new position. Without the need for the user to click on ‘Done’ button.
actionBtn() method
actionBtn(){ if(this.btnName == 'edit') { this.btnName = 'Done'; this.flag = true; } else { this.btnName = 'edit'; this.flag = false; this.storage.set('myStore1', this.items); } }; |
Initially variable ‘btnName’ will be ‘edit’ and flag will be ‘false’. When the user clicks on ‘edit’ button, the label name changes to ‘Done’ and the flag value changes to ‘true’. By this, the drag and rearrange interface appears on the list items. Once the arrangement is done, the user needs to click on the button ‘Done’. When the user clicks on ‘Done’ button, the button label or name changes back to ‘edit’ and the visual drag and rearrange interface gets disabled and optionally we save the rearranged data back to the database.
item reordering and ion-refresher conflict
< ion-header>
  < ion-navbar>
    < ion-title>
      Company Names
    < /ion-title>
    < ion-buttons end>
      < button ion-button small clear (click)="actionBtn();">
        {{btnName}}
      < /button>
    < /ion-buttons>
  < /ion-navbar>
< /ion-header>

< ion-content padding>
  < ion-refresher (ionRefresh)="doRefresh($event);">
    < ion-refresher-content
      pullingText="Pull to refresh"
      pullingIcon="arrow-dropdown"
      refreshingSpinner="circles"
      refreshingText="..fetching">
    < /ion-refresher-content>
 < /ion-refresher>

 < ion-list no-lines>
   < ion-list-header>Company Names< /ion-list-header>
   < ion-item-group reorder="true"
                    (ionItemReorder)="reorderItems($event);">
   < ion-item *ngFor="let item of items">
     {{item}}
   < /ion-item>
   < /ion-item-group>
 < /ion-list>
< /ion-content> |
This code has both ion-refresher as well as reorder directive. Here when the user tries to drag an item downwards the refresher component gets invoked. To avoid that, we can simply disable ion-refresher when we enable reordering and enable ion-refresher when we disable reordering, as shown in below code.
Fixed: ion-refresher & item reorder
< ion-header>
  < ion-navbar>
    < ion-title>
      Company Names
    < /ion-title>
    < ion-buttons end>
      < button ion-button small clear (click)="actionBtn();">
        {{btnName}}
      < /button>
    < /ion-buttons>
  < /ion-navbar>
< /ion-header>

< ion-content padding>
  < ion-refresher (ionRefresh)="doRefresh($event);"
                  *ngIf="flag == false">
    < ion-refresher-content
      pullingText="Pull to refresh"
      pullingIcon="arrow-dropdown"
      refreshingSpinner="circles"
      refreshingText="..fetching">
    < /ion-refresher-content>
 < /ion-refresher>

 < ion-list no-lines>
   < ion-list-header>Company Names< /ion-list-header>
   < ion-item-group reorder="{{flag}}"
                    (ionItemReorder)="reorderItems($event);">
   < ion-item *ngFor="let item of items">
     {{item}}
   < /ion-item>
   < /ion-item-group>
 < /ion-list>
< /ion-content> |
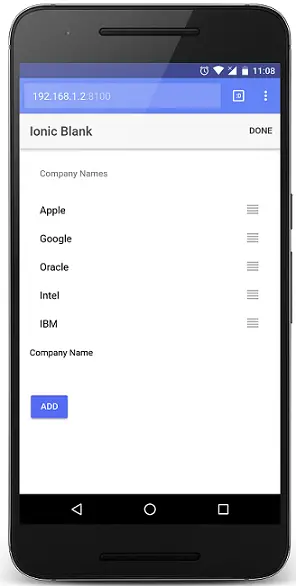
Full Free Source Code: src/pages/home/home.html
< ion-header>
  < ion-navbar>
    < ion-title>
      Company Names
    < /ion-title>
    < ion-buttons end>
      < button ion-button small clear (click)="actionBtn();">
        {{btnName}}
      < /button>
    < /ion-buttons>
  < /ion-navbar>
< /ion-header>

< ion-content padding>
  < ion-refresher (ionRefresh)="doRefresh($event);"
                  *ngIf="flag == false">
    < ion-refresher-content
      pullingText="Pull to refresh"
      pullingIcon="arrow-dropdown"
      refreshingSpinner="circles"
      refreshingText="..fetching">
    < /ion-refresher-content>
 < /ion-refresher>

 < ion-list no-lines>
   < ion-list-header>Company Names< /ion-list-header>
   < ion-item-group reorder="{{flag}}"
                    (ionItemReorder)="reorderItems($event);">
   < ion-item *ngFor="let item of items">
     {{item}}
   < /ion-item>
   < /ion-item-group>
 < /ion-list>

  < p>
    < ion-label fixed>Company Name< /ion-label>
    < ion-input type="text" name="company" [(ngModel)]="company">
    < /ion-input>
    < button ion-button (click)="save(company);">Add< /button>
  < /p>
< /ion-content> |
Full Free Source Code: src/pages/home/home.ts
import { Component } from '@angular/core'; import { NavController } from 'ionic-angular'; import { Storage } from '@ionic/storage'; @Component({ selector: 'page-home', templateUrl: 'home.html' }) export class HomePage { items: any; btnName: any = 'edit'; flag: any = false; constructor(public navCtrl: NavController, public storage: Storage) { this.doRefresh(0); }; doRefresh(refresher){ this.storage.get('myStore1').then((data) => { this.items = data; if(refresher != 0) refresher.complete(); }); }; reorderItems(indexes){ let element = this.items[indexes.from]; this.items.splice(indexes.from, 1); this.items.splice(indexes.to, 0, element); }; actionBtn(){ if(this.btnName == 'edit') { this.btnName = 'Done'; this.flag = true; } else { this.btnName = 'edit'; this.flag = false; this.storage.set('myStore1', this.items); } }; save(val){ console.log('data added '+val); this.storage.get('myStore1').then((data) => { if(data != null) { data.push(val); this.storage.set('myStore1', data); } else { let array = []; array.push(val); this.storage.set('myStore1', array); } }); }; } |
Example Application:
We’ve implemented the same code in one of our application ‘RSS Reader‘. Go to ‘Feed’ tab and add few blog / news sites rss feeds and the refresh the ‘Feed’ tab to see ‘list item reordering’ in action.