Ionic 2 Starter Templates

Ionic 2 comes with some starter templates which saves us a lot of time and effort.

Video Content
Today lets learn:
1. How to install ionic framework via ionic CLI (Command Line Interface) utility.
2. Install ionic 2 templates such as blank, tutorial/sidemenu, tabs(default ionic 2 template).
3. Run each project and check how each template looks.

Related Read:
Getting Started With IONIC APP
(Go through above link without fail)

Ionic Logo

Requirement

Ionic CLI (Command Line Interface) utility.
Node.js version 6 or higher: Download Nodejs
XCode for iOS: Cordova iOS Platform Guide
Android Studio for Windows: Cordova Android Platform Guide

Related Read:
Node.js Video Tutorial List

Troubleshooting

If you already had older version of Ionic and cordova installed, then make sure to uninstall them first

npm uninstall -g ionic cordova

Then make sure you’ve latest version of node.js installed.

Now install ionic and cordova globally using by logging in as a root user / system admin

npm install -g ionic cordova

My System Info, for this tutorial

ionic info

Cordova CLI: 6.1.1
Gulp version: CLI version 3.9.0
Gulp local:
Ionic CLI Version: 2.1.0
Ionic App Lib Version: 2.1.0-beta.1
OS: Windows 10
Node Version: v6.7.0

Video Tutorial: Starting IONIC 2 Project


[youtube https://www.youtube.com/watch?v=AcEY_bS37SU]

YouTube Link: https://www.youtube.com/watch?v=AcEY_bS37SU [Watch the Video In Full Screen.]


Installing CLI
Open command prompt and type the following command to install latest Ionic CLI

npm install -g ionic cordova

Ionic 2 apps are created and developed primarily through the Ionic CLI utility and use cordova to build and deploy as a native app.

Remember, Ionic CLI and Ionic framework are two different things. Ionic CLI is a utility which provides bunch of tools through the command line to help create and manage your Ionic project.

Important: The Ionic CLI will handle downloading the actual Ionic framework onto your machine for each project you create.

Ionic Starter templates

List of templates

ionic start -l

OR

ionic start -list

Output

blank — A blank starter project for Ionic.
complex-list — A complex list starter template.
maps — An Ionic starter project using Google Maps and a side menu.
salesforce — A starter project for Ionic and Salesforce.
sidemenu — A starting project for Ionic using a side menu with navigation in the content area.
tabs — A starting project for Ionic using a simple tabbed interface.

But to my surprise some of these templates aren’t working. Ionic team might fix these or remove some of the templates in future release of ionic 2 framework. In this tutorial I’m showing blank, tutorial/sidemenu and tabs templates.

Note: Ionic uses tabs template as its default template.

Starting Ionic Project

ionic start is the command to start an Ionic project, followed by project name, followed by template name(if not specified, tabs template will be installed), followed by version of Ionic framework to be installed.

Note: Here myApp1, myApp2, myApp3 are my project names.
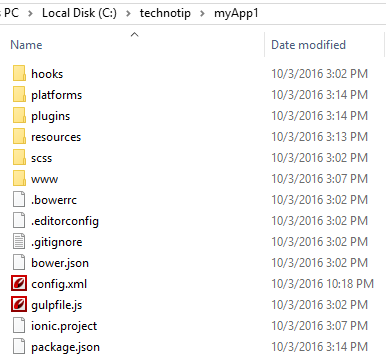
myApp1 has blank template.
myApp2 has tutorial or sidemenu template.
myApp3 has tabs template.

Blank Template

ionic start myApp1 blank --v2

Tutorial or Side Menu Template

ionic start myApp2 tutorial --v2

OR

ionic start myApp2 sidemenu --v2

Tabs Template

ionic start myApp3 tabs --v2

OR

ionic start myApp3 --v2

Launching Project in Web Browser

Get into the projects folder before using the command ionic serve or else it’ll through errors:

C:\ionic2>ionic serve

Couldn’t find ionic.config.json file. Are you in an Ionic project?

So first get into project folder and then run the project

C:\ionic2>cd myApp1
C:\ionic2\myApp1>ionic serve -l

We can see how our project looks via web browser. With labs feature we can see how our project looks on each platform – iOS, android and Windows.

ionic serve -l

-l is supplied to ionic serve command to invoke labs feature.

Positioning The Tabs: IONIC APPS

Some components like tabs, titles behave according to the platform they are built for. For example, on iOS the default display of tabs is at the bottom and at top in android devices.


ionic-tabs-position

This might look like a minor thing at the beginning of app development, but when we want to place an ad or social sharing icons at the bottom, we might like to place the tabs at the top or visa-versa!

To have consistent looks across platforms we can ‘hard set’ the tabs location by setting the tabs.position function of $ionicConfigProvider.

$ionicConfigProvider.tabs.position() takes 2 values:
1. top
2. bottom


[youtube https://www.youtube.com/watch?v=tXW7Px7A3qo]

YouTube Link: https://www.youtube.com/watch?v=tXW7Px7A3qo [Watch the Video In Full Screen.]


To center the title of header you can make use of following syntax:

< ion-header-bar
  title="headerTitle"
  left-buttons="leftButtons"
  right-buttons="rightButtons"
  type="bar-positive"
  align-title="center">
< /ion-header-bar>

Getting Started With IONIC APP

Let us learn the basics of IONIC today. We know that IONIC 2 is already in its Beta, and is being received well by the developer community. But we do not want to leave behind people using ionic versions below 2.

What is IONIC?
Ionic is a beautiful, open source front-end SDK for developing hybrid mobile apps with web technologies.
Web technologies like angular, HTML5, CSS.

Topics covered
1. Ionic commands.
2. Ionic templates – tabs, sidemenu, blank.
3. Ionic project folder structure.
4. Basic Dependency plugins.
5. Running our application in web browser.
6. Installing platform android to our project.
7. Building the application.
8. Running our application in android emulator.
9. Running our application in real mobile device.
10. USB debugging, Environment variable setting etc.

Software Versions used for the demo
1. Node: v4.2.6
2. Cordova: 6.0.0
3. Ionic: 1.7.14
4. android : Android 6.0 (API level 23)
5. OS: Demo showed on Windows 10 Operating System.

How to get android sdk installation details on Windows using command prompt?
1. Go to Run, open command prompt by typing cmd
2. Type this command android list targets
And you’ll get the list of all the installation and their basic details.

OR

“ionic info” command

C:\technotip\myApp1>ionic info
 
Your system information:
 
Cordova CLI: 6.0.0
Gulp version:  CLI version 3.9.0
Gulp local:
Ionic Version: 1.2.4
Ionic CLI Version: 1.7.14
Ionic App Lib Version: 0.7.0
OS:
Node Version: v4.2.6

Let’s start with the project


[youtube https://www.youtube.com/watch?v=0YQipkK_hi0]

YouTube Link: https://www.youtube.com/watch?v=0YQipkK_hi0 [Watch the Video In Full Screen.]


Software Installation
1. Install Node.js if you have not already.
2. Install cordova and ionic globally using the following command.

npm install -g cordova ionic

This will take some time to install cordova and ionic. To know more about npm(Node Package Manager), check External Module( NPM ) Install, Update, Remove: Node.js

Ionic Templates
There are 3 pre-designed templates ionic gives us to start the project
1. sidemenu
2. tabs
3. blank

For this tutorial I’ll be demonstrating using tabs template. All the explanation shown in the video applies to other templates too.

Start Project with tabs template

ionic start app_name tabs

All ionic commands start with the keyword ionic. Let us call our application as myApp1, so the command will be

c:/>cd technotip
c:/technotip>ionic start myApp1 tabs

Similarly, for sidemenu

ionic start myApp1 sidemenu

for blank

ionic start myApp1 blank

Downloading the project files
Once we run ionic start myApp1 tabs command, all the necessary files will be downloaded to our project folder(myApp1 folder) from ionic official git repository. Know that it’ll take some time to download these files – depending on your internet connection speed.

Once the files are downloaded, we need to get inside our project folder to execute ionic commands ..

c:/>cd technotip
c:/technotip>cd myApp1
c:/technotip/myApp1>

File structure


ionic file structure

plugins folder has plugins on which our project depends on, for some services.
www folder has all our files – like, templates, js files, css files and ionic library files
config.xml file is an important file and we’ll cover it in detail in another video tutorial

android sdk / android studio
Download android studio from Google Developer Site and install it without fail.

(I’m demonstrating for android platform, for iOS, use MAC and replace android keyword with ios in below ionic commands.)

Run the project
1. on browser using the command

ionic serve

use -l option to get additional log information + to launch ionic labs

ionic serve -l

You can enable chrome inspector and check how your app would look inside various devices. Use CTRL+SHIFT+i to open chrome inspector. Then use CTRL+SHIFT+M to open the device view mode.

2. add platform android

ionic platform add android

OR

cordova platform add android

3. Build the project

ionic build android

4. on emulator

ionic emulate android

emulator would take a lot of time to start and display your application. And usually it’s very slow to operate. Simply know this option but never use it for real serious development. For development purpose make sure to check the app using real device.

5. on real mobile device

ionic run android

use -l option to get additional log details + to launch ionic labs

ionic run android -l

Nexus USB Debugging
Connect your mobile phone(preferably nexus device) using USB cable. Turn on ‘Developer’ option and usb debugging option in your phone.
settings – Developer options ( enable it ) – ( scroll down ) – USB debugging ( enable it).

Environment variables
Note: I’m using Windows 10 operating system.

ANDROID_HOME=C:\Users\user_name\AppData\Local\Android\android-sdk
JAVA_HOME=C:\Program Files\Java\jdk1.8.0_45

Check the file paths of the environment variable and change the path depending on the versions installed.

..other commands
1. Get plugin list

cordova plugin list

2. to exit ionic server

CTRL + C

3. whitelist plugin
Whitelist plugin gets installed by default when you create an ionic application. After that insert this piece of code inside head tag of index.html

     <meta http-equiv="Content-Security-Policy" 
           content="default-src *; style-src 'self' 'unsafe-inline'; 
           script-src 'self' 'unsafe-inline' 'unsafe-eval'"/>

Troubleshoot
Let us know what problems you’re facing and we’ll try our best to solve it for you ..please give us proper log information, so that we can understand the problem.

Sharing Is Caring ..
Please share this article with your friends/colleagues on your social profile ..thanks
Hope it helps