Today lets learn how to apply custom transformation to our drawings on canvas.
In this video tutorial, we draw 3 rectangles and show you how scale, skew and move properties of custom transform methods work.
Custom Transformation Methods
transform(a, b, c, d, e, f);
setTransform(a, b, c, d, e, f);
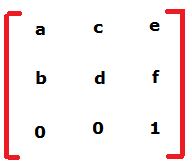
Custom transformation takes the form of a square matrix, as shown above.
a – Scales drawing horizontally
b – Skews drawing horizontally
c – Skews drawing vertically
d – Scales drawing vertically
e – Moves drawing horizontally
f – Moves drawing vertically
Recommended Read:
Translate Transformation in Canvas: HTML5
Scale Transformation in Canvas: HTML5
Rotate Transformation in Canvas: HTML5
index.html and myStyle.css file content are same as Linear Gradients in Canvas: HTML5
JavaScript file: Transform method
myScript.js
1
2
3
4
5
6
7
| context.fillStyle = "blue";
context.fillRect(5, 5, 150, 75);
context.transform(1, 0.5, 0.5, 1, 10, 10);
context.fillStyle = "red";
context.fillRect(5, 5, 150, 75); |
context.fillStyle = "blue";
context.fillRect(5, 5, 150, 75);
context.transform(1, 0.5, 0.5, 1, 10, 10);
context.fillStyle = "red";
context.fillRect(5, 5, 150, 75);
transform() method changes the origin of the canvas to (x, y) = (10, 10) and scale horizontally and vertically, so that we can see it drawn on the canvas. Also skews by 0.5 both horizontally and vertically.
JavaScript file: Transform method is Additive
myScript.js
1
2
3
4
5
6
7
8
9
10
11
12
| context.fillStyle = "blue";
context.fillRect(5, 5, 150, 75);
context.transform(1, 0.5, 0.5, 1, 10, 10);
context.fillStyle = "red";
context.fillRect(5, 5, 150, 75);
context.transform(1, 0, 0, 1, 20, 200);
context.fillStyle = "gray";
context.fillRect(5, 5, 150, 75); |
context.fillStyle = "blue";
context.fillRect(5, 5, 150, 75);
context.transform(1, 0.5, 0.5, 1, 10, 10);
context.fillStyle = "red";
context.fillRect(5, 5, 150, 75);
context.transform(1, 0, 0, 1, 20, 200);
context.fillStyle = "gray";
context.fillRect(5, 5, 150, 75);
Using transform() method we draw third rectangle at (x, y) = (20, 200); And horizontal and vertical skew is made 0, but still a skew of 0.5 is applied both in horizontal and vertical direction, since the transform() method written before for second rectangle is influencing it.
JavaScript file: setTransform method is not Additive
myScript.js
1
2
3
4
5
6
7
8
9
10
11
12
| context.fillStyle = "blue";
context.fillRect(5, 5, 150, 75);
context.transform(1, 0.5, 0.5, 1, 10, 10);
context.fillStyle = "red";
context.fillRect(5, 5, 150, 75);
context.setTransform(1, -0.5, 0, 1, 20, 200);
context.fillStyle = "gray";
context.fillRect(5, 5, 150, 75); |
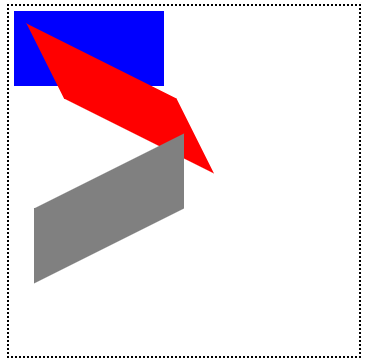
context.fillStyle = "blue";
context.fillRect(5, 5, 150, 75);

context.transform(1, 0.5, 0.5, 1, 10, 10);

context.fillStyle = "red";
context.fillRect(5, 5, 150, 75);
context.setTransform(1, -0.5, 0, 1, 20, 200);
context.fillStyle = "gray";
context.fillRect(5, 5, 150, 75);
setTransform() method is non-additive in nature. It is independent of its previous transformation matrix. All other parameter and behavior are same with respect to transform() and setTransform() methods.
Custom Transformation in Canvas: HTML5
[youtube https://www.youtube.com/watch?v=9eyr9MQNAuM]
JavaScript file: Full Free Code
myScript.js
1
2
3
4
5
6
7
8
9
10
11
12
13
14
15
16
17
18
19
20
21
22
23
24
| window.onload = canvas;
function canvas()
{
var myCanvas = document.getElementById("myCanvas");
if( myCanvas && myCanvas.getContext("2d") )
{
var context = myCanvas.getContext("2d");
context.fillStyle = "blue";
context.fillRect(5, 5, 150, 75);

context.transform(1, 0.5, 0.5, 1, 10, 10);

context.fillStyle = "red";
context.fillRect(5, 5, 150, 75);

context.setTransform(1, -0.5, 0, 1, 20, 200);

context.fillStyle = "gray";
context.fillRect(5, 5, 150, 75);
}
} |
window.onload = canvas;

function canvas()
{
var myCanvas = document.getElementById("myCanvas");

if( myCanvas && myCanvas.getContext("2d") )
{
var context         = myCanvas.getContext("2d");

context.fillStyle   = "blue";
context.fillRect(5, 5, 150, 75);

context.transform(1, 0.5, 0.5, 1, 10, 10);

context.fillStyle   = "red";
context.fillRect(5, 5, 150, 75);

context.setTransform(1, -0.5, 0, 1, 20, 200);

context.fillStyle   = "gray";
context.fillRect(5, 5, 150, 75);
}
}
Skewing can be done both in positive and negative direction, as shown in the video. If you previously used scale() and/or rotate() transformations that will be additive to transform() method, and will have no influence on setTransform() method.