C Program To Search A Number And Count Its Occurrence In An Array

Twenty-five numbers are entered from the keyboard into an array. The number to be searched is entered through the keyboard by the user. Write a C program to find if the number to be searched is present in the array and if it is present, display the number of times it appears in the array.

Example: Expected Output

Enter 5 integer numbers
1
5
6
3
5
Enter the number to be searched …
5

5 has appeared at position 2 in the array.
5 has appeared at position 5 in the array.

Final Result: 5 has appeared 2 times in the array.

Visual Representation
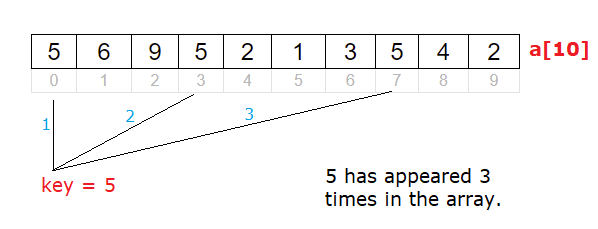
search key in array

Video Tutorial: C Program To Search A Number And Count Its Occurrence In An Array


[youtube https://www.youtube.com/watch?v=qLrIu_epQYU]

YouTube Link: https://www.youtube.com/watch?v=qLrIu_epQYU [Watch the Video In Full Screen.]

Source Code: C Program To Search A Number And Count Its Occurrence In An Array

#include<stdio.h>

#define N 5

int main()
{
    int a[N], i, key, count = 0;

    printf("Enter %d integer numbers\n", N);
    for(i = 0; i < N; i++)
        scanf("%d", &a[i]);

    printf("Enter the number to be searched ...\n");
    scanf("%d", &key);

    printf("\n");

    for(i = 0; i < N; i++)
    {
        if(a[i] == key)
        {
          printf("%d has appeared at position %d in the array.\n", key, i + 1);
          count++;
        }
    }

  printf("\nFinal Result: %d has appeared %d times in the array.\n", key, count);

    printf("\n");

    return 0;
}

Output 1:
Enter 5 integer numbers
1
5
9
6
4
Enter the number to be searched …
4

4 has appeared at position 5 in the array.
Final Result: 4 has appeared 1 times in the array.

Output 2:
Enter 5 integer numbers
1
2
3
4
5
Enter the number to be searched …
6

Final Result: 6 has appeared 0 times in the array.

Output 3:
Enter 5 integer numbers
1
5
4
5
2
Enter the number to be searched …
5

5 has appeared at position 2 in the array.
5 has appeared at position 4 in the array.

Final Result: 5 has appeared 2 times in the array.

Logic To Search A Number And Count Its Occurrence In An Array

We ask the user to enter N integer numbers(25 integer numbers according to the problem statement) and store it inside array a[N]. Next we ask the user to input the number to be searched – we store the user input inside variable key.

Inside for loop
We make use of for loop to iterate through entire array. For each iteration we check if the value present at a[i] is equal to value present in key. If it’s true, then we display the position(index value + 1) at which “key” appears and also increment the value of variable count by 1.

After all the iterations of for loop, we display the number of occurrences of key inside the array – value of which is present in variable count.

Explanation With Example

If int a[5] = {1, 5, 6, 3, 5};
key = 5;

ia[i]a[i] == keycount
01FALSE0
15TRUE1
26FALSE1
33FALSE1
45TRUE2

5 has appeared at position 2 in the array.
5 has appeared at position 5 in the array.

Final Result: 5 has appeared 2 times in the array.

Note: We increment the position of key in the array by 1, as users are not used to counting from 0. (Array index starts from 0.)

For list of all c programming interviews / viva question and answers visit: C Programming Interview / Viva Q&A List

For full C programming language free video tutorial list visit:C Programming: Beginner To Advance To Expert

explain() method: MongoDB

We’ve seen the working of explain() method briefly in previous video tutorials – in this video tutorial lets dive in to learn more about this useful method, which helps us analyze and optimize our MongoDB commands.

explain-method-mongodb

Related Read:
Create and Insert Documents: MongoDB
index creation: MongoDB

temp: database name
name: collection name

Inserting 1000 Documents

1
2
3
4
5
6
7
8
MongoDB shell version: 2.6.1
connecting to: test
 
> use temp
switched to db temp
 
> for(i = 1; i < = 1000; i++) db.name.insert({a: i, b: i, c: i});
WriteResult({ "nInserted" : 1 })

Here we inserted 1000 documents using for loop.

Basic Cursor

1
2
3
4
5
6
7
8
9
10
11
12
13
14
15
16
17
18
19
20
> db.name.find({a: 5})
{ "_id" : ObjectId("53dcd070340ac74e061d7215"), "a" : 5, "b" : 5, "c" : 5 }
 
> db.name.find({a: 5}).explain()
{
        "cursor" : "BasicCursor",
        "isMultiKey" : false,
        "n" : 1,
        "nscannedObjects" : 1000,
        "nscanned" : 1000,
        "nscannedObjectsAllPlans" : 1000,
        "nscannedAllPlans" : 1000,
        "scanAndOrder" : false,
        "indexOnly" : false,
        "nYields" : 7,
        "nChunkSkips" : 0,
        "millis" : 1,
        "server" : "Satish-PC:27017",
        "filterSet" : false
}

Here MongoDB server is returning a basic cursor, as we do not have index on field “a”. Also note that, it’s scanning 1000 documents in the “name” collection and scanning 1000 index keys in “system.indexes” collection, where the default key is “_id”.

explain() method: MongoDB


[youtube https://www.youtube.com/watch?v=q59nF4ziW-w]

YouTube Link: https://www.youtube.com/watch?v=q59nF4ziW-w [Watch the Video In Full Screen.]


Creating Index on fields “a” and “b”

1
2
3
4
5
6
7
8
9
10
11
12
13
14
15
16
17
18
19
20
21
22
23
24
25
26
27
28
29
30
31
32
33
34
35
36
37
38
39
40
41
42
43
> db.name.ensureIndex({a: 1, b: 1});
{
        "createdCollectionAutomatically" : false,
        "numIndexesBefore" : 1,
        "numIndexesAfter" : 2,
        "ok" : 1
}
 
> db.name.find({a: 5}).explain()
{
        "cursor" : "BtreeCursor a_1_b_1",
        "isMultiKey" : false,
        "n" : 1,
        "nscannedObjects" : 1,
        "nscanned" : 1,
        "nscannedObjectsAllPlans" : 1,
        "nscannedAllPlans" : 1,
        "scanAndOrder" : false,
        "indexOnly" : false,
        "nYields" : 0,
        "nChunkSkips" : 0,
        "millis" : 0,
        "indexBounds" : {
                "a" : [
                        [
                                5,
                                5
                        ]
                ],
                "b" : [
                        [
                                {
                                        "$minElement" : 1
                                },
                                {
                                        "$maxElement" : 1
                                }
                        ]
                ]
        },
        "server" : "Satish-PC:27017",
        "filterSet" : false
}

Here we create index on key “a” and “b” – it’s called compound key – after which the explain() method shows that MongoDB server is returning a Btree cursor, meaning it’s making use of index key to execute the query/command.

Also not the number of objects scanned in the “name” collection as well as in the “system.indexes” collection.

indexOnly: true

1
2
3
4
5
6
7
8
9
10
11
12
13
14
15
16
17
18
19
20
21
22
23
24
25
26
27
28
29
30
31
32
33
34
35
36
37
38
39
40
41
> db.name.find({a: 5})
{ "_id" : ObjectId("53dcd070340ac74e061d7215"), "a" : 5, "b" : 5, "c" : 5 }
 
> db.name.find({a: 5}, {a: 1, b: 1, _id: 0})
{ "a" : 5, "b" : 5 }
 
> db.name.find({a: 5}, {a: 1, b: 1, _id: 0}).explain()
{
        "cursor" : "BtreeCursor a_1_b_1",
        "isMultiKey" : false,
        "n" : 1,
        "nscannedObjects" : 0,
        "nscanned" : 1,
        "nscannedObjectsAllPlans" : 0,
        "nscannedAllPlans" : 1,
        "scanAndOrder" : false,
        "indexOnly" : true,
        "nYields" : 0,
        "nChunkSkips" : 0,
        "millis" : 0,
        "indexBounds" : {
                "a" : [
                        [
                                5,
                                5
                        ]
                ],
                "b" : [
                        [
                                {
                                        "$minElement" : 1
                                },
                                {
                                        "$maxElement" : 1
                                }
                        ]
                ]
        },
        "server" : "Satish-PC:27017",
        "filterSet" : false
}

Covered Index or indexOnly
If our command is requesting for values present inside the index, mongo engine will fetch that information from the “system.indexes” collection itself and does not go to the collection where the entire document is present – in our case “name” collection. Since index is on keys “a” and “b” in our case, if we query for “a” and “b” values only, it fetches those values directly from the index information and will not go to “name” collection. Hence the speed of execution of the command is faster, and this type of commands are very efficient in creating optimized web applications.

Note from above explain() result, the number of objects scanned in the “name” collection is 0, and the number of scans made on indexes in only 1.

Get Index and Delete Index: MongoDB

We learnt the uses of having an index/key on our collection and how to create the index. Now, in this video tutorial lets learn how to get index on individual collection and how to drop / remove / delete the index we’ve created.

getIndex-dropIndex-mongodb

Related Read: index creation: MongoDB

temp: Database name
no, another: collection names
We’ve 10 Million documents inside “no” collection.

Sample document

1
2
3
4
5
6
7
8
9
10
11
12
13
14
15
16
17
18
19
20
21
22
> use temp
switched to db temp
> show collections
no
system.indexes
 
> db.no.find({"student_id": {$lt: 3}}).pretty()
{
        "_id" : ObjectId("53c9020abcdd1ea7fb833cda"),
        "student_id" : 0,
        "name" : "Satish"
}
{
        "_id" : ObjectId("53c9020abcdd1ea7fb833cdb"),
        "student_id" : 1,
        "name" : "Satish"
}
{
        "_id" : ObjectId("53c9020abcdd1ea7fb833cdc"),
        "student_id" : 2,
        "name" : "Satish"
}

Fetch Index and Drop / remove Index: MongoDB


[youtube https://www.youtube.com/watch?v=qYHIRWHS_5I]

YouTube Link: https://www.youtube.com/watch?v=qYHIRWHS_5I [Watch the Video In Full Screen.]


We shall take a look at “system.indexes” collection

1
2
3
4
5
> db.system.indexes.find()
{ "v" : 1, "key" : { "_id" : 1 }, 
           "name" : "_id_", "ns" : "temp.no" }
{ "v" : 1, "key" : { "student_id" : 1 }, 
           "name" : "student_id_1", "ns" : "temp.no" }

Create “another” collection

1
2
3
4
5
6
7
8
9
10
11
12
13
14
15
> db.another.insert({"name": "Satish", "age": 27});
WriteResult({ "nInserted" : 1 })
 
> show collections
another
no
system.indexes
 
> db.system.indexes.find()
{ "v" : 1, "key" : { "_id" : 1 }, 
           "name" : "_id_", "ns" : "temp.no" }
{ "v" : 1, "key" : { "student_id" : 1 }, 
           "name" : "student_id_1", "ns" : "temp.no" }
{ "v" : 1, "key" : { "_id" : 1 }, 
           "name" : "_id_", "ns" : "temp.another" }

After creating “another” collection, mongoDB engine generates default key on its “_id” field. And “system.indexes” shows all the keys present inside the database for all the collections it has. This can get messy if we have large number of collections – which we do in even slightly bigger projects.

To get index on individual collection

1
2
3
4
5
6
7
8
9
10
11
12
13
14
15
16
17
18
19
20
21
22
23
24
25
26
27
28
29
30
31
> db.another.getIndexes()
[
        {
                "v" : 1,
                "key" : {
                        "_id" : 1
                },
                "name" : "_id_",
                "ns" : "temp.another"
        }
]
 
> db.no.getIndexes()
[
        {
                "v" : 1,
                "key" : {
                        "_id" : 1
                },
                "name" : "_id_",
                "ns" : "temp.no"
        },
        {
                "v" : 1,
                "key" : {
                        "student_id" : 1
                },
                "name" : "student_id_1",
                "ns" : "temp.no"
        }
]

We can make use of getIndex() method to fetch or get indexes / keys present on individual collection.

Removing / deleting / dropping – index / key

1
2
3
4
5
6
7
8
9
10
11
12
13
14
> db.no.dropIndex({"student_id": 1});
{ "nIndexesWas" : 2, "ok" : 1 }
 
> db.no.getIndexes()
[
        {
                "v" : 1,
                "key" : {
                        "_id" : 1
                },
                "name" : "_id_",
                "ns" : "temp.no"
        }
]

make use of dropIndex() method and pass-in the index object similar to that used while creating the index. This shall drop the index.

index creation: MongoDB

Lets learn to create index and to optimize the database in MongoDB.

Creating “Database”: “temp”, “Collection”: “no”, and inserting 10 Million documents inside it

1
2
3
4
5
use temp
switched to db temp
 
for(i=0; i< = 10000000; i++)
db.no.insert({"student_id": i, "name": "Satish"});

Since Mongo Shell is built out of JavaScript, you can pass in any valid Javascript code to it. So we write a for loop and insert 10 Million documents inside “no” collection.

creating-index-mongodb

1
2
3
4
5
6
7
8
9
10
11
12
13
14
15
16
17
18
19
20
21
22
23
24
25
26
27
28
29
30
31
32
33
34
35
36
37
38
39
40
41
42
43
44
45
46
47
48
49
50
51
52
53
54
55
56
57
58
59
60
61
62
63
64
65
66
67
68
69
70
71
72
73
74
75
76
77
78
79
80
81
82
83
84
85
86
87
88
89
90
91
92
93
94
95
96
97
98
99
100
101
102
103
104
105
106
107
108
109
110
111
112
113
114
115
116
117
118
119
MongoDB shell version: 2.6.1
connecting to: test
> show dbs
admin    (empty)
daily    0.078GB
local    0.078GB
nesting  0.078GB
school   0.078GB
temp     3.952GB
test     0.078GB
> use temp
switched to db temp
> show collections
no
system.indexes
> db.no.find().pretty()
{
        "_id" : ObjectId("53c9020abcdd1ea7fb833cda"),
        "student_id" : 0,
        "name" : "Satish"
}
{
        "_id" : ObjectId("53c9020abcdd1ea7fb833cdb"),
        "student_id" : 1,
        "name" : "Satish"
}
{
        "_id" : ObjectId("53c9020abcdd1ea7fb833cdc"),
        "student_id" : 2,
        "name" : "Satish"
}
{
        "_id" : ObjectId("53c9020abcdd1ea7fb833cdd"),
        "student_id" : 3,
        "name" : "Satish"
}
{
        "_id" : ObjectId("53c9020abcdd1ea7fb833cde"),
        "student_id" : 4,
        "name" : "Satish"
}
{
        "_id" : ObjectId("53c9020abcdd1ea7fb833cdf"),
        "student_id" : 5,
        "name" : "Satish"
}
{
        "_id" : ObjectId("53c9020abcdd1ea7fb833ce0"),
        "student_id" : 6,
        "name" : "Satish"
}
{
        "_id" : ObjectId("53c9020abcdd1ea7fb833ce1"),
        "student_id" : 7,
        "name" : "Satish"
}
{
        "_id" : ObjectId("53c9020abcdd1ea7fb833ce2"),
        "student_id" : 8,
        "name" : "Satish"
}
{
        "_id" : ObjectId("53c9020abcdd1ea7fb833ce3"),
        "student_id" : 9,
        "name" : "Satish"
}
{
        "_id" : ObjectId("53c9020abcdd1ea7fb833ce4"),
        "student_id" : 10,
        "name" : "Satish"
}
{
        "_id" : ObjectId("53c9020abcdd1ea7fb833ce5"),
        "student_id" : 11,
        "name" : "Satish"
}
{
        "_id" : ObjectId("53c9020abcdd1ea7fb833ce6"),
        "student_id" : 12,
        "name" : "Satish"
}
{
        "_id" : ObjectId("53c9020abcdd1ea7fb833ce7"),
        "student_id" : 13,
        "name" : "Satish"
}
{
        "_id" : ObjectId("53c9020abcdd1ea7fb833ce8"),
        "student_id" : 14,
        "name" : "Satish"
}
{
        "_id" : ObjectId("53c9020abcdd1ea7fb833ce9"),
        "student_id" : 15,
        "name" : "Satish"
}
{
        "_id" : ObjectId("53c9020abcdd1ea7fb833cea"),
        "student_id" : 16,
        "name" : "Satish"
}
{
        "_id" : ObjectId("53c9020abcdd1ea7fb833ceb"),
        "student_id" : 17,
        "name" : "Satish"
}
{
        "_id" : ObjectId("53c9020abcdd1ea7fb833cec"),
        "student_id" : 18,
        "name" : "Satish"
}
{
        "_id" : ObjectId("53c9020abcdd1ea7fb833ced"),
        "student_id" : 19,
        "name" : "Satish"
}
Type "it" for more
 
> it

“no” collection has 10 Million record, but it won’t fetch you all records at once, as it would take a lot of time and resources of your computer! So it only fetches 20 records at a time. You can iterate through next 20 documents by using command “it“.

index creation: MongoDB


[youtube https://www.youtube.com/watch?v=zK_mRyiNs-I]

YouTube Link: https://www.youtube.com/watch?v=zK_mRyiNs-I [Watch the Video In Full Screen.]


1
2
3
4
5
6
7
8
9
10
11
12
13
14
15
16
17
18
19
20
> db.no.find({"student_id": 5}).pretty()
{
        "_id" : ObjectId("53c9020abcdd1ea7fb833cdf"),
        "student_id" : 5,
        "name" : "Satish"
}
 
 
> db.no.findOne({"student_id": 5});
{
        "_id" : ObjectId("53c9020abcdd1ea7fb833cdf"),
        "student_id" : 5,
        "name" : "Satish"
}
> db.no.find({"student_id": 5000000}).pretty()
{
        "_id" : ObjectId("53c90ca6bcdd1ea7fbcf881a"),
        "student_id" : 5000000,
        "name" : "Satish"
}

find() method scans through all the documents present in the collection to find multiple matches for the condition. So in above case, find() method scans through 10 Million documents, hence returns the result slowly. Where as findOne() method stops scanning the collection as soon as it finds the first matching document, so findOne() returns result faster than find() method.

Related Read:
Multi-key Index: MongoDB
index / key: MongoDB

Creating index

1
2
3
4
5
6
7
8
9
10
11
12
13
14
15
16
17
18
19
20
> show collections
no
system.indexes
 
> db.system.indexes.find()
{ "v" : 1, "key" : { "_id" : 1 }, "name" : "_id_", "ns" : "temp.no" }
 
> db.no.ensureIndex({"student_id": 1});
{
        "createdCollectionAutomatically" : false,
        "numIndexesBefore" : 1,
        "numIndexesAfter" : 2,
        "ok" : 1
}
 
> db.system.indexes.find()
{ "v" : 1, "key" : { "_id" : 1 }, 
                     "name" : "_id_", "ns" : "temp.no" }
{ "v" : 1, "key" : { "student_id" : 1 }, 
                     "name" : "student_id_1", "ns" : "temp.no" }

We create index on “student_id”. It takes little time to create the index, as we have 10 Million documents inside “no” collection.

After creating index on “student_id”, run the same command and you’ll get the results instantly – maybe it takes 0.01 ms, but the delay can’t be noticed.
Why does it return results faster after creating index on “student_id”? Watch this short video lesson to know it: index / key: MongoDB

1
2
3
4
5
6
7
8
9
10
11
12
13
> db.no.find({"student_id": 5000000}).pretty()
{
        "_id" : ObjectId("53c90ca6bcdd1ea7fbcf881a"),
        "student_id" : 5000000,
        "name" : "Satish"
}
> db.no.find({"student_id": 10000000}).pretty()
{
        "_id" : ObjectId("53c914adbcdd1ea7fb1bd35a"),
        "student_id" : 10000000,
        "name" : "Satish"
}
>

So the querys/commands can be optimized by creating indexes on frequently accessed fields.

index / key: MongoDB

Lets look at some basics of indexes in MongoDB.

If we have 3 fields in a document – name, age, sex
We could make name or age or sex or (name, age) or (name, age, sex) as index.

index-key-mongodb

Assume that we make a index out of (name, age, sex)
In this case, we need to use the keys from left to right.

If we use “name” in our command, it makes use of the index.
If we use (“name”, “age”) in our command, it makes use of the index.
If we use (“name”, “age”, “sex”) in our command, it makes use of the index.

If we use “age” in our command, it can’t use the index for its operation.
If we use (“age”, “sex”) in our command, it can’t use the index for its operation.

If we use (“name”, “sex”) in our command, it simply uses “name” field and ignores “sex” field.

indexes / keys: MongoDB


[youtube https://www.youtube.com/watch?v=NiP-zX-jPaY]

YouTube Link: https://www.youtube.com/watch?v=NiP-zX-jPaY [Watch the Video In Full Screen.]


For convenience, mongoDB adds “_id” field to each document inserted. “_id” is unique across the collection. And index is automatically created on “_id”.

Since index information is stored in “system.indexes” collection – it consumes disk too. So we need to make sure to add indexes to only those fields which we access frequently. Also note that, each time a document is inserted, “system.indexes” collection must be updated with the new index information, which takes time, bandwidth and disk space. So we need to be careful while creating indexes.