It’s very important for any game to have some global configurations – like, display mode(Landscape or Portrait), device width and height, background image, background music/common sound effects, a logo(for branding) at the bottom or anything like that which applies to the entire game application.
Video Tutorial List At One Place:
Phaser Video Tutorial List: Game Framework
In today’s video tutorial we shall learn:
1. Detecting device and loading configuration based on the device type.
2. Configuration options like: Landscape, Portrait modes, setting minimum and maximum dimensions of the device, aligning page vertically and horizontally, setting input pointers.
Related Read:
1. State Manager: Phaser
2. Managing Multiple States: Phaser
Configure Global Settings In Phaser
[youtube https://www.youtube.com/watch?v=ybm4-6cKnVc]
HTML File – index.html
< !DOCTYPE html>
<html>
<head>
<meta name="apple-mobile-web-app-capable" content="yes"/>
<meta name="viewport" content="minimal-ui"/>

<style>
    body{
        padding: 0px;
        margin: 0px;
    }
</style>

<script type="text/javascript" src="javascripts/library/phaser.js">
</script>
<script type="text/javascript" src="javascripts/states/Boot.js">
</script>
</head>
<body>

<script type="text/javascript" src="javascripts/Main.js">
</script>
</body>
</html> |
The meta tags(in above html file) are to make sure that the game runs properly on Apples mobile browsers – to make the game full screen.
Style information is to take off any padding and margin. Some browsers add this behavior by default, but as we want to have same experience across different browsers we add this styling information ourselves.
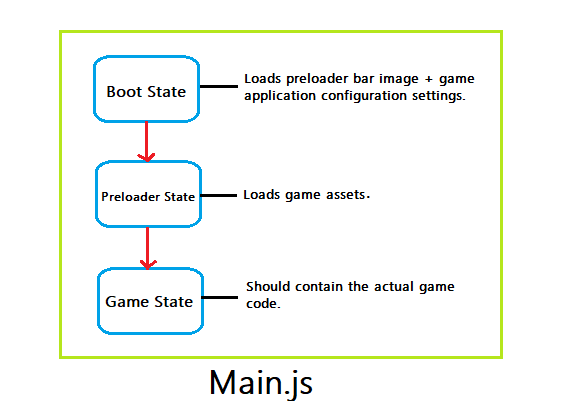
Next we add the phaser library followed by Boot.js file(Boot State). Before closing body tag we include Main.js file(which is not a state file) which contains our global game object i.e., Phaser.Game() instance and this is the file where we add states to state manager and also kick-start the first state i.e., Boot State.
Main.js file source code
var game = new Phaser.Game(400, 400, Phaser.AUTO);
    game.state.add('Boot', Technotip.Boot);
game.state.start('Boot'); |
Here we have our global game object, which is an instance of Phaser.Game() and then we add Boot State and immediately start the state(Boot State).
Boot.js file source code – Boot State
var Technotip = {};

Technotip.Boot = function(game){};

Technotip.Boot.prototype = {
   preload: function() {
       this.load.image('logo', '/images/logo1.png');
       this.load.image('preloadbar', '/images/progress-bar.png');
   },
  create: function(){
       this.game.stage.backgroundColor = '#000';
       this.add.sprite(30, 10, 'logo');
       this.input.maxPointers = 1;
       if(this.game.device.desktop)
       {
           this.scale.pageAlignHorizontally = true;
       }
       else
       {
           this.scale.scaleMode = Phaser.ScaleManager.SHOW_ALL;
           this.scale.forceLandscape = true;
           this.scale.pageAlignHorizontally = true;
        //   this.scale.pageAlignVertically = true;
        //   this.scale.forcePortrait = true;
        //   this.scale.minWidth = 600;
        //   this.scale.minHeight = 800;
        //   this.scale.maxWidth = 1000;
        //   this.scale.maxHeight = 1800;
        //   this.scale.setScreenSize(true);
        this.input.addPointer();
       }
  }
}; |
In the preload method I’ve added a logo and a preload bar image. Will use the same code for my next video tutorial, so watch out for our next video tutorial on loading game assets and showing the loading bar or load progress to the user.
Inside create method we check if the device where the game is rendered is desktop using this.game.device.desktop and inside if block we write the code which should be applied to desktops. If the device is not a desktop then the else block code will be executed. Configure the game application according to the device it’s being rendered on.
this.input.maxPointers sets the number of pointers – example, the cursor or the touch(single or multi-touch on a mobile device)
this.scale.scaleMode = Phaser.ScaleManager.SHOW_ALL fits all the game objects/elements inside the device screen.
this.scale.forceLandscape setting it to true forces the device to render the game in Landscape mode.
this.scale.forcePortrait setting it to true forces the device to render the game in Portrait mode.
this.scale.pageAlignHorizontally setting this to true sets the page alignment horizontal.
this.scale.pageAlignVertically setting this to true sets the page alignment vertical.
this.scale.minWidth the minimum width of the device in which the game renders.
this.scale.minHeight the minimum height of the device in which the game renders.
this.scale.maxWidth the maximum width of the device in which the game renders.
this.scale.maxHeight the maximum height of the device in which the game renders.
this.scale.setScreenSize(true); we need to set this after we set the minWidth, minHeight, maxWidth, maxHeight of the devices. After we pass ‘true’ to setScreenSize() method, these device scales get set in our game.
this.input.addPointer() adds input pointer to the game. For mobile, its finger touch.
In our next video tutorial we shall work on a preloader bar to indicate the user of assets loading progress ..
