Here we list all the HTML5 and CSS3 video tutorials ..all these video tutorials are 3 or 5 or 10 minutes in length and you can go through them very quickly. Learning along with me while I teach is the best way to learn. You can ask your questions/doubts in the comment section of respective tutorial page/post.

If you’re thinking of HTML7, then my advice would be to first learn HTML5 – this would surly be a basement for upcoming improvements. By learning HTML5, you’ll be ahead of your competition.
Please bookmark this page, share on social sites, let your friends know about our video tutorials – this way you’ll be helping us in our good cause of helping people!
This page will be updated with up coming HTML5 and CSS3 lessons ..stay subscribed
- Geolocation API – Success Handler: HTML5
- Geolocation API – Error Handle: HTML5
- Google Maps Integration: HTML5
- Adding Pin/Marker To Google Map: HTML5
- Add Popup message To Google Map Pin: HTML5
- Realtime Location Tracking – Google Maps: HTML5
Geolocation API
- Canvas Basics: HTML5
- Draw Rectangle: HTML5 Canvas
- Canvas State: HTML5
- Canvas clearRect: HTML5
- Canvas Lines and Paths: HTML5
- Line Ending In Canvas: HTML5
- Line Joining In Canvas: HTML5
- Draw Arcs/Circle with Canvas: HTML5
- Bezier Curve In Canvas: HTML5
- Quadratic Curve In Canvas: HTML5
- Draw Text on Canvas: HTML5
- Shadow Effect on Canvas: HTML5
- Canvas Image Patterns: HTML5
- Canvas Element Pattern: HTML5
- Linear Gradients in Canvas: HTML5
- Radial Gradients in Canvas: HTML5
- Clipping Paths in Canvas: HTML5
- drawImage() in Canvas: HTML5
- Translate Transformation in Canvas: HTML5
- Scale Transformation in Canvas: HTML5
- Rotate Transformation in Canvas: HTML5
- Custom Transformation in Canvas: HTML5
- globalAlpha and RGBa in Canvas: HTML5
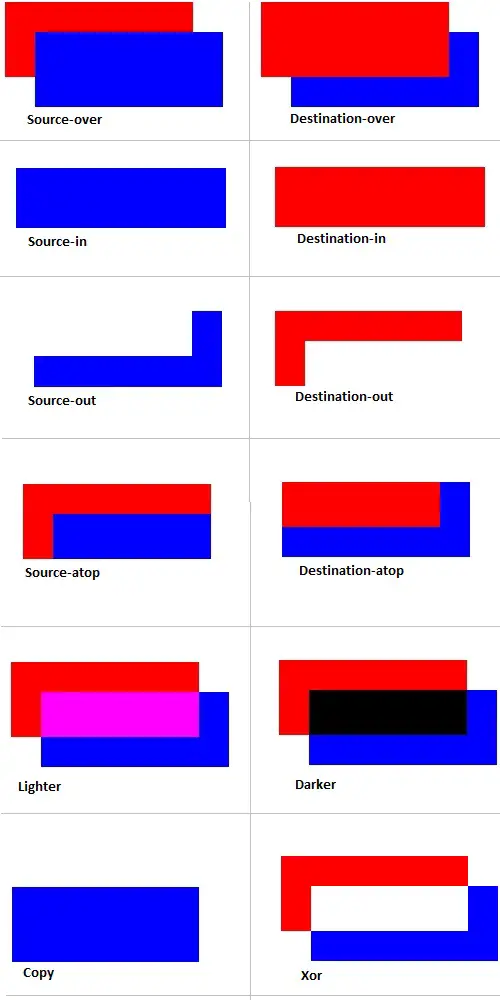
- Compositing Methods in Canvas: HTML5
- Accessing Raw Pixel Data in Canvas: HTML5
- Image Gallery using Canvas: HTML5
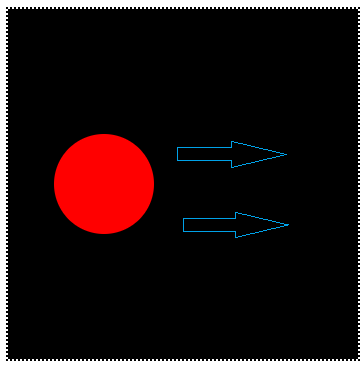
- Simple Animation using Canvas: HTML5
Canvas
- Pseudo-classes for Form Element
- autofocus Attribute of Form Field: HTML5
- autocomplete Attribute of Form Field: HTML5
- Suggested Entries Using datalist Element: HTML5
- Dynamic Suggested List: HTML5 + jQuery + PHP + MySQL
- placeholder Attribute of Form Field: HTML5
- pattern and title Attribute of Form Field: HTML5
- require attribute: HTML5
- Form novalidate attribute: HTML5
- Text Selection API: HTML5
- Form Input Type – search: HTML5
- Email Input Type: HTML5
- URL Input Type: HTML5
- Tel Input Type: HTML5
- number Input Type: HTML5
- range Input Type: HTML5
- date time Input Type: HTML5
- color Input Type: HTML5
- progress Element: HTML5
- Download Attribute: HTML5
HTML5 Web Forms
..more videos will be added soon, stay subscribed