Today lets learn in-depth about drawImage() method of HTML5.
Using drawImage() method we can draw a portion or an entire image, fetch a video frame, fetch an image(drawing) from another canvas element. We can grab – re-size, crop etc an image, video or something present on another canvas.
drawImage() syntax
Basic:
drawImage(imgSrc, dx, dy);
imgSrc – image soruce.
Top Right Corner Position
dx – destination/main canvas x-axis value.
dy – destination/main canvas y-axis value.
drawImage(imgSrc, dx, dy, dw, dy);
dw – destination width to which the image should fit into. [optional]
dh – destination height to which the image should fit into. [optional]
drawImage(imgSrc, sx, sy, sw, sh, dx, dy, dw, dy);
sx – source image or video or another canvas elements x-axis value. [optional]
sy – source image or video or another canvas elements y-axis value. [optional]
sw – selecting source image or video or another canvas’s width. [optional]
sh – selecting source image or video or another canvas’s height. [optional]
In other words!!
context.drawImage(img,sx,sy,swidth,sheight,x,y,width,height);
sx – The x coördinate where to start clipping(optional).
sy – The y coördinate where to start clipping(optional).
x – The x coördinate where to place the image on the canvas.
y – The y coördinate where to place the image on the canvas.
swidth– The width of the clipped image(optional).
sheight– The height of the clipped image(optional).
stretch or reduce the image
width– The width of the image to use(optional).
height– The height of the image to use(optional) .
HTML file
index.html
1
2
3
4
5
6
7
8
9
10
11
12
13
14
15
16
17
18
19
20
| < !DOCTYPE HTML>
<html>
<head>
<title>Canvas: HTML5</title>
<meta charset="utf-8"/>
<link href="myStyle.css" rel="stylesheet" />
<script src="myScript.js"></script>
</head>
<body>
<canvas id="myCanvas" width="500" height="300">
Upgrade Browser
</canvas>
<canvas id="two" width="50" height="50"></canvas>
<img id="img" src="technotip.jpg" style="display: none;" />
<video id="video" src="technotip.mp4" style="display: none;"></video>
</body>
</html> |
< !DOCTYPE HTML>
<html>
<head>
<title>Canvas: HTML5</title>
<meta charset="utf-8"/>
<link href="myStyle.css" rel="stylesheet" />
<script src="myScript.js"></script>
</head>
<body> <canvas id="myCanvas" width="500" height="300"> Upgrade Browser </canvas> <canvas id="two" width="50" height="50"></canvas> <img id="img" src="technotip.jpg" style="display: none;" /> <video id="video" src="technotip.mp4" style="display: none;"></video>
</body>
</html>
Here we have 2 canvas elements. 1 image and 1 video. Image and video are set to display none, so that they’re not shown below or besides the canvas element on the html document. Our main canvas with the id myCanvas has a width of 500px and a height of 300px. This is the canvas on which we draw image by fetching it from an image file or a video frame or another canvas element.
CSS file
myStyle.css
1
2
3
| canvas {
border: 2px dotted black;
} |
canvas {
border: 2px dotted black;
}
We assign 2px black dotted border to the canvas present on our HTML page.
JavaScript file: Image example
myScript.js
1
2
| var myImg = document.getElementById("img");
context.drawImage(myImg, 35, 15, 550, 550, 0, 0, 500, 300); |
var myImg = document.getElementById("img");
context.drawImage(myImg, 35, 15, 550, 550, 0, 0, 500, 300);
Fetch the image by its id. Using drawImage() method, we grab a portion of the image and fit display it on the main canvas.
JavaScript file: Fetching video frame
myScript.js
1
2
3
4
5
6
7
8
9
10
11
12
| var myVideo = document.getElementById("video");
myVideo.play();
setInterval(function(){
var myCanvas = document.getElementById("myCanvas");
var context = myCanvas.getContext("2d");
var myVideo = document.getElementById("video");
context.drawImage(myVideo, 30, 0, 950, 720, 0, 0, 500, 300);
}, 3000); |
var myVideo = document.getElementById("video");
myVideo.play();
setInterval(function(){
var myCanvas = document.getElementById("myCanvas");
var context = myCanvas.getContext("2d");
var myVideo = document.getElementById("video");
context.drawImage(myVideo, 30, 0, 950, 720, 0, 0, 500, 300);
}, 3000);
We grab the video using its id. using play() method, we start playing the video automatically. Once the video starts playing, we set the time interval to 3 seconds and for every 3 seconds we grab the current video playback frame and display it on the specified position and in specified width and height of the main canvas.
JavaScript file: Fetching image from another canvas
myScript.js
1
2
3
4
5
6
7
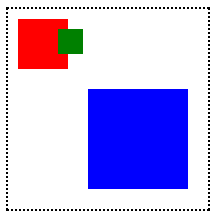
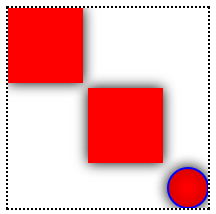
| canvas2.arc(25, 25, 25, 0, 2 * Math.PI);
canvas2.fillStyle = "red";
canvas2.strokeStyle = "blue";
canvas2.fill();
canvas2.stroke();
context.drawImage(second, 0, 0, 50, 50, 120, 20, 250, 250); |
canvas2.arc(25, 25, 25, 0, 2 * Math.PI);
canvas2.fillStyle = "red";
canvas2.strokeStyle = "blue";
canvas2.fill();
canvas2.stroke();
context.drawImage(second, 0, 0, 50, 50, 120, 20, 250, 250);
Here we draw a circle on smaller canvas. And then display it on main canvas by enlarging it.
Related: Draw Arcs/Circle with Canvas: HTML5
JavaScript file: Full Code
myScript.js
1
2
3
4
5
6
7
8
9
10
11
12
13
14
15
16
17
18
19
20
21
22
23
24
25
26
27
28
29
30
31
32
33
34
35
36
37
38
39
40
41
42
43
44
| window.onload = canvas;
function canvas()
{
var myCanvas = document.getElementById("myCanvas");
if( myCanvas && myCanvas.getContext("2d") )
{
var context = myCanvas.getContext("2d");
// var myImg = document.getElementById("img");
// context.drawImage(myImg, 35, 15, 550, 550, 0, 0, 500, 300);
var second = document.getElementById("two");
var canvas2 = second.getContext("2d");
canvas2.arc(25, 25, 25, 0, 2 * Math.PI);
canvas2.fillStyle = "red";
canvas2.strokeStyle = "blue";
canvas2.fill();
canvas2.stroke();
context.drawImage(second, 0, 0, 50, 50, 120, 20, 250, 250);
                var myVideo             = document.getElementById("video");
myVideo.play();

setInterval(function(){

var myCanvas   = document.getElementById("myCanvas");
var context    = myCanvas.getContext("2d");

var myVideo    = document.getElementById("video");
context.drawImage(myVideo, 30, 0, 950, 720, 0, 0, 500, 300);

}, 3000);
}
} |
window.onload = canvas;
function canvas()
{
var myCanvas = document.getElementById("myCanvas");
if( myCanvas && myCanvas.getContext("2d") )
{
var context = myCanvas.getContext("2d");
// var myImg = document.getElementById("img");
// context.drawImage(myImg, 35, 15, 550, 550, 0, 0, 500, 300);
var second = document.getElementById("two");
var canvas2 = second.getContext("2d");
canvas2.arc(25, 25, 25, 0, 2 * Math.PI);
canvas2.fillStyle   = "red";
canvas2.strokeStyle = "blue";
canvas2.fill();
canvas2.stroke();

context.drawImage(second, 0, 0, 50, 50, 120, 20, 250, 250);
var myVideo = document.getElementById("video");
myVideo.play();
setInterval(function(){
var myCanvas = document.getElementById("myCanvas");
var context = myCanvas.getContext("2d");
var myVideo = document.getElementById("video");
context.drawImage(myVideo, 30, 0, 950, 720, 0, 0, 500, 300);
}, 3000);
}
}
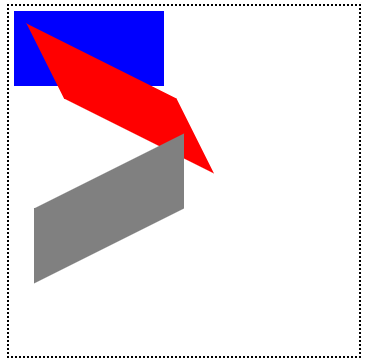
By changing the x-axis and y-axis values of source and destination, we can change position of the image and we can snatch a particular video frame or a particular part of an image or another canvas element. By using source / destination width and height we can shrink or stretch the image.
drawImage() in Canvas: HTML5
[youtube https://www.youtube.com/watch?v=f9ZjZc1XiFg]
drawImage() method will be helpful in building image manipulation and video oriented applications.
Example: You can grab a particular frame image from your video and set it as it’s cover pic! Like YouTube allows video uploader to select a cover image to each video – by default, it’s fetched randomly from the uploaded video file frames.