Video tutorial illustrates insertion of data into MySQL database using jQuery and PHP, using AJAX method i.e., $.post() method of jQuery.
There are 5 shortcuts for AJAX in jQuery, ultimately calling ajax method, and by default configured to have different parameters.
$.get
$.post
$.getJSON
$.getScript
$.load
Tutorial Theme: Insert Data Into Database Without Refreshing Webpage
In this tutorial we’ll illustrate $.post method of jQuery.
HTML code
index.html
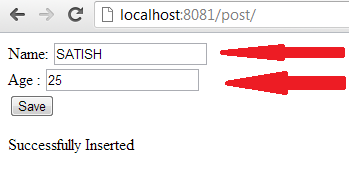
1 2 3 4 5 6 7 8 9 10 11 12 13 14 15 16 | <html> <head><title>Insert Data Into MySQL: jQuery + AJAX + PHP</title></head> <body> <form id="myForm" action="userInfo.php" method="post"> Name: <input type="text" name="name" /><br /> Age : <input type="text" name="age" /><br /> <button id="sub">Save</button> </form> <span id="result"></span> <script src="script/jquery-1.8.1.min.js" type="text/javascript"></script> <script src="script/my_script.js" type="text/javascript"></script> </body> </html> |
Here we have a form with an id called myForm, which has 2 input box.
A button with id sub. And a span tag with an id of result.
Once the user enters his/her name, age and hits Save button, the information will be sent to userInfo.php file present in the action field, via post method.
Using AJAX technique, we would make sure the form doesn’t redirect to userInfo.php file after the submission, and we’ll display appropriate message to the user on index.html file itself after the user entered values has been processed by userInfo.php file.
Database Connection code: PHP
db.php
1 2 3 4 | < ?php
$conn = mysql_connect('localhost', 'root', '');
$db = mysql_select_db('test');
?> |
We connect our application to mysql server using the user name root( and we leave password field empty, as we haven’t set any password to it on our machine ).
Also select the database called test.
Create Database called test.
A table user inside the database test.
user table has 2 fields called name and age.
Processing Page code: PHP
userInfo.php
1 2 3 4 5 6 7 8 9 10 11 | < ?php
include_once('db.php');
$name = $_POST['name'];
$age = $_POST['age'];
if(mysql_query("INSERT INTO user VALUES('$name', '$age')"))
echo "Successfully Inserted";
else
echo "Insertion Failed";
?> |
Once the user hits the Save button of our form in index.html, the information is being sent to userInfo.php
Where the user entered values are being copied to local variables $name and $age.
Next a simple MySQL query is formed to insert the data into the table user.
Using mysql_query() standard php function, the MySQL query is being processed.
Using if else conditional statements, we check if the process was successful or failed. Based on which we echo the result.
jQuery code: AJAXing
my_script.js
1 2 3 4 5 6 | $("#sub").click( function() {
$.post( $("#myForm").attr("action"),
$("#myForm :input").serializeArray(),
function(info){ $("#result").html(info);
});
}); |
Once the user clicks on the button with the id sub, $.post() method is invoked.
$.post() is a shortcut to $.ajax() method.
General Syntax:
$.post( ‘pass_data_to_this_url’, ‘data’, ‘callback_function’ );
We fetch the URL from myForm form, from its action attribute.
Serialize all the user entered input’s.
SerializeArray makes the input into property: value pair.
After the data is passed to the url and is being processed, the result will be returned back to the callback function and is caught in info variable, and is inserted inside the span tag using html() method – which is similar to innerHTML() method of JavaScript.
jQuery code: Disable Form Redirection
my_script.js
1 2 3 | $("#myForm").submit( function() {
return false;
}); |
Select the form and make sure to return false upon submission.
jQuery code: Clear Input Fields
my_script.js
1 2 3 4 5 | function clearInput() {
$("#myForm :input").each( function() {
$(this).val('');
});
} |
Write a custom function. Select the input fields and set each of its value to none or empty.
Call this function once the user clicks the submit button.
Full jQuery code
my_script.js
1 2 3 4 5 6 7 8 9 10 11 12 13 14 15 16 17 | $("#sub").click( function() {
$.post( $("#myForm").attr("action"),
$("#myForm :input").serializeArray(),
function(info){ $("#result").html(info);
});
clearInput();
});
$("#myForm").submit( function() {
  return false;
});
function clearInput() {
$("#myForm :input").each( function() {
$(this).val('');
});
} |
Note that, we have called clearInput() function inside the click event of #sub.
Video Tutorial: Insert Data Into MySQL: jQuery + AJAX + PHP
[youtube https://www.youtube.com/watch?v=gvGb5Z0yMFY]
Note:
You have to implement addslash and stripslash or any other methods into your PHP code, to secure your script from SQL Injection.
If the PHP returns json encoded data, then we need to use json in $.post() method as follows:
1 2 3 4 5 | $("#sub").click( function() {
$.post( $("#myForm").attr("action"),
$("#myForm :input").serializeArray(),
function(info){ $("#result").html(info); },
"json" ); |
But in our example, we are not returning json encoded data from userInfo.php file, so we do not specify encoding information in $.post() method.