Your First Payload: XUMM SDK

Once we establish connection to the XUMM platform using XUMM SDK, its time to actually learn about sending payload. Payload is nothing buy “transaction template”.

What is a Payload or “Transaction Template”?

Think of Payload or “Transaction Template” as invoice. The minimum things which an invoice should include are:
1. What kind of an invoice it is.
2. The destination address for payment.

We could even leave the amounts section empty assuming that the client will fill it.

Simple Transaction Template

{
  "TransactionType": "Payment",
  "Destination": "rHdkzpxr3VfabJh9tUEDv7N4DJEsA4UioT"
}

This is the bare minimal Payload or Transaction template we can write. It has transaction type and destination address(XRP address). The keywords “TransactionType”: “Payment” and “Destination” should be formatted as per XRP ledger transaction specifications.

If we don’t mention amount in our payload, end user can edit and enter the amount himself or herself after opening the payload request using their XUMM App. If we mention the amount in payload or transaction template, then he or she will not be able to edit it while signing.

Signing simply means authorizing the payment request. Or authorizing the sign request.

Sample Transaction Template With More Information

{
  "TransactionType": "Payment",
  "Destination": "rHdkzpxr3VfabJh9tUEDv7N4DJEsA4UioT",
  "Amount": "1000000",
  "Memos": [
    {
      "Memo": {
        "MemoData": "F09F94A520546563686E6F7469702E636F6D"
      }
    }
  ]
}

Here we’ve explicitly mentioned the “Amount” which is 1 Million, which means 1 XRP. i.e., one XRP is one million Drops. And a Memo (HEX encoded string). TransactionType and Destination are mandatory fields, all other fields are optional.

Generating Memo(HEX encoded string)

const hex = Buffer.from('🔥 Technotip.com').toString('hex').toUpperCase()
console.log(hex)

Buffer is a nodejs packages built-in property, so you need not install any other packages once again.

Video Tutorial: Your First Payload: XUMM SDK


[youtube https://www.youtube.com/watch?v=RYAHzvUqM64]

YouTube Link: https://www.youtube.com/watch?v=RYAHzvUqM64 [Watch the Video In Full Screen.]

Things To Keep In Mind While Sending Payload

1. A payload (sign request) sent to the XUMM platform should be formatted as per XRP ledger transaction specifications, but some fields may be omitted as XUMM will automatically fill them in if able to do so.

2. Usually, a payload sent to the XUMM platform will be signed by the end user (e.g., for a sign in, subscription, payment, escrow creation etc). For this tutorial, you will be the initiator and the end user, either signing or rejecting your own payload.

3. The first sign request from a specific XUMM app will always have to be scanned using a QR code on the desktop. Once an end user trusts your application, by signing your sign request, your application can obtain a user specific user token to deliver future sign requests using push notification.

Source Code: Complete Code To Send Payload

const {XummSdk} = require('xumm-sdk')
const Sdk = new XummSdk('xumm-app-id', 'xumm-app-secret')

const main = async () => {
  const request = {
    "TransactionType": "Payment",
    "Destination": "rHdkzpxr3VfabJh9tUEDv7N4DJEsA4UioT",
    "Amount": "1000000",
    "Memos": [
      {
        "Memo": {
          "MemoData": "F09F94A520546563686E6F7469702E636F6D"
        }
      }
    ]
  }

  const payload = await Sdk.payload.create(request, true)
  console.log(payload)
}
main()

Here we are making use of Sdk.payload.create() method to generate sign request URL and QR code and other outputs. We pass 2 arguments to Sdk.payload.create(). First argument is the payload or the transaction template(in above code the constant by name request), and the second argument will be a flag (boolean, true) telling the code to return an error, if one occurs.

Running The Application

We issue the command node index.js to run our application and we get the following output:
payload

{
  uuid: '127287c3-bf55-40ee-b0ab-345f9edc8840',
  next: {
    always: 
'https://xumm.app/sign/127287c3-bf55-40ee-b0ab-345f9edc8840'
  },
  refs: {
    qr_png: 
'https://xumm.app/sign/127287c3-bf55-40ee-b0ab-345f9edc8840_q.png',    
    qr_matrix: 
'https://xumm.app/sign/127287c3-bf55-40ee-b0ab-345f9edc8840_q.json',
    qr_uri_quality_opts: [ 'm', 'q', 'h' ],
    websocket_status: 
'wss://xumm.app/sign/127287c3-bf55-40ee-b0ab-345f9edc8840'   
  },
  pushed: false
}

Your output will be different, and most part of this output will be unique. The output at payload.next.always is the sign request URL. payload.refs.qr_png is the QR code which has sign request information encoded. payload.pushed is false as this is the first time we are sending payload to the end user and we do not yet have the user token. We get the user token if the user successfully signs the sign request. We store this user token, which is specific to XUMM platform and from next time we can send sign request as push notification to the end users mobile device.

Action Steps

Now you can open YOUR payload output and navigate to payload.next.always or payload.refs.qr_png, open the XUMM app present on your mobile phone, scan the QR code and sign or reject the sign request and check for the status changes at payload.next.always URL.

Benefits of using XUMM Platform for our Application

1. DEX or any site can make use of XUMM “sign” transaction type for authorization – for example, for signing up for a DEX account or for creating an account on an app etc.

2. We can use XUMM platform to create and accept payments and/or subscription services.

3. Once the user signs/authorizes our first sign request, we can start sending payments/sign requests as push notification directly to their XUMM app in their mobile devices. That’s so convenient and seamless payments experience.

For full “XUMM SDK/API” free video tutorial list visit: Working With XUMM SDK/API: XRPL
Send Ping Request To XUMM Platform and Get Application Details

Lets write a nodejs program to fetch application details from XUMM platform. We’ll also see how to retrieve all the IOU details using single line of code.

Video Tutorial: Send Ping Request To XUMM Platform and Get Application Details


[youtube https://www.youtube.com/watch?v=3jvkJUJMUpQ]

YouTube Link: https://www.youtube.com/watch?v=3jvkJUJMUpQ [Watch the Video In Full Screen.]

Source Code: Send Ping Request To XUMM Platform and Get Application Details

const {XummSdk} = require('xumm-sdk')  
const Sdk = new XummSdk('Your-API-Id', 'Your-API-Secret')  
  
const main = async () => {  
  const appInfo = await Sdk.ping() 
}  
  
main() 

Output

$ node index.js
{
  quota: {},
  application: {
    uuidv4: '401015ee-7edc-4469-bdfd-3af11f229885',       
    name: 'My Super Duper App!',
    webhookurl: 'https://technotip.com',
    disabled: 0
  },
  call: { uuidv4: 'a47219a5-8802-44d2-84bf-0c692ff05e48' }
}

Most part of above code in taken from our previous video tutorial, so please visit Prepare Your Project & Start Coding: XUMM SDK before going further.

Explanation of Above Source Code

We are writing a asynchronous function and the child process waits for the result from Sdk.ping() method. Once the result is retrieved, the result is printed on to the console window.

Since we are writing asynchronous method, we need to use await keyword to wait for the result or the promise to be resolved.

If we do not write the await keyword, you’ll get the following result:

const {XummSdk} = require('xumm-sdk')  
const Sdk = new XummSdk('Your-API-Id', 'Your-API-Secret')  
  
const main = async () => {  
  const appInfo = Sdk.ping() 
}  
  
main() 

Output

$ node index.js 
Promise {  }

That’s because the child process didn’t wait for the result to be returned or the promise to be resolved.

Display XUMM Application Name

const {XummSdk} = require('xumm-sdk')  
const Sdk = new XummSdk('Your-API-Id', 'Your-API-Secret')  
  
const main = async () => {  
  const appInfo = await Sdk.ping() 
  console.log(appInfo.application.name)
}  
  
main() 

Output

$ node index.js 
My Super Duper App!

Here we fetch the name of the XUMM application by traversing the json output, using DOT(.) notation. name key is present inside key application.

Display XUMM Curated Assets: IOU Details

const {XummSdk} = require('xumm-sdk')  
const Sdk = new XummSdk('Your-API-Id', 'Your-API-Secret')  
  
const main = async () => {  
      const IOU = await Sdk.getCuratedAssets()
      console.log(IOU)
}  
  
main() 

Output

$ node index.js 
{
  issuers: [ 'Bitstamp', 'GateHub', 'Towo Labs', 'Sologenic', 'Wietse' ],
  currencies: [
    'USD',
    'BTC',
    'EUR',
    'ETH',
    'BCH',
    'ETC',
    'XAU',
    'DSH',
    'REP',
    'XTK',
    '534F4C4F00000000000000000000000000000000',
    'WIE'
  ],
  details: {
    Bitstamp: {
      id: 185,
      name: 'Bitstamp',
      domain: 'bitstamp.net',
      avatar: 
'https://xumm.app/assets/icons/currencies/ex-bitstamp.png',
      shortlist: 1,
        currencies: {
            USD: {
            id: 178,
            issuer_id: 185,
            issuer: 'rvYAfWj5gh67oV6fW32ZzP3Aw4Eubs59B',
            currency: 'USD',
            name: 'US Dollar',
            avatar: 
'https://xumm.app/assets/icons/currencies/fiat-dollar.png',
            shortlist: 1
            },
            BTC: {
            id: 492,
            issuer_id: 185,
            issuer: 'rvYAfWj5gh67oV6fW32ZzP3Aw4Eubs59B',
            currency: 'BTC',
            name: 'Bitcoin',
            avatar: 
'https://xumm.app/assets/icons/currencies/crypto-btc.png',
            shortlist: 1
            }
        }
    },
    GateHub: {
      id: 182,
      name: 'GateHub',
      domain: 'gatehub.net',
      avatar: 
'https://xumm.app/assets/icons/currencies/ex-gatehub.png',
      shortlist: 1,
        currencies: {
            EUR: {
                id: 169,
                issuer_id: 182,
                issuer: 'rhub8VRN55s94qWKDv6jmDy1pUykJzF3wq',
                currency: 'EUR',
                name: 'Euro',
                avatar: 
'https://xumm.app/assets/icons/currencies/fiat-euro.png',  
                shortlist: 1
            },
            USD: {
                id: 170,
                issuer_id: 182,
                issuer: 'rhub8VRN55s94qWKDv6jmDy1pUykJzF3wq',
                currency: 'USD',
                name: 'US Dollar',
                avatar: 
'https://xumm.app/assets/icons/currencies/fiat-dollar.png',
                shortlist: 1
            },
            BTC: {
                id: 172,
                issuer_id: 182,
                issuer: 'rchGBxcD1A1C2tdxF6papQYZ8kjRKMYcL',
                currency: 'BTC',
                name: 'Bitcoin',
                avatar: 
'https://xumm.app/assets/icons/currencies/crypto-btc.png',
                shortlist: 1
            },
            ETH: {
                id: 174,
                issuer_id: 182,
                issuer: 'rcA8X3TVMST1n3CJeAdGk1RdRCHii7N2h',
                currency: 'ETH',
                name: 'Ethereum',
                avatar: 
'https://xumm.app/assets/icons/currencies/crypto-eth.png',
                shortlist: 1
            },
            BCH: {
                id: 173,
                issuer_id: 182,
                issuer: 'rcyS4CeCZVYvTiKcxj6Sx32ibKwcDHLds',
                currency: 'BCH',
                name: 'Bitcoin Cash',
                avatar: 
'https://xumm.app/assets/icons/currencies/crypto-bch.png',
                shortlist: 1
            },
            ETC: {
                id: 175,
                issuer_id: 182,
                issuer: 'rDAN8tzydyNfnNf2bfUQY6iR96UbpvNsze',
                currency: 'ETC',
                name: 'Ethereum Classic',
                avatar: 
'https://xumm.app/assets/icons/currencies/crypto-etc.png',
                shortlist: 1
            },
            XAU: {
                id: 171,
                issuer_id: 182,
                issuer: 'rcoef87SYMJ58NAFx7fNM5frVknmvHsvJ',
                currency: 'XAU',
                name: 'Gold Gram',
                avatar: 
'https://xumm.app/assets/icons/currencies/crypto-gold.png',
                shortlist: 1
            },
            DSH: {
                id: 177,
                issuer_id: 182,
                issuer: 'rcXY84C4g14iFp6taFXjjQGVeHqSCh9RX',
                currency: 'DSH',
                name: 'Dash',
                avatar: 
'https://xumm.app/assets/icons/currencies/crypto-dash.png',
                shortlist: 1
            },
            REP: {
                id: 176,
                issuer_id: 182,
                issuer: 'rckzVpTnKpP4TJ1puQe827bV3X4oYtdTP',
                currency: 'REP',
                name: 'REP',
                avatar: 
'https://xumm.app/assets/icons/currencies/crypto-rep.png',
                shortlist: 1
            }
        }
    },
    'Towo Labs': {
      id: 2601,
      name: 'Towo Labs',
      domain: 'xrptoolkit.com',
      avatar: 
'https://xumm.app/assets/icons/currencies/xtk-symbol.png?2',
      shortlist: 1,
        currencies:{
            XTK: {
                id: 9622,
                issuer_id: 2601,
                issuer: 'rXTKdHWuppSjkbiKoEv53bfxHAn1MxmTb',
                currency: 'XTK',
                name: 'XTK',
                avatar: 
'https://xumm.app/assets/icons/currencies/xtk-symbol.png?2',
                shortlist: 1
            }
        }
    },
    Sologenic: {
      id: 4380,
      name: 'Sologenic',
      domain: 'sologenic.com',
      avatar: 
'https://xumm.app/assets/icons/currencies/icon-sologenic.png',
      shortlist: 0,
        currencies:{
            '534F4C4F00000000000000000000000000000000': {
                id: 861,
                issuer_id: 4380,
                issuer: 'rsoLo2S1kiGeCcn6hCUXVrCpGMWLrRrLZz',
                currency: '534F4C4F00000000000000000000000000000000',
                name: 'SOLO',
                avatar: 
'https://xumm.app/assets/icons/currencies/icon-sologenic.png',
                shortlist: 0
            }
        }
    },
    Wietse: {
      id: 17553,
      name: 'Wietse',
      domain: 'wietse.com',
      avatar: 
'https://xumm.app/assets/icons/currencies/wietse.jpg',
      shortlist: 0,
        currencies:{
            WIE: {
                id: 17552,
                issuer_id: 17553,
                issuer: 'rwietsevLFg8XSmG3bEZzFein1g8RBqWDZ',
                currency: 'WIE',
                name: 'Wietse',
                avatar: 
'https://xumm.app/assets/icons/currencies/transparent.png',
                shortlist: 0
            }
        }
    }
  }
}

IOU means “I owe you”. An “issuer” is the one who owe you, if you get funds as IOU transaction on XRP Ledger.

The acronym IOU stands for “I owe you” and refers to an informal document that acknowledges a debt one party owes to another.

When you run above code you can, programmatically, get to see all the supported IOU’s on XUMM platform. You can even get the issuer details, currency symbol and the name of the currency – just by running a single line of code.

IOU Details From Above Output

Bitstamp supports following currencies:
1. USD(US Dollar)
2. BTC(Bitcoin).

GateHub supports following currencies:
1. EUR(Euro)
2. USD(US Dollar)
3. BTC(Bitcoin)
4. ETH(Ethereum)
5. BCH(Bitcoin Cash)
6. ETC(Ethereum Classic)
7. XAU(Gold Gram)
8. DSH(Dash)
9. REP(REP)

Towo Labs supports following currency:
1. XTK(XTK)

Sologenic supports following currency:
1. SOLO(SOLO)

Wietse supports following currency:
1. WIE(Wietse)

Here ‘Bitstamp’, ‘GateHub’, ‘Towo Labs’, ‘Sologenic’, ‘Wietse’ are the issuers of the respective currencies. So you can transact above currencies on XRP Ledger via XUMM application.

As you can see from above examples, we’re successfully able to connect and communicate with XUMM platform. So in our next video tutorial lets send a simple PAYLOAD. More on that in next video tutorial, stay subscribed to our blog and YouTube channel.

For full “XUMM SDK/API” free video tutorial list visit: Working With XUMM SDK/API: XRPL
Prepare Your Project & Start Coding: XUMM SDK

Lets install the software and packages needed to run a nodejs application and try to connect with the XUMM platform.

Software Required

1. Visual Studio Code Editor
2. Nodejs

Package To Be Installed

xumm-sdk (install via node package manager).

Video Tutorial: Prepare Your Project & Start Coding: XUMM SDK


[youtube https://www.youtube.com/watch?v=pgSckFopZ6Q]

YouTube Link: https://www.youtube.com/watch?v=pgSckFopZ6Q [Watch the Video In Full Screen.]

Lets test our installation

After installing Visual Studio Code Editor and Nodejs, lets create a new project. Create a file called index.js inside the project folder.
index.js

console.log("WELCOME TO XUMM SDK/API VIDEO TUTORIALS!")

Running Node Application
Command

 >node index.js

Output
WELCOME TO XUMM SDK/API VIDEO TUTORIALS!

If you get above output then your installation is working correctly. Lets move forward.

Installing xumm-sdk Package

Lets install xumm-sdk node package and try to connect with XUMM platform.

npm install xumm-sdk

It might take couple of seconds to couple of minutes depending on your internet connection speed. So you may have to wait patiently.

Error Message: Your npm doesn’t work with the version of Node

If you start getting error messages like: “npm WARN npm npm does not support Node.js” Just download lower version of Nodejs and try to run the program once again. In most of the cases the issue will be resolved.

Source Code: Importing xumm-sdk package into our project

const {XummSdk} = require('xumm-sdk')
const Sdk = new XummSdk('Your-API-Id', 'Your-API-Secret')

const main = async () => {
  console.log('XUMM SDK VIDEO TUTORIALS!')
}

main()

Run The Application
Command

 >node index.js

Output
XUMM SDK VIDEO TUTORIALS!

In the first line, we are importing xumm-sdk package. Next we create an instance of XummSdk, by passing XUMM application credentials.

Next we write a asynchronous function, which creates a child progress or a thread and waits for the response. Meanwhile the main thread or the main process continues to execute the code after it.

In above code, we simply output a message to the console window.

Note: By connecting to XUMM platform we can indirectly interact with XRP Ledger(XRPL).

For full “XUMM SDK/API” free video tutorial list visit: Working With XUMM SDK/API: XRPL
Get your XUMM API Credentials

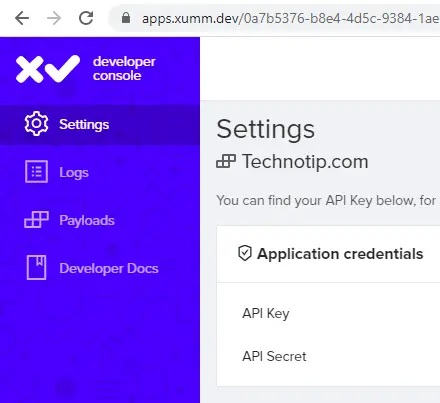
To start working with XUMM SDK and API, the first thing you’ll need is application credentials. Application credentials are: App ID and App Secret, which you’ll get once you signup and register your application at apps.xumm.dev

Application Creation: XUMM Platform

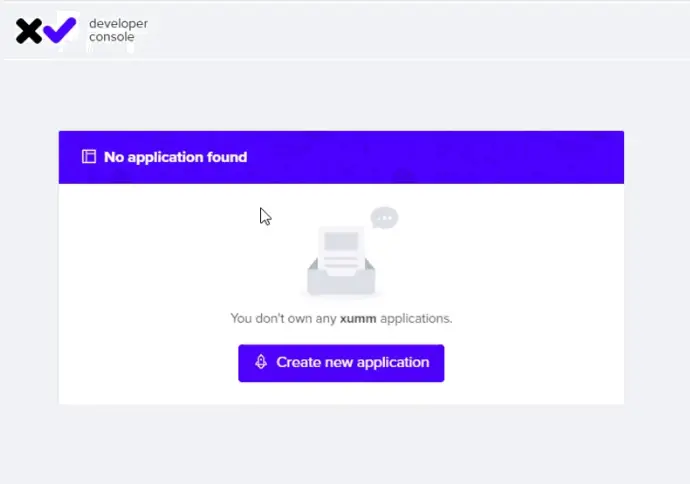
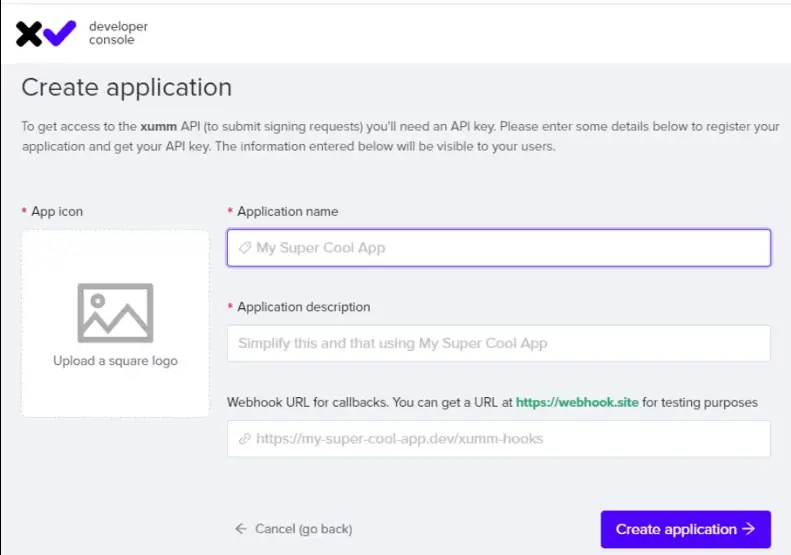
xumm register application

All the application details can be modified later after creating the application, so need not stress too much to get it perfect the first time. You can even re-upload the application icon later on.

xumm create application

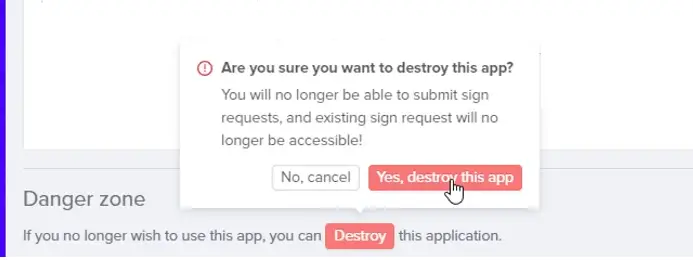
You can register multiple applications inside single xumm developer account. And you can also delete the registered application, by visiting the applications details page.

xumm delete application

Video Tutorial: Get your XUMM API Credentials


[youtube https://www.youtube.com/watch?v=tdoLbHiMTGo]

YouTube Link: https://www.youtube.com/watch?v=tdoLbHiMTGo [Watch the Video In Full Screen.]

Important Note

1. You can get App ID any time you log into your XUMM developer dashboard, but App Secret will be shown to you only once. i.e., when you create your application you’ll be shown the App Secret, after that it’ll be permanently hidden. You need to copy and paste it in safe place.

2. Please do not place your application credentials in client side code. These credentials are meant to be in server side code. If you place it in client side code, someone can get hold of it and use it for wrong things.

3. If you think your application credentials are compromised, then you can log into your xumm developer dashboard and generate a new one. Once you generate new App Secret, do not forget to replace the old one in your application.

4. Make sure to keep checking the LOGS and PAYLOADS section inside your XUMM developer dashboard.

xumm logs payloads dashboard

That’s where you’ll get valuable information about your program execution. Whenever you encounter a bug in your code, check the terminal output and then immediately check the LOGS and PAYLOADS section inside your XUMM developer account. It’ll have valuable information which can help you fix the issue sooner.

Note: Using your Application credentials you can connect to XUMM platform and then interact with XRP Ledger(XRPL) via XUMM SDK/API.

For full “XUMM SDK/API” free video tutorial list visit: Working With XUMM SDK/API: XRPL
Working With XUMM SDK/API: XRPL

XRP Ledger(XRPL) was developed by Ripple founders and is now open sourced.

Ripple is a real-time gross settlement system, currency exchange and remittance network created by Ripple Labs Inc., a US-based technology company. XRP is the underlying crypto-asset.

Not everyone will be comfortable digging deep into how XRPL works and how to change/modify the code once the XRPL gets updated(through proposals, voting & amendments). And not everyone of us can host a XRPL node. But still if you are willing to create applications for payments, subscription, signing in, escrow account creation etc, then you can simply make use of XUMM platform.

xumm logo

Developers can use XUMM platform to interact with XRPL and also make use of XUMM specific features like sending payments/subscription related messages as push notification. The best thing about XUMM app is there is very less changes of miss transactions, as there are only 2 types of transactions your users will be involved – either they initiate a transaction or they scan a QR code and make a payment. In both the cases it involves very less to no possibilities of making a miss transaction using this app.

Also note that XUMM is developed by “XRPL LABS” team and the project is supported by Ripple / RippleX.

In this video tutorial series we shall learn how to work with XUMM SDK and XUMM API to interact with XRP Ledger, and also see how to make use of XUMM platform specific features to enhance the end user experience.

While following these video tutorials, occasionally you may have to create new XRPL accounts and make transactions and check the results: you can use OsmWallet for that. OsmWallet is a non-custodial wallet and it is a browser extension like MetaMask, but for XRP Ledger.

Sample App Built using XUMM API

Automate Digital Sales using XUMM Payment

XUMM SDK/API Video Tutorial Playlist


[youtube https://www.youtube.com/watch?v=tdoLbHiMTGo&list=PLM4pPs1mzl_NjoQPoMlJEx2XAEpDQ-Vhq]

YouTube Link: XUMM SDK/API playlist [Watch the Video In Full Screen.]

XUMM SDK/API, Free Video Tutorials List

Please follow the tutorials in the same order as listed below