Before we move forward with coding, it’s important to know some of the files and folders present inside our ionic 2 project. Since you’re a beginner you might find this video to be confusing and fast paced. But let me assure you, this won’t affect your learning of Ionic 2. How much ever time you spend in understanding the anatomy of an ionic 2 cordova project, you won’t understand it properly until we start coding and utilizing these files and folders for our application needs.
I would advice you to take down whatever you understand in this video in a note-book and keep it for your future reference. It would be handy soon.
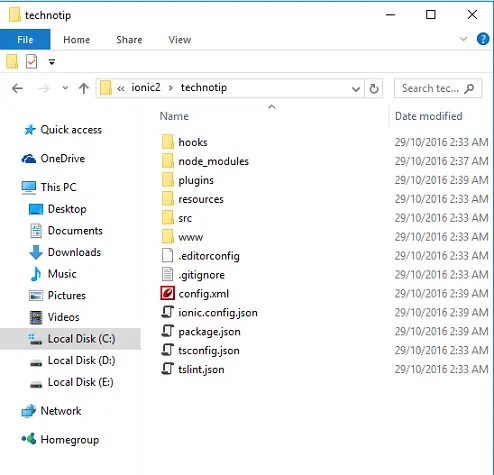
hooks: this is not for beginners, so will skip that for now.
node_modules: This is where core libraries like angular2, ionic2, array manipulation, regEx etc are present. We import these libraries in our ionic 2 project and utilize their services.
plugins: Here Ionic 2 project specific cordova plugins are stored. There are many plugins which ionic-native provides which we can make use of for our application needs. For example: If you need to use your devices camera functionality, there is a cordova plugin for that which you can use in your ionic 2 project.
resources: Here we store icon and splashscreen files of our app.
src: is where we can find raw, uncompiled code. Inside src we have our page components(src/pages), application root components(src/app), static files(src/assets) etc, which gets transpiled, compiled, minified and stored inside www folder during the build process. If you edit any file inside www folder, it’ll simply be overwritten during the build process.
Anatomy of an Ionic 2 Project
[youtube https://www.youtube.com/watch?v=JpB3FafevH4]
src/assets: We store static resource files in this folder. Example: Image files which we use for our project.
src/pages: For every page you create you’ll add another folder in this directory. For example, if you want to create a login page, you’ll need to create a folder called login(or any other unique name) and then store the login template, login class definition file and login style definition file inside that folder. Ionic CLI can be used to automate this process and I’ll show you how to do it in upcoming video tutorials.
src/theme: This folder has style definition which is applicable for the entire application. We can simply change the value of some variables and customize the look and feel of our application. This will also be explained in a separate video tutorial in coming days.
src/app: This folder is where the ‘root components’ of our application are located. main.dev.ts and main.prod.ts files are responsible for the bootstrapping process of the application. main.dev.ts is active in development mode and main.prod.ts should be used in production environment.
src/app/app.module.ts is the entry point for the app.
import { NgModule } from '@angular/core';
import { IonicApp, IonicModule } from 'ionic-angular';
import { MyApp } from './app.component';
import { AboutPage } from '../pages/about/about';
import { ContactPage } from '../pages/contact/contact';
import { HomePage } from '../pages/home/home';
import { TabsPage } from '../pages/tabs/tabs';

@NgModule({
  declarations: [
    MyApp,
    AboutPage,
    ContactPage,
    HomePage,
    TabsPage
  ],
  imports: [
    IonicModule.forRoot(MyApp)
  ],
  bootstrap: [IonicApp],
  entryComponents: [
    MyApp,
    AboutPage,
    ContactPage,
    HomePage,
    TabsPage
  ],
  providers: []
})
export class AppModule {}
This essentially controls the work flow of rest of the application.
Using NgModule of angular core library we manage the modules in our ionic 2 applications. All the components and data services we create must be imported in this file and its class name must be specified inside the declarations and entryComponents section. If we have any data service providers we must specify it inside providers block. This file also points to the first component of our Ionic 2 application i.e., MyApp class of src/app/app.component.ts
src/app/app.component.ts is the first component of Ionic 2 application
import { Component } from '@angular/core';
import { Platform } from 'ionic-angular';
import { StatusBar, Splashscreen } from 'ionic-native';

import { TabsPage } from '../pages/tabs/tabs';


@Component({
  template: `<ion-nav [root]="rootPage"></ion-nav>`
})
export class MyApp {
  rootPage = TabsPage;

  constructor(platform: Platform) {
    platform.ready().then(() => {
      // Okay, so the platform is ready and our plugins are available.
      // Here you can do any higher level native things you might need.
      StatusBar.styleDefault();
      Splashscreen.hide();
    });
  }
}
This is the first component which gets loaded in our application. It’s simply an empty shell for other components to load into.
One important thing to note here is the rootPage. Since this is a project which uses tabs template, it has automatically assigned the rootPage to the TabsPage present in our src/pages/tabs/tabs.ts page.
src/pages/tabs/tabs.ts component
import { Component } from '@angular/core';

import { HomePage } from '../home/home';
import { AboutPage } from '../about/about';
import { ContactPage } from '../contact/contact';

@Component({
  templateUrl: 'tabs.html'
})
export class TabsPage {
  // this tells the tabs component which Pages
  // should be each tab's root Page
  tab1Root: any = HomePage;
  tab2Root: any = AboutPage;
  tab3Root: any = ContactPage;

  constructor() {

  }
}
Here we are importing 3 pages HomePage, AboutPage and ContactPage and then assigning it to each tab.
src/pages/tabs/tabs.html template file
<ion-tabs>
  <ion-tab [root]="tab1Root" tabTitle="Home" tabIcon="home"></ion-tab>
  <ion-tab [root]="tab2Root" tabTitle="About" tabIcon="information-circle"></ion-tab>
  <ion-tab [root]="tab3Root" tabTitle="Contact" tabIcon="contacts"></ion-tab>
</ion-tabs>
Which is then assigned as root pages on each tab. This is to maintain the sanity of navigation history. We’ll discuss about navigation in Ionic 2 in a separate video shortly.
src/index.html
<!DOCTYPE html>
<html lang="en" dir="ltr">
<head>
  <meta charset="UTF-8"/>
  <title>Ionic App</title>
  <meta name="viewport" content="width=device-width, initial-scale=1.0,
        minimum-scale=1.0, maximum-scale=1.0, user-scalable=no"/>
  <meta name="format-detection" content="telephone=no"/>
  <meta name="msapplication-tap-highlight" content="no"/>

  <link rel="icon" type="image/x-icon" href="assets/icon/favicon.ico"/>
  <link rel="manifest" href="manifest.json"/>
  <meta name="theme-color" content="#4e8ef7"/>

  <!-- cordova.js required for cordova apps -->
  <script src="cordova.js"></script>

  <!-- un-comment this code to enable service worker
  <script>
    if ('serviceWorker' in navigator) {
      navigator.serviceWorker.register('service-worker.js')
        .then(() => console.log('service worker installed'))
        .catch(err => console.log('Error', err));
    }
  -->

  <link href="build/main.css" rel="stylesheet"/>

</head>
<body>

  <!-- Ionic's root component and where the app will load -->
  <ion -app></ion>

  <!-- The polyfills js is generated during the build process -->
  <script src="build/polyfills.js"></script>

  <!-- The bundle js is generated during the build process -->
  <script src="build/main.js"></script>

</body>
</html>
This file has some minimal configurations and links to some JavaScript library files. Ionic 2 application looks for ion-app tag present inside the body of index.html to kick-start the visuals of the project.
config.xml (located at the root of the project)
<?xml version="1.0" encoding="UTF-8" standalone="yes"?>
<widget id="com.technotip.radio" version="0.0.1"
        xmlns="http://www.w3.org/ns/widgets"
        xmlns:cdv="http://cordova.apache.org/ns/1.0">
  <name>Radio</name>
  <description>Internet radio streaming live ..</description>
  <author email="[email protected]" href="https://technotip.com/">SATISH</author>
 .
 .
 .
 .
</widget>
Using this file we can configure the display mode and other such things of the device for our application. We can also set the app name, description. author email id, name and the URL. We can set the id of the application which’ll be shown in the URL of the playstore once your app has been uploaded to the playstore. We have a radio application in the playstore which has an id com.technotip.radio You can visit our Radio Application and check the URL.
package.json (located at the root of our application)
This file has the list of our dependencies and plugins our application is using. It gets updated automatically when we install new plugins.
Important: Keep in mind that, whenever you are using any page component or data services in any of your project files, make sure to import it first. Also make sure to register its existence by importing it in src/app/app.module.ts file and listing it in specific sections which it belongs to.