Today lets learn to make progress bar to indicate game loading time to the user. This keeps the user informed about the percentage of assets being loaded and the wait time – this method has proved to dramatically increase the user retention rate on the page, even though it simply is an indicator of the game being loaded. Simply showing a continuously rotating circular image would turn off most users after some time. Progress bars on the other hand have always been well received – I’m telling this after digging into my analytics data.

Video Tutorial List At One Place:
Phaser Video Tutorial List: Game Framework
In this video you’ll learn:
1. Adding progress bar and making it progress in coordination with the game assets being loaded.
2. Shifting/swapping the states.
3. Adding audio assets to your game.
4. Best methods to add compressed and uncompressed/raw audio file formats.
Progress Bar While Loading Game Assets: Phaser
[youtube https://www.youtube.com/watch?v=Q08CXexdn7c]
HTML File – index.html
< !DOCTYPE html>
<html>
<head>
<meta name="apple-mobile-web-app-capable" content="yes"/>
<meta name="viewport" content="minimal-ui"/>

<style>
    body{
        padding: 0px;
        margin: 0px;
    }
</style>

<script type="text/javascript" src="javascripts/library/phaser.js">
</script>
<script type="text/javascript" src="javascripts/states/Boot.js">
</script>
<script type="text/javascript" src="javascripts/states/Preloader.js">
</script>
<script type="text/javascript" src="javascripts/states/Game.js">
</script>
</head>
<body>

<script type="text/javascript" src="javascripts/Main.js">
</script>
</body>
</html> |
To know about the meta tags and style code of above html file source code please watch previous day video tutorial Configure Global Variables: Phaser
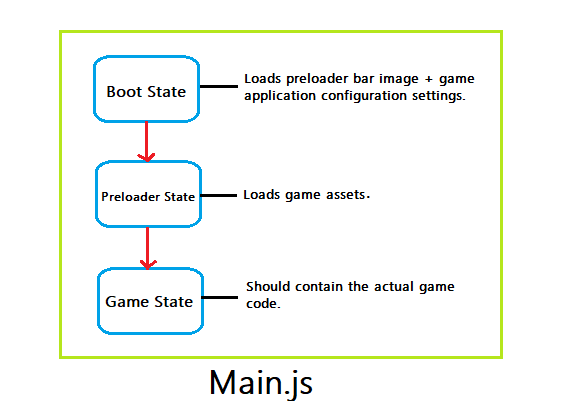
We’ve added Main.js file before closing body tag and have added various State Javascript files after adding Phaser library inside header of html page.
Javascript File – Main.js File Source code
var game = new Phaser.Game(400, 400, Phaser.AUTO);
    game.state.add('Boot', Technotip.Boot);
    game.state.add('Preloader', Technotip.Preloader);
    game.state.add('Game', Technotip.Game);
game.state.start('Boot'); |
Here we create a global game object which is an instance of Phaser.Game() and let Phaser decide the game renderer – ‘WebGL or Canvas’ by using Phaser.AUTO property. Next we add states Boot, Preloader, Game and then immediately start the Boot State.
Related Read:
1. State Manager: Phaser
2. Managing Multiple States: Phaser
Boot State Source Code – Boot.js
var Technotip = {};

Technotip.Boot = function(game){
};

Technotip.Boot.prototype = {
   preload: function() {
       this.load.image('preloadbar', '/images/progress-bar.png');
   },
  create: function(){
       this.game.stage.backgroundColor = '#fff';
  },
  update: function(){
      this.state.start('Preloader');
  }
}; |
In preload method we’ve added a preloader-bar image to the cache which we make use of in the Preloader State. In create method we set the background color of game stage to white. Next, in update method we simply switch to Preloader State. Boot state is usually used to set game configurations.
Preloader State Source Code – Preloader.js
Technotip.Preloader = function(game){
    this.ready = false;
};

Technotip.Preloader.prototype = {
    preload: function(){
        this.preloadBar = this.add.sprite(10, 30, 'preloadbar');
        this.load.setPreloadSprite(this.preloadBar);
        //this.load.audio('myMusic', ['path/1.mp3', 'path/1.ogg']);
        //this.load.audio('myMusic', 'path/1.wav');
        this.load.audio('m1', '/audio/1.mp3');
        this.load.audio('m2', '/audio/2.mp3');
        this.load.audio('m3', '/audio/3.mp3');
        this.load.audio('m4', '/audio/4.mp3');
        this.load.audio('m5', '/audio/5.mp3');
        this.load.audio('m6', '/audio/6.mp3');
        this.load.onLoadComplete.add(this.loadComplete, this);
    },
    loadComplete: function(){
       this.ready = true;
    },
    update: function(){
        if(this.ready === true)
        {
            this.state.start('Game');
        }
    }
}; |
Here we set a state level global variable this.ready to false and then inside preload method we add the previously loaded image(preloadbar image – in Boot State) and set it as preload sprite using this.load.setPreloadSprite(). Next load the game assets like audio, sprites/images, sprite sheets and any other assets and finally call onLoadComplete. Once onLoadComplete.add() method is triggered, we call this.loadComplete custom method and set this.ready to true – this means all the game assets we set to load in preload method has been completely loaded.
Inside update method we check to see if all the audio files has been decoded by the browser engine. To do that we can use this.cache.isSoundDecoded() method and pass the audio key we used while loading the audio file, in preload method – we can check multiple audio keys for decoding using && (and) logical operators. If the audio isn’t decoded it’ll not be played inside the game later on. So check if the sound files are decoded and check if all other assets are loaded by checking if this.ready variable is set to true. Once these conditions are true, we switch to Game State.
Note: If you’re using compressed audio formats like mp3 or ogg, then pass it as an array to this.load.audio() method. This way the browser picks up the one(audio format) which it supports. If the audio file format is uncompressed/raw file like wav file format, then you can directly include its path(as second parameter) while loading it.
Example:
this.load.audio('myMusic', ['/filePath/Microsoft.mp3', '/filePath/Microsoft.ogg']);
this.load.audio('myMusic', '/filePath/Apple.wav'); |
Game State Source Code – Game.js
Technotip.Game = function(game){
};

Technotip.Game.prototype = {
    create: function(){
      this.add.text(10, 10, 'Loading finished', {fill: '#000'});
    }
}; |
Here we simply display a message to the user that the loading has been finished.
Note: If we have large number of assets to be loaded we can split that up into multiple loading screens – multiple loading states. For example, we can load some assets which is needed for level 1 of the game. If we need something specific to level 2, we can load it separately once again when the user is at level 2 – just before the level 2 game begins. We can show a loading progress screen once again and load remaining game assets.
You could even use onLoadStart and onFileComplete along with onLoadComplete.
Below is it’s usage example:
    var text = game.add.text(32, 32, '', { fill: '#ffffff' });
    var x = 10;
    var y = 20;
    this.load.onLoadStart.add(loadStart, this);
    this.load.onFileComplete.add(fileComplete, this);
    this.load.onLoadComplete.add(loadComplete, this);

function loadStart() {
text.setText("Game Assets Loading ...");
}

function fileComplete(progress, cacheKey, success, totalLoaded, totalFiles) {

text.setText("Game loading: " + progress + "% - " + totalLoaded + " out of " + totalFiles);

var newImage = game.add.image(x, y, cacheKey);

newImage.scale.set(0.3);

x += newImage.width + 20;

if (x > 700)
{
x = 32;
y += 332;
}

}

function loadComplete() {
text.setText("Load Complete");
} |
Once the loading of assets starts phaser calls loadStart method(custom method), where you can simply display and keep the user informed that the loading has started. Once the first bit of file or asset is being loaded you can start displaying the progress inside fileComplete method. Later when the asset loading is completed you can display a message to the user inside loadComplete method. loadStart, fileComplete and loadComplete are all custom methods.
cacheKey contains cached game asset, like images and sound files.

Hi, I just post a question in youtube, but i cant find the solution, the game go right in single stage, but dont show any image or something, only the screen white. please help me.
@Jorge, Can you please post the log information from your Chrome dev console, so that we can understand the real problem in your code?
Sure, but dont show any error, ahm srry for the noob question but how i can post the all log information or dev console chrome
### this is my preload.js
“`javascript
Matematics.Preloader = function (game) {
this.ready = false;
}
Matematics.Preloader.prototype = {
preload: function () {
this.preloadBar = this.add.sprite(100, 300, ‘preloadBar’);
this.load.setPreloadSprite(this.preloadBar);
game.load.image(‘100’, ‘assets/img/500/100.png’);
game.load.image(‘101’, ‘assets/img/500/101.png’);
game.load.image(‘102’, ‘assets/img/500/102.png’);
// in total are more of 500 images
//.
//.
//.
game.load.image(‘500’, ‘assets/img/500/500.png’);
this.load.onLoadComplete.add(this.loadComplete, this);
},
loadComplete: function () {
this.ready = true;
},
update: function () {
if ( this.ready === true )
game.state.start(‘Menu’)
},
create: function () {
},
}
“`
### this is my boot.js
“`javascript
var Matematics = {};
Matematics.Boot = function (game){
var rightAnswer;
var wrongAnswer;
var indicator;
}
Matematics.Boot.prototype = {
preload: function () {
game.load.image(‘preloadBar’, ‘assets/img/timer.png’);
/*
var answer1 = new Media( Menu.getPathApp() + ‘assets/audio/bien_hecho.m4a’);
var answer2 = new Media( Menu.getPathApp() + ‘assets/audio/esplendido.m4a’);
var answer3 = new Media( Menu.getPathApp() + ‘assets/audio/estupendo.m4a’);
var answer4 = new Media( Menu.getPathApp() + ‘assets/audio/excelente.m4a’);
var answer5 = new Media( Menu.getPathApp() + ‘assets/audio/magnifico.m4a’);
var answer6 = new Media( Menu.getPathApp() + ‘assets/audio/muybien.ogg’);
const playlistOk = [answer1, answer2, answer3, answer4, answer5, answer6];
rightAnswer = playlistOk;
var wrong1 = new Media( Menu.getPathApp() + ‘assets/audio/intenta_nuevo.m4a’);
var wrong2 = new Media( Menu.getPathApp() + ‘assets/audio/no_te_rindas.ogg’);
var wrong3 = new Media( Menu.getPathApp() + ‘assets/audio/sigue_intentando.m4a’);
const playlistBad = [wrong1, wrong2, wrong3];
wrongAnswer = playlistBad;
*/
},
update: function () {
game.state.start(‘Preloader’);
},
create: function () {
this.game.stage.backgroundColor = ‘#efe4b0’;
}
}
“`
Run your game project in Google Chrome browser. Then open Google Inspector(Ctrl + Shift + I) and switch to Console tab and there you can find the log information. Am sure you can debug it yourself once you see the log information. In any case let us know what caused the trouble.